Azure Project
Setting up a secure application in Microsoft Azure
This project simulates creating a secure cloud application for a business.
We used virtual networks, network security groups (NSGs), configured firewall rules, configured IAM and private endpoints, set up private DNS zones, and implemented a CIS Benchmark guideline.

I recommend viewing the Instructions and Walkthrough/ Deliverables together, side-by-side.
Deliverables complete: 15/17
Final Grade: 9/10
The deliverables are screenshots of certain pages to make sure that we completed a task correctly.
Instructions
The instructions given to us are purposefully vague:
1
2
3
4
5
6
7
8
9
10
11
12
13
14
15
16
17
18
19
20
21
22
23
24
25
26
27
28
29
30
31
32
33
34
35
36
37
38
39
40
41
42
43
44
45
46
47
48
49
50
51
52
53
54
55
56
57
58
59
60
61
62
63
64
65
66
67
68
69
70
71
72
73
74
75
76
77
78
79
80
81
82
83
84
85
86
87
88
89
90
91
92
93
94
95
96
97
98
99
100
101
102
103
104
105
106
107
108
109
110
111
112
113
114
115
116
117
118
119
120
121
122
123
124
125
126
127
128
129
130
131
132
133
134
135
136
137
138
139
140
141
142
143
144
145
146
147
148
149
150
151
152
153
154
155
156
157
158
159
160
161
162
163
164
165
166
167
168
169
170
171
172
173
174
175
176
177
178
179
180
181
182
183
184
185
186
187
188
189
190
191
192
193
194
195
196
197
198
199
200
201
202
203
204
205
206
207
208
209
210
211
212
213
214
215
216
217
218
219
220
221
222
223
224
225
226
227
228
229
230
231
1. First we are going to create a virtual network under the resource group it342midterm
and named [ucid]vnet
a. Ensure the address space of the vnet is 10.1.0.0/16
b. Additionally you are to make 2 subnets under this vnet
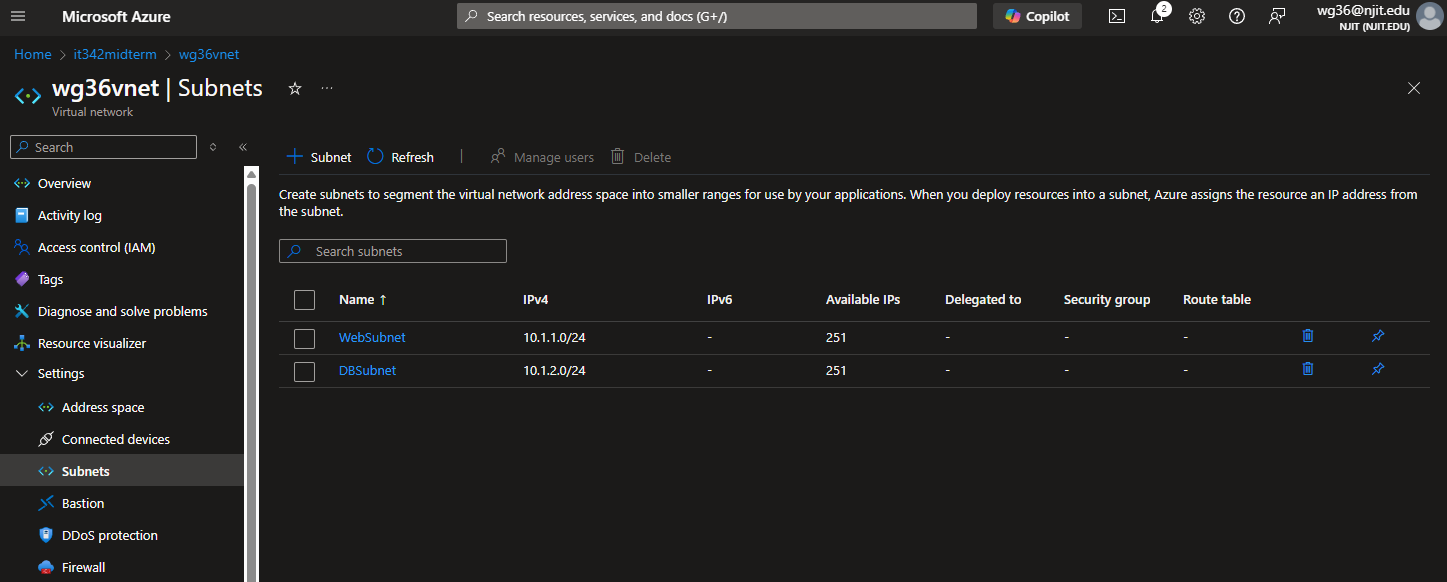
i. WebSubnet with an address space of 10.1.1.0/24
ii. DBSubnet with an address space of 10.1.2.0/24
Take a screenshot of both the Overview tab and the Subnets tab under the VNet (2
screenshots here)
2. Next we are going to create a network security group named [ucid]nsg
a. For inbound NSG rules we need to allow http and https.
b. We also need to allow RDP, but only from ourselves
c. We also need to under subnets, associate our NSG to the WebSubnet
d. Going back to the main overview menu for your NSG go to Monitoring, nsg flow logs,
and create a NSG flow log with a 90 days retention policy
i. You will have to quick make a storage account, with whatever naming scheme
you wish
Take a screenshot of the Overview tab showing your new rules entirely, the Subnets tab
under the Network Security Group, and lastly of the NSG Flow logs page (3 screenshots here)
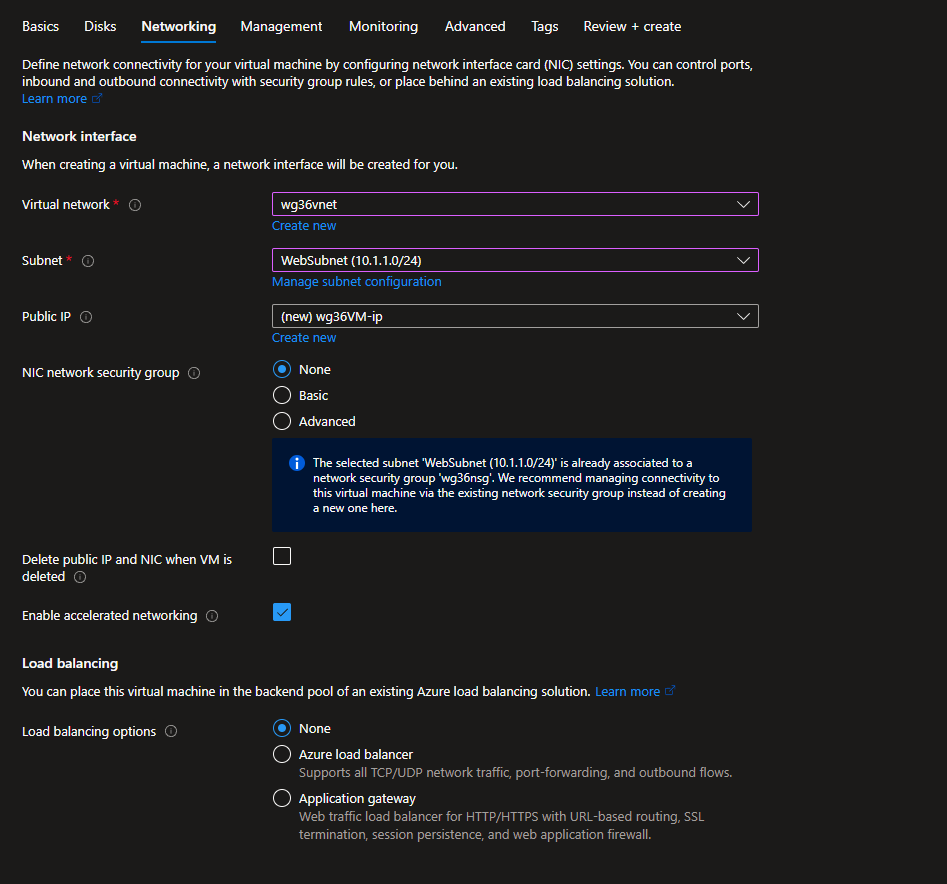
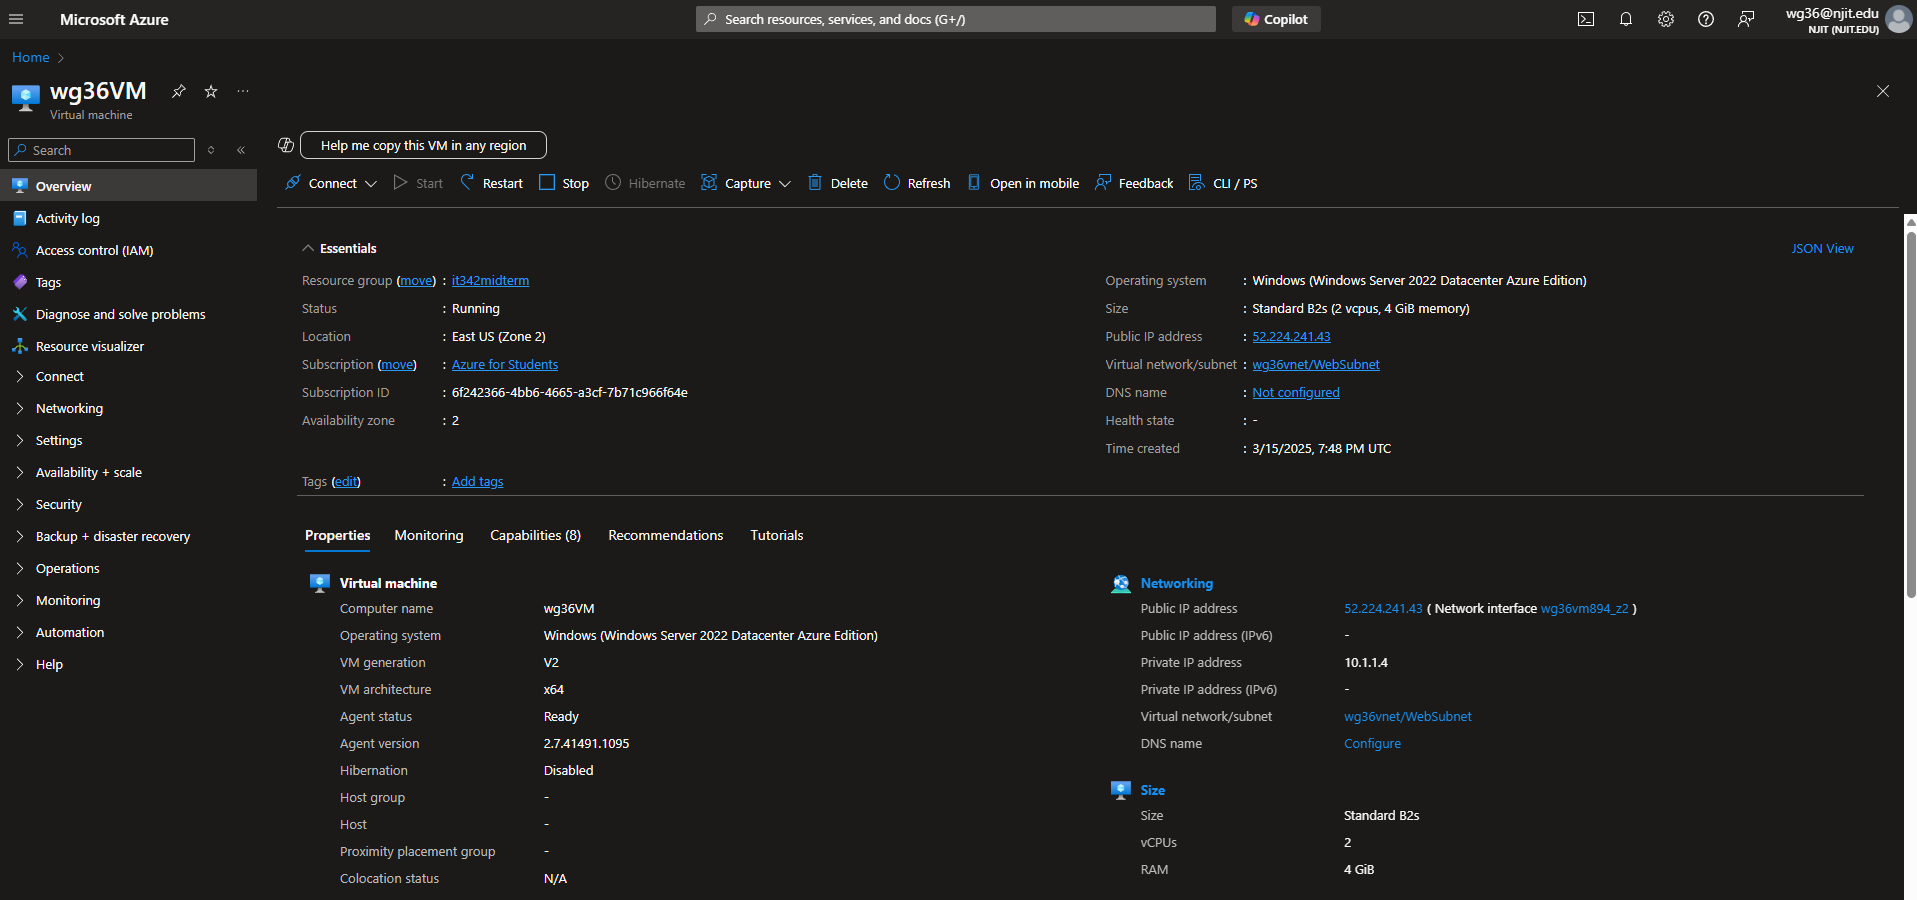
3. Next we are going to deploy a VM with the following specifications:
a. Name: [ucid]VM
b. Image: Windows Server 2022
c. Auth Type: password
i. User: UCID
ii. Password: Whatever you want to remember
d. Set the availability zone to 3
e. Nothing should be allowed for inbound access
f. The VM should be connected to the vnet and WebSubnet created earlier
Take a screenshot of the overview tab once the resource is created, make sure to
include the basics and the networking information
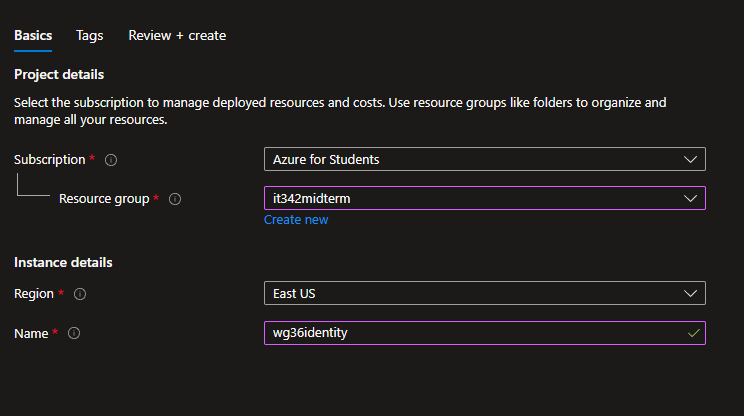
4. Create a managed identity for your resources by searching up Managed Identity
5. Navigate to the it342midterm resource group and under the IAM tab we are going to
create a custom role for accessing the VM
a. Search Virtual machines in the permissions and find the following rules
i. Microsoft.ClassicCompute (Download RDP, Get network interface
associated with NSG, get virtual machine associated with NSG)
ii. Microsoft.Compute (Start virtual machine)
b. Save this custom role as [ucid]role
Take a screenshot of the role once it is created
6. Go to the VM we created and under the IAM section for the VM we are going to add a
policy by doing the following:
a. Add the role we just created to the policy
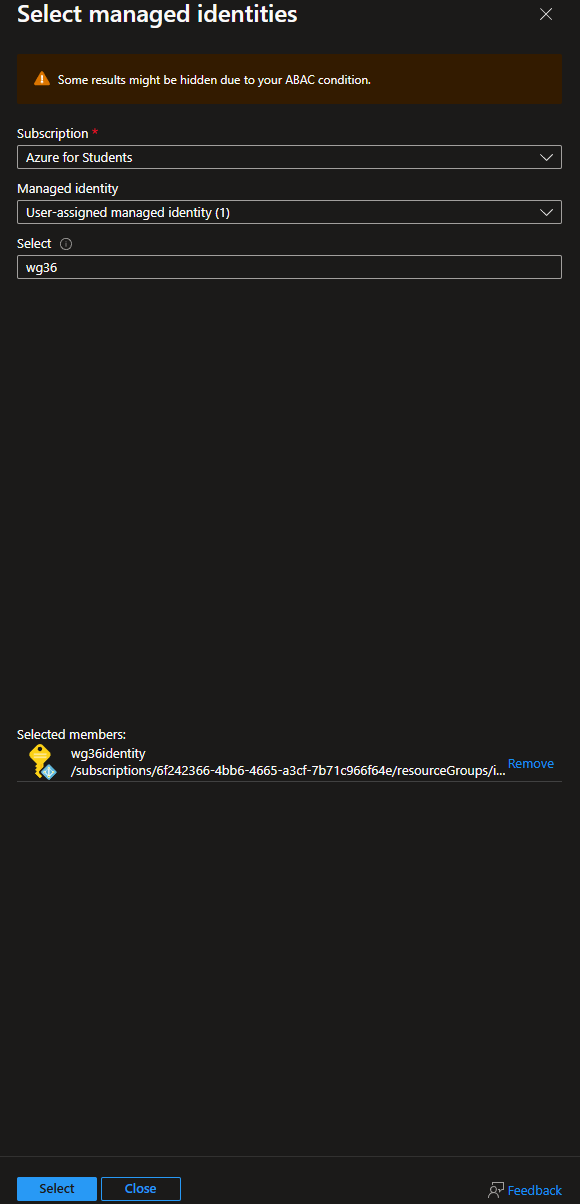
b. Under members we want to make it a managed identity, and add the
managed identity we created above
Scroll down in the IAM tab of the VM until you find the Managed identity assigned and
then take a screenshot of it
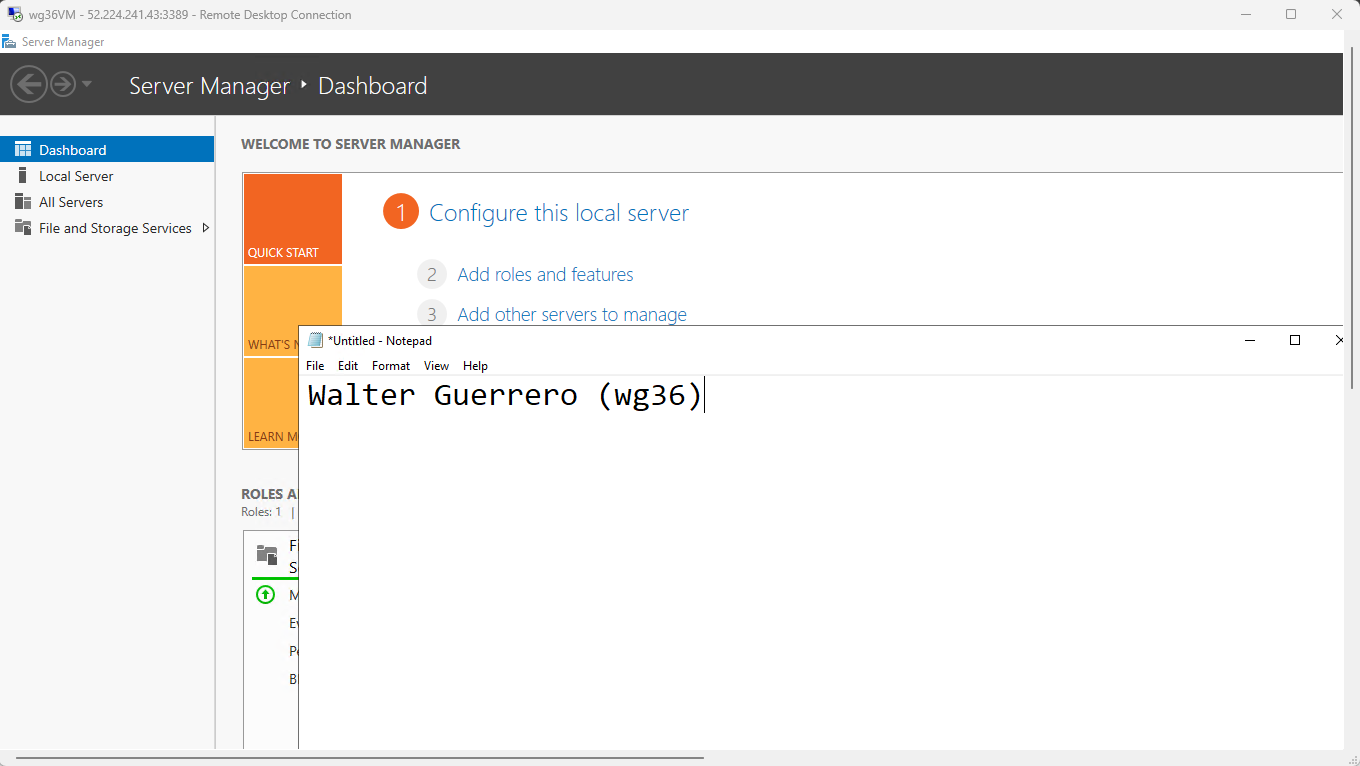
7. Verify RDP Connectivity by going into the VM and opening a notepad with your name
on it
Take a screenshot of this and ensure that your name is visible in the screenshot
8. Next we are going to create another Vm representative of the backend/DB with the
following specificatons:
a. Name: [ucid]dbvm
b. Image: Windows Server 2019
c. Availability Zone 3
d. NO PUBLIC IP
e. Ensure it is part of the vnet made earlier as well as a part of the DBSubnet
created earlier
9. With now the 2 VM’s created we are going to configure NSG rules between them in
order to allow secure communications between the machines
a. On the [ucid]VM you are going to make the following rules
i. Inbound connections allowed from the CIDR range of DBSubnet to the
CIDR range of WebSubnet along any ports
b. On the [ucid]dbvm you are going to make the following rules
i. Inbound connections allowed from the CIDR range of WebSubnet to
the CIDR range of DBSubnet along any ports
c. After creating these rules RDP into [ucid]VM and then RDP from inside the VM
into our [ucid]dbvm to verify the connectivity between them
Take a screenshot of your name on a notepad on the Desktop of [ucid]dbvm
10. Next deploy an azure web app following the specifications below:
a. Name: [ucid]webapp
b. Python Environment
c. Ensure regions the same as the others or you will have problems
Open the page you just created and take a screenshot of the full browser window
showing the landing page
11. Next we are going to secure the app service with Private Endpoints, by going to the
networking settings of the Web App
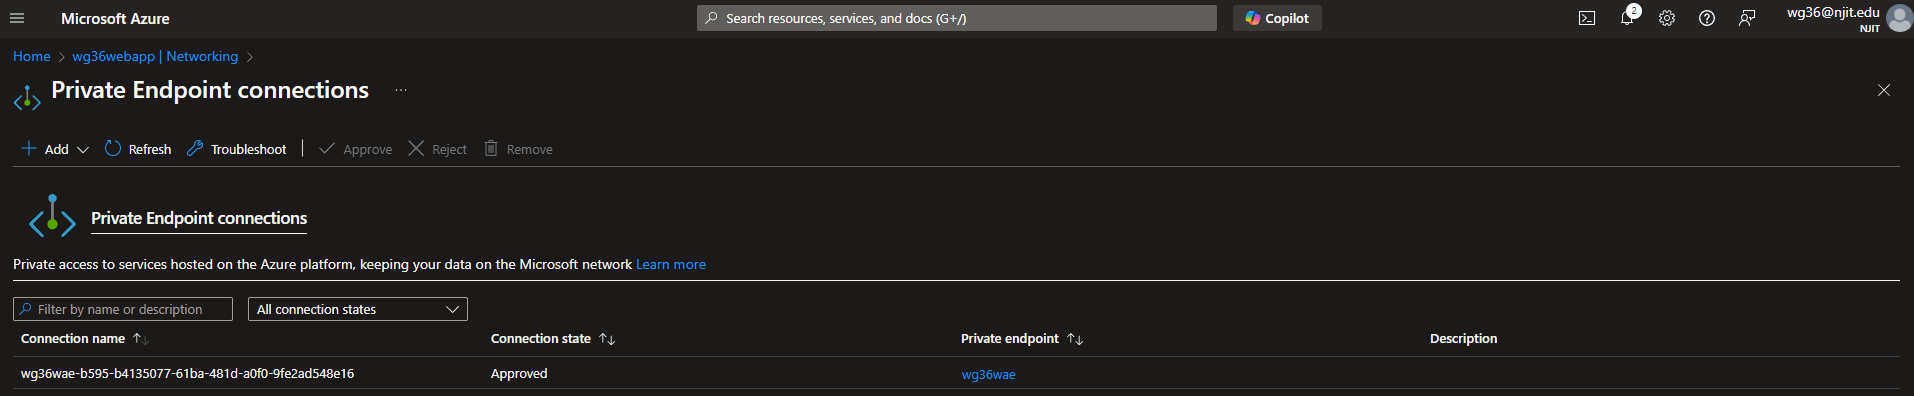
a. Call the Private Endpoint [ucid]wae
b. Use the vnet and DBSubnet created in the previous steps
c. This step when you create it will take a while so just hang tight till its
done
Take a screenshot of the Private Endpoint Connections page with your newly created
endpoint
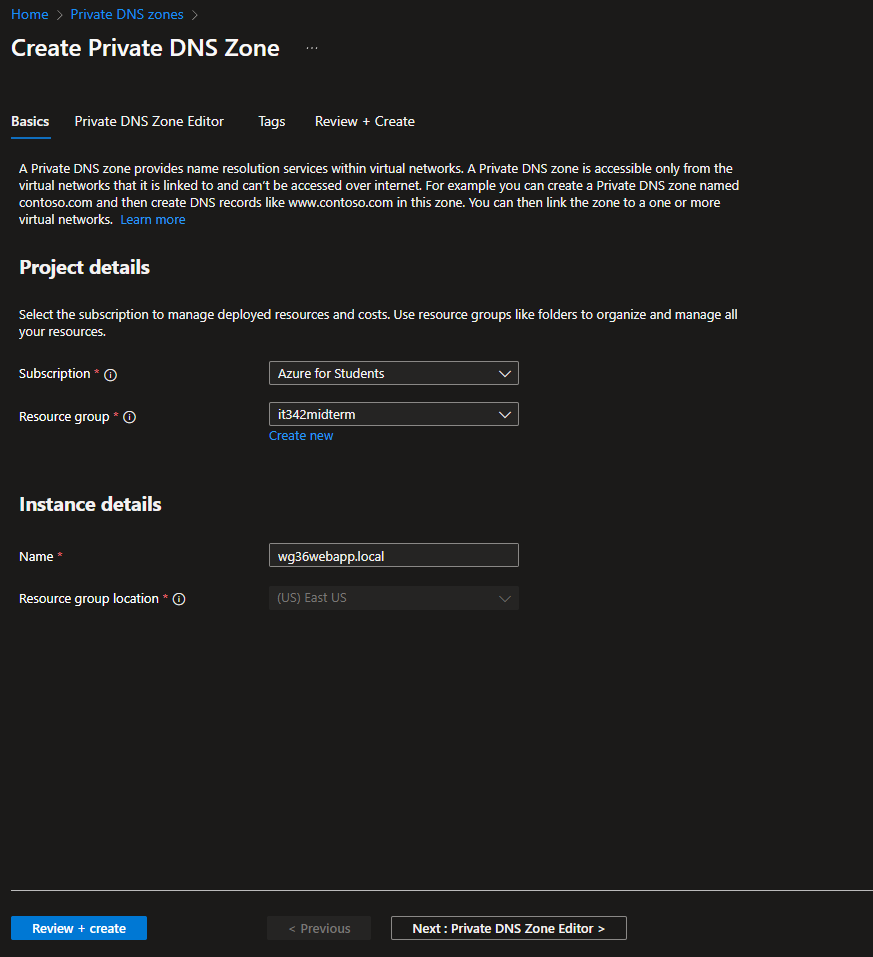
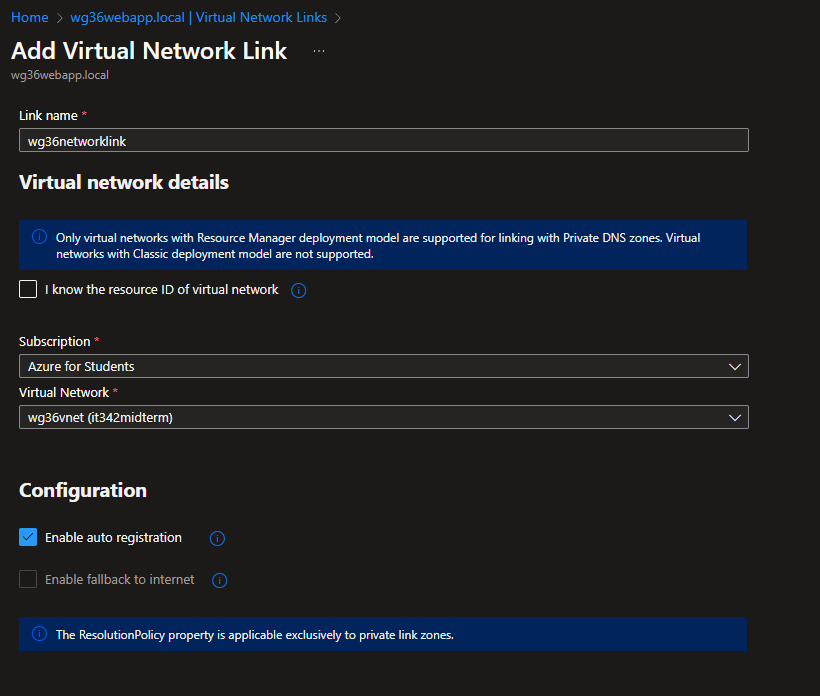
12. Lastly, we are going to configure an Azure Private DNS Zone for internal access to
our web app and link it to the Virtual Network
a. Create a Private DNS Zone called [ucid]webapp.local
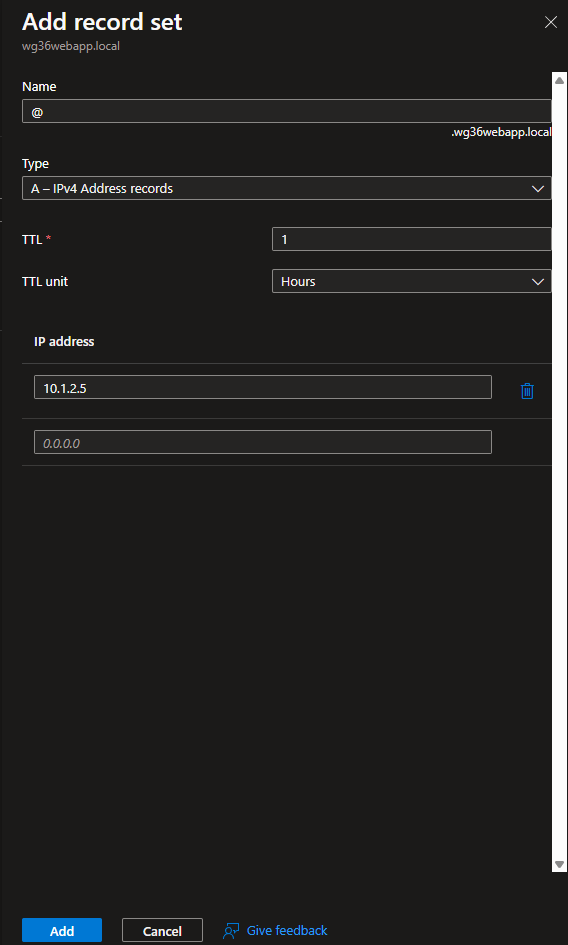
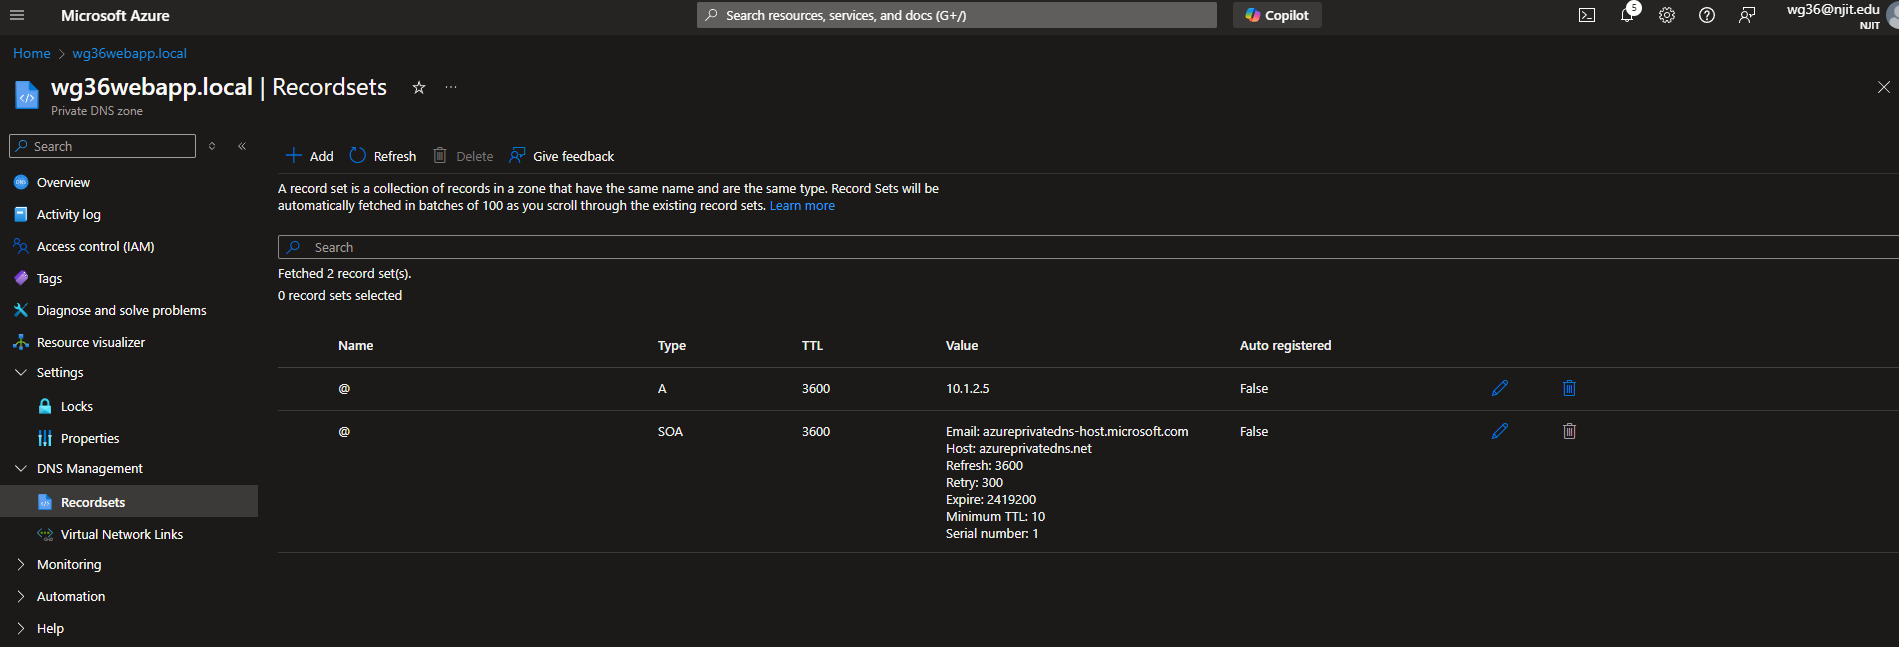
b. Go to the record sets and add a record with the following details
i. Type: A
ii. Name: @
iii. IP: Local and use the private endpoint IP
iv. TTL: Leave default to avoid excess charges
c. Go to the virtual network link tab and add a network link with the resources
created before and auto-registration
Take a screenshot of the newly created DNS Record
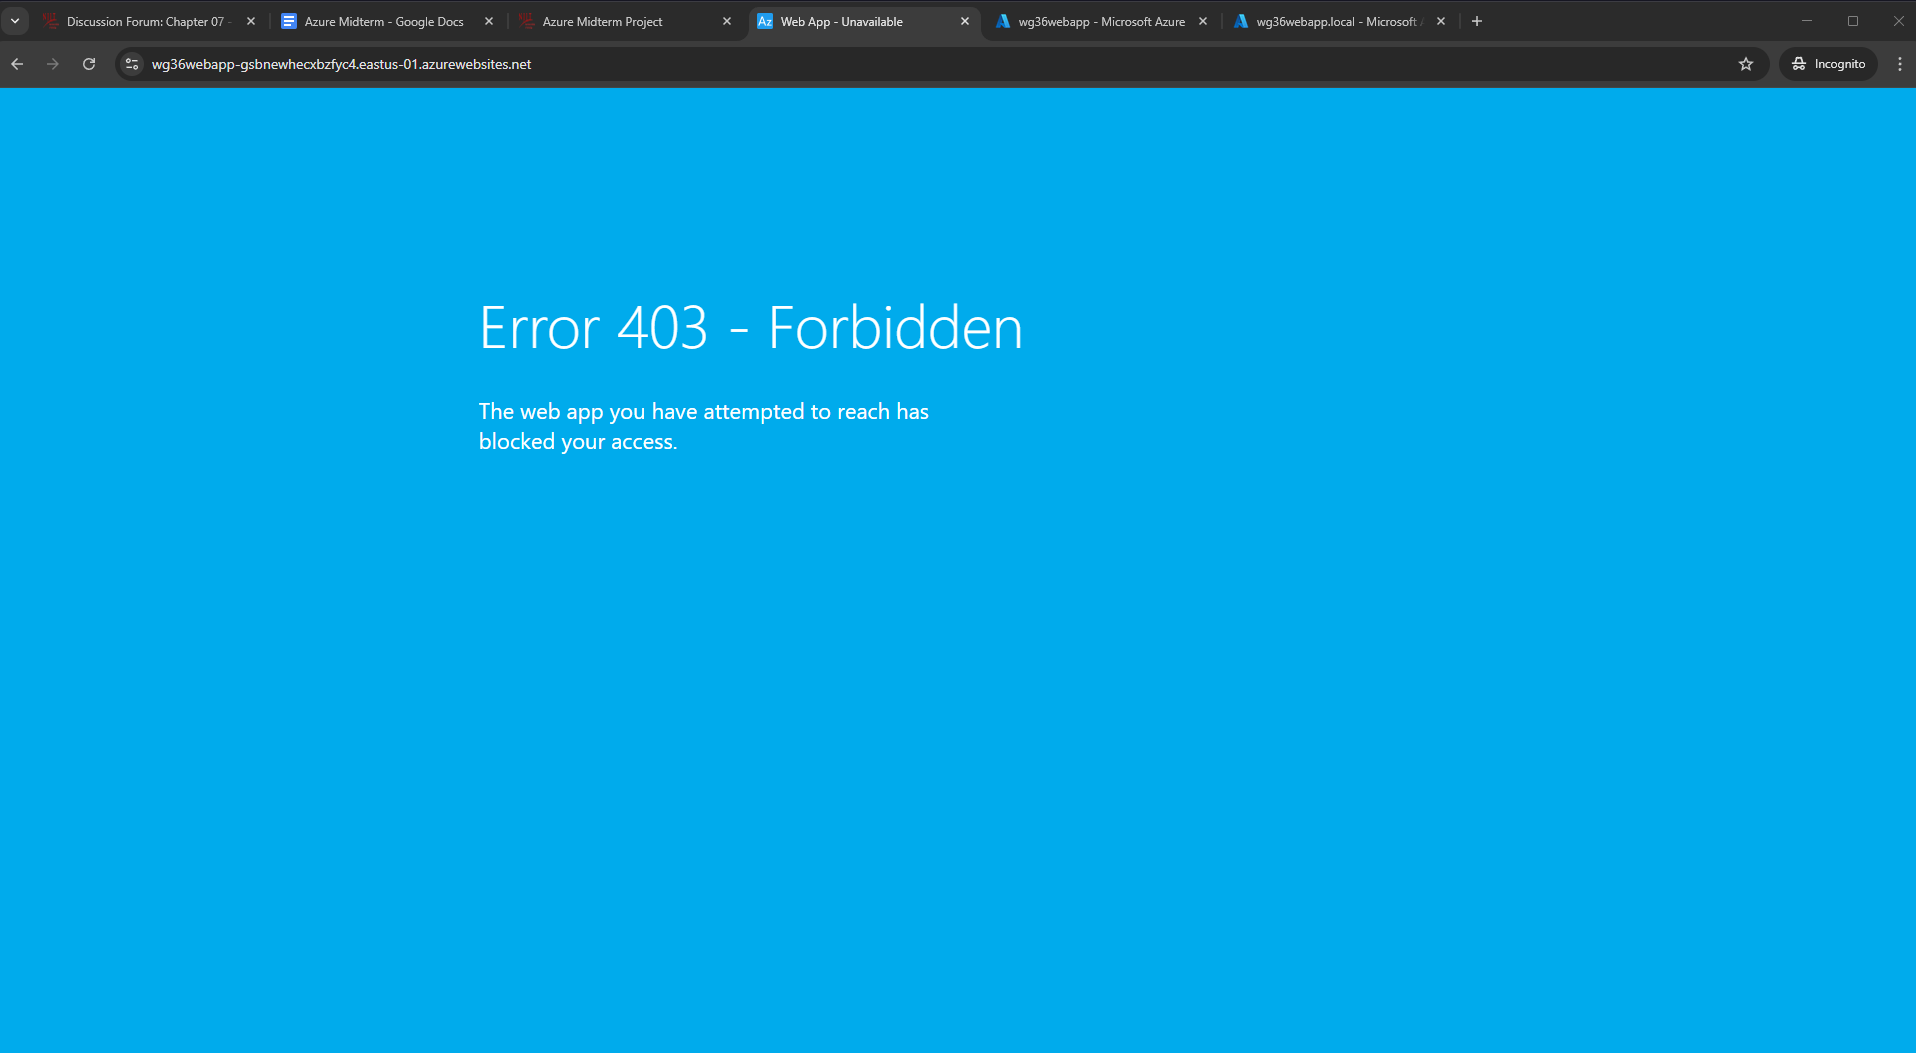
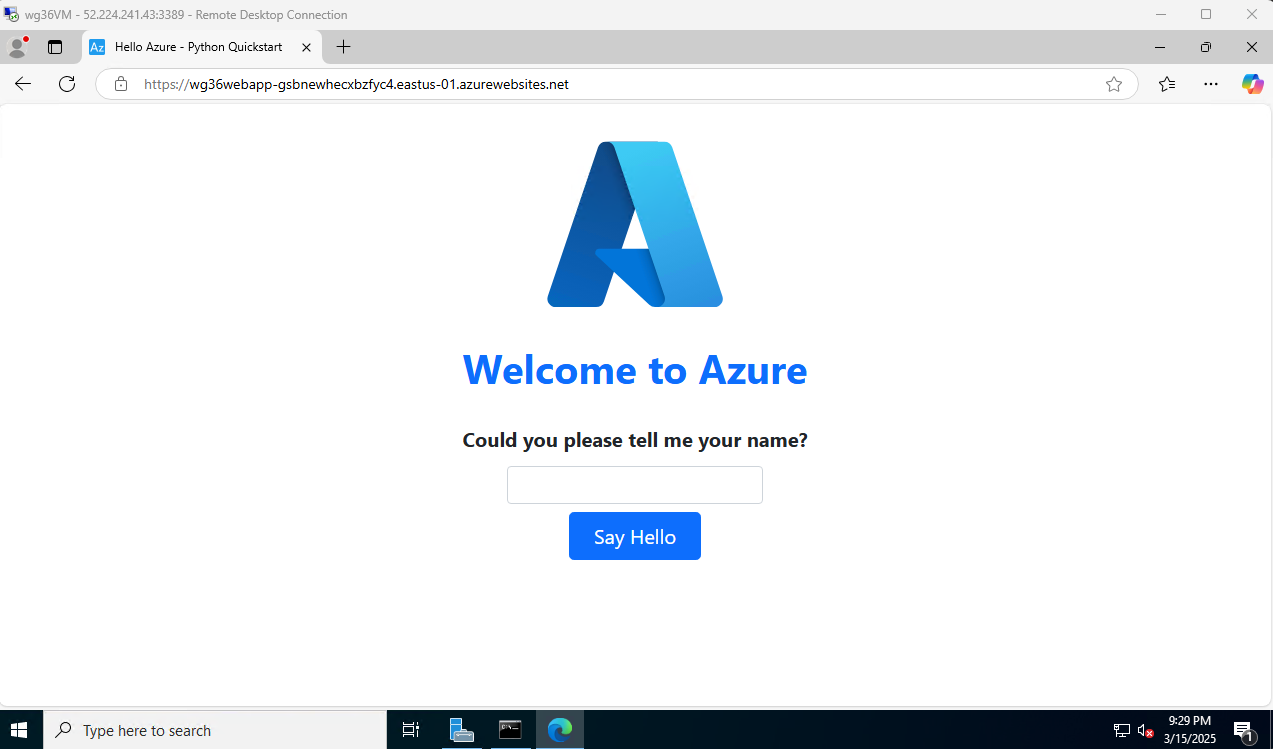
13. Verify that everything is now secured and working and launch your VM via RDP
a. First verify your web app works by going to its public URL / default domain on
edge in the VM. Screenshot what loads
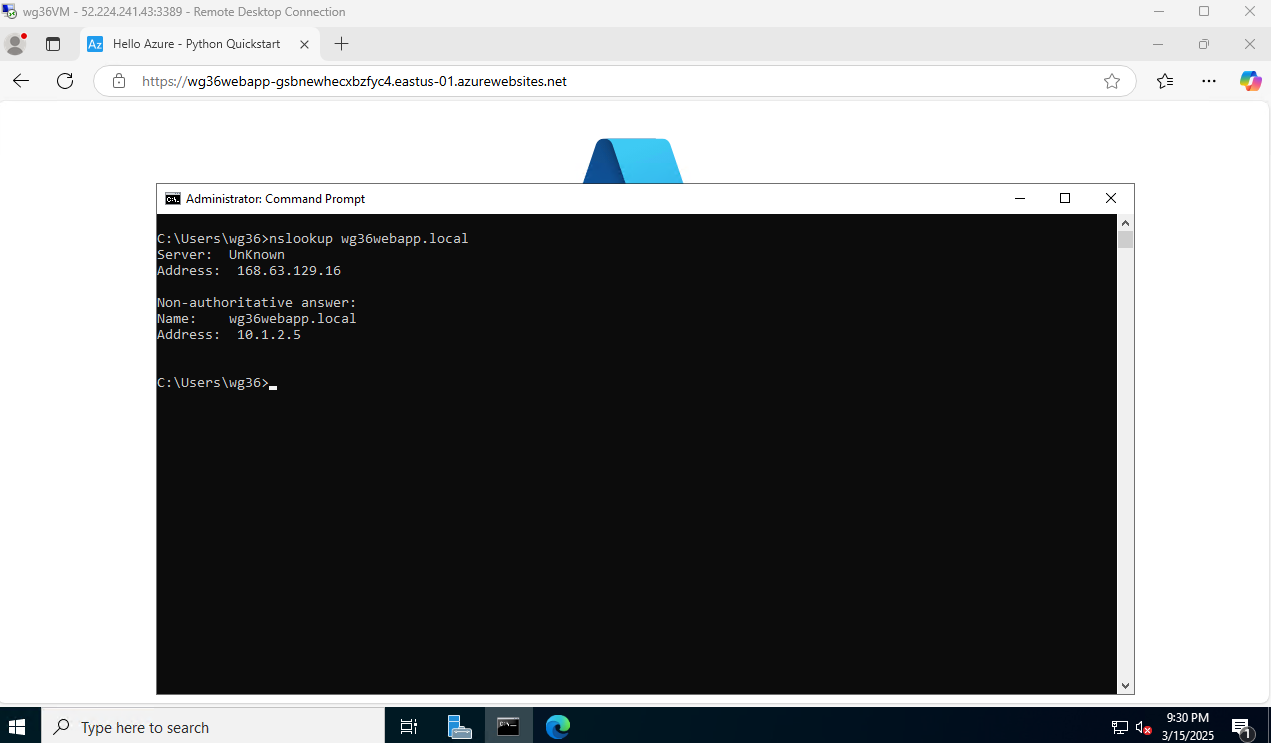
b. Then go to command prompt and do an nslookup on your [ucid]webapp.local
Screenshot the command prompt window with command and output
visible inside your RDP session
c. Close your RDP session, switch your laptop to your mobile hotspot or a
different network, and try to launch the RDP session again. Screenshot the
result of this
14. Add a CIS Benchmark item that wasn’t mentioned and implement it, then take a
screenshot of its implementation and outline which benchmark you did.
Walkthrough and Deliverables
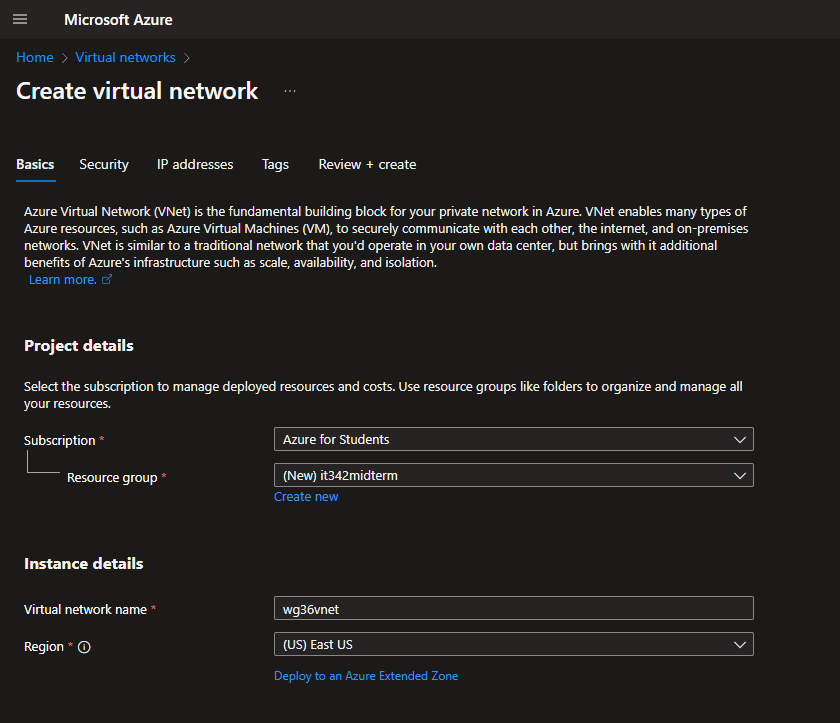
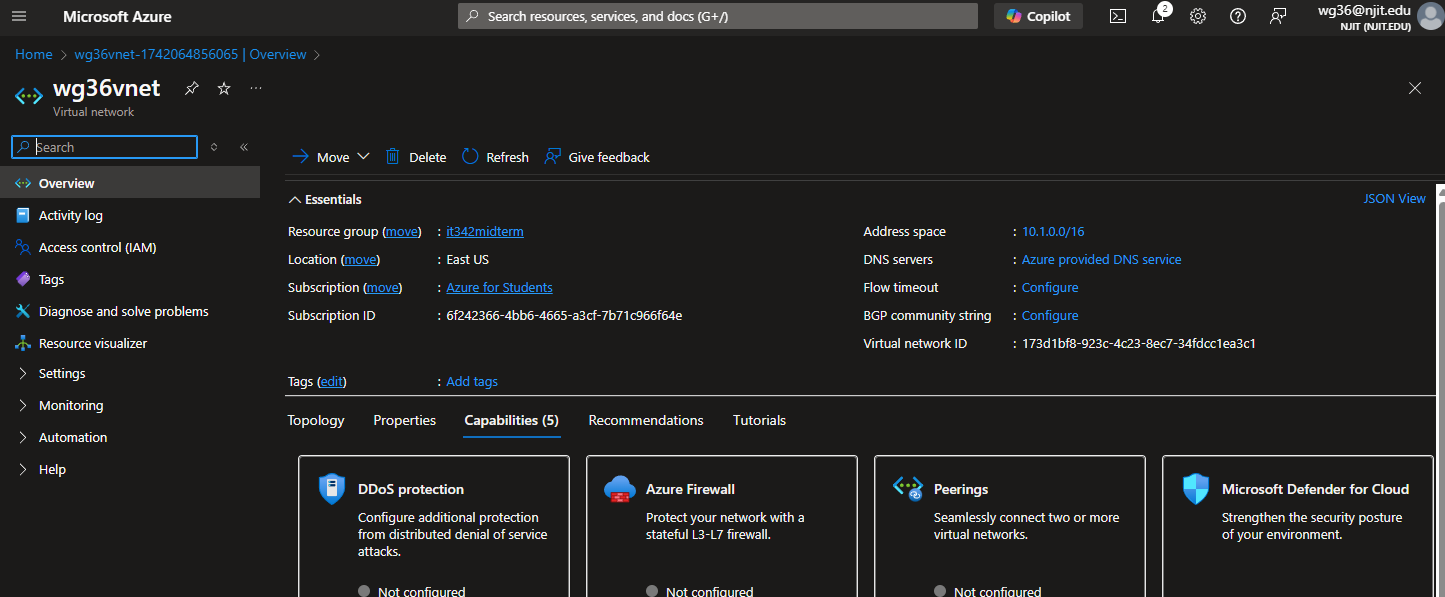
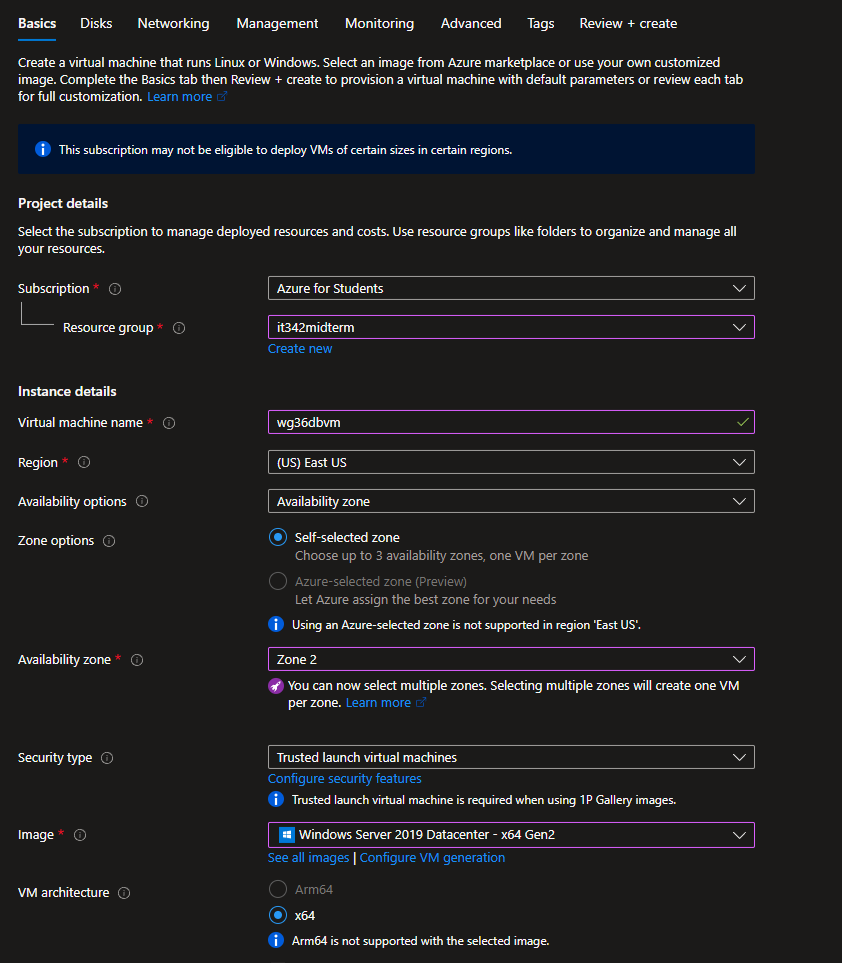
1. Virtual Network (VNet)
Head to Virtual networks and click create new virtual network
Set the resource group to it342midterm (Azure for Students resource group)
VNet name: wg36vnet
Region: East US
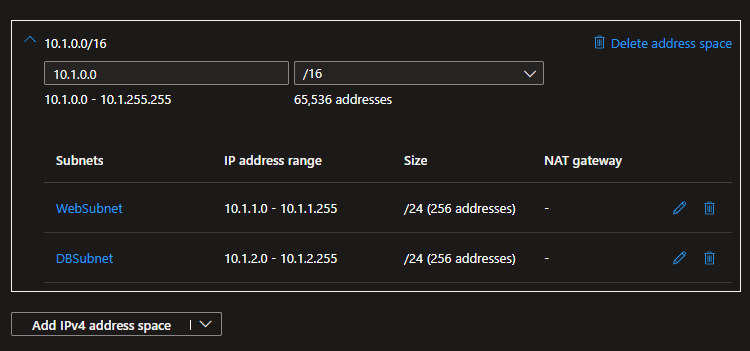
Under Add a Subnet, set the IPv4 address range to 10.1.0.0/16 and the starting address to 10.1.0.0. Leave the size to /24
Everything else is left to default
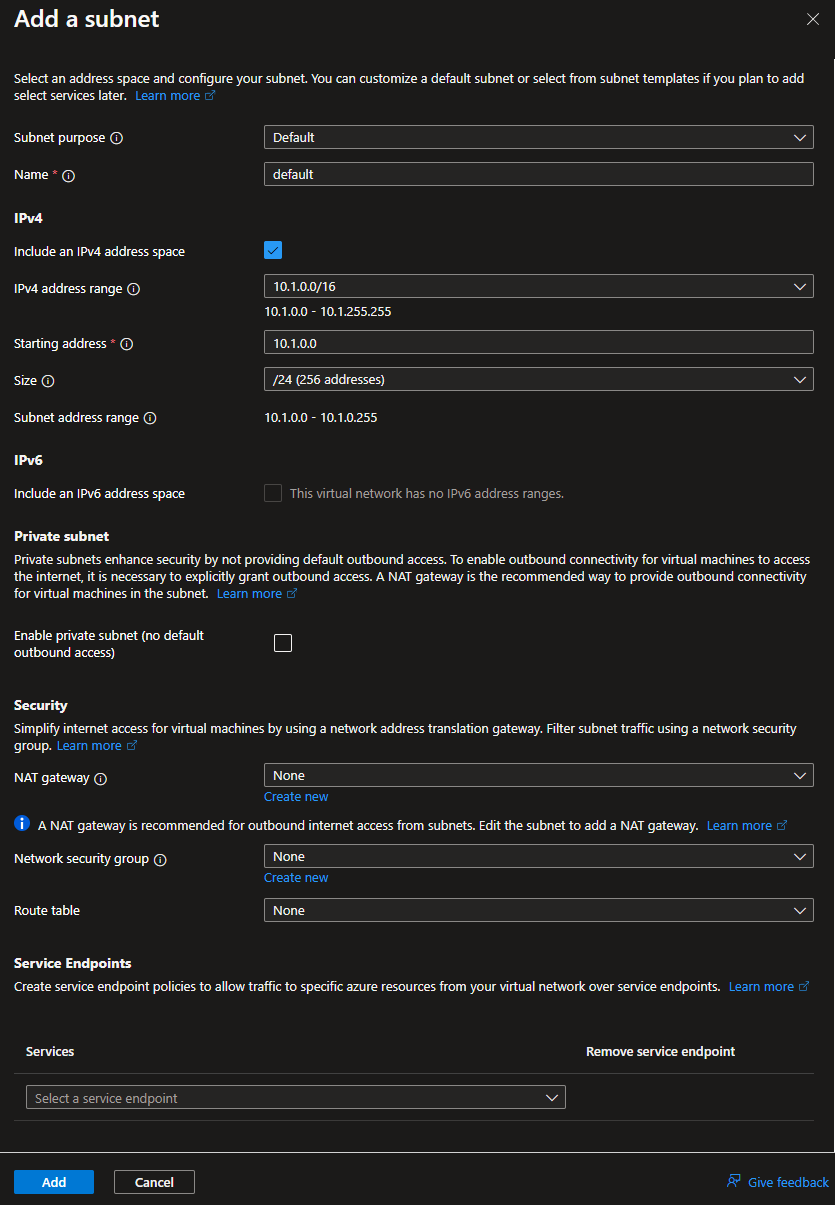
Create the WebSubnet and DBSubnet with the address range from the instructions.
Then click Review + Create
Deliverable 1/17: Virtual Network overview tab
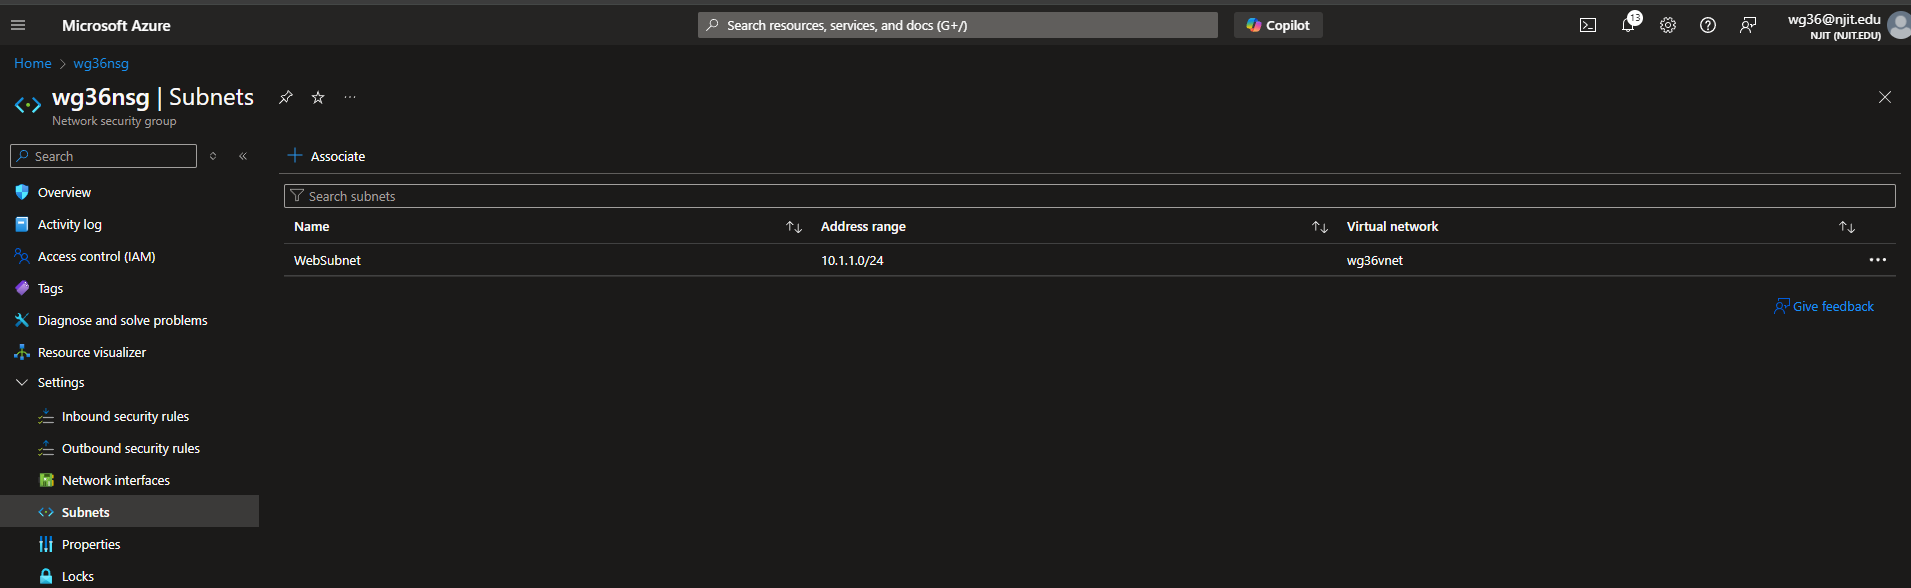
Deliverable 2/17: Subnets tab under the VNet
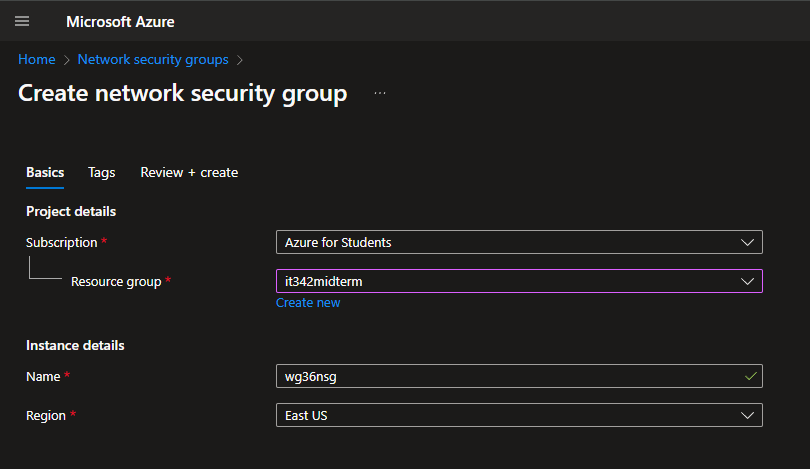
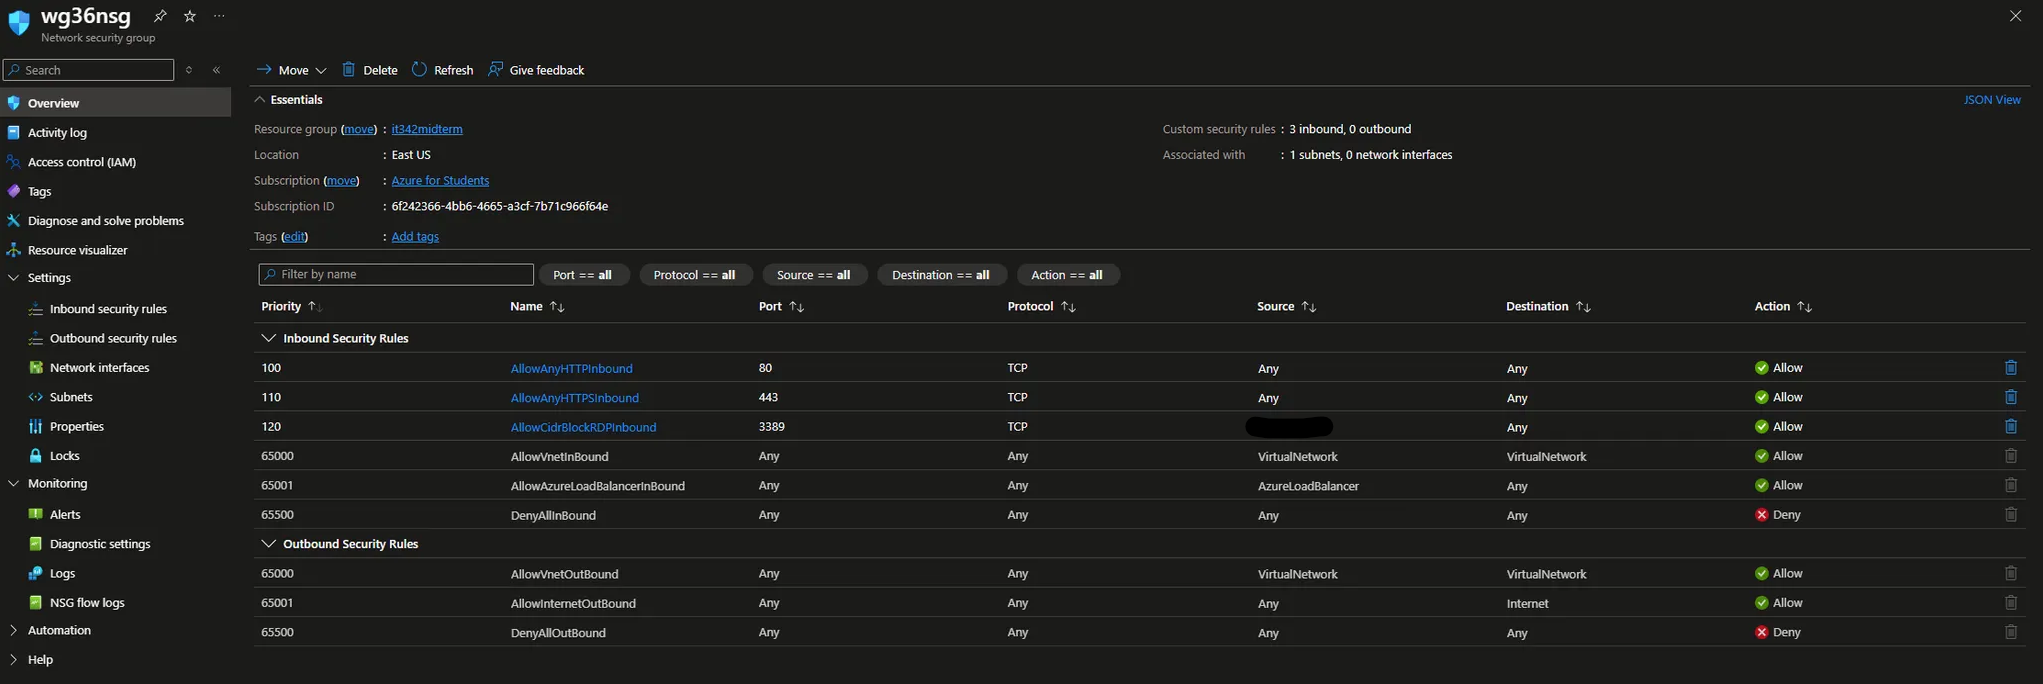
2. Network Security Group (NSG)
Head to Network security groups and click create new
Make sure the resource group is set to it342midterm
Set a name and make sure the region matches the VNet (East US)
Skip Tags and go directly to Review + create
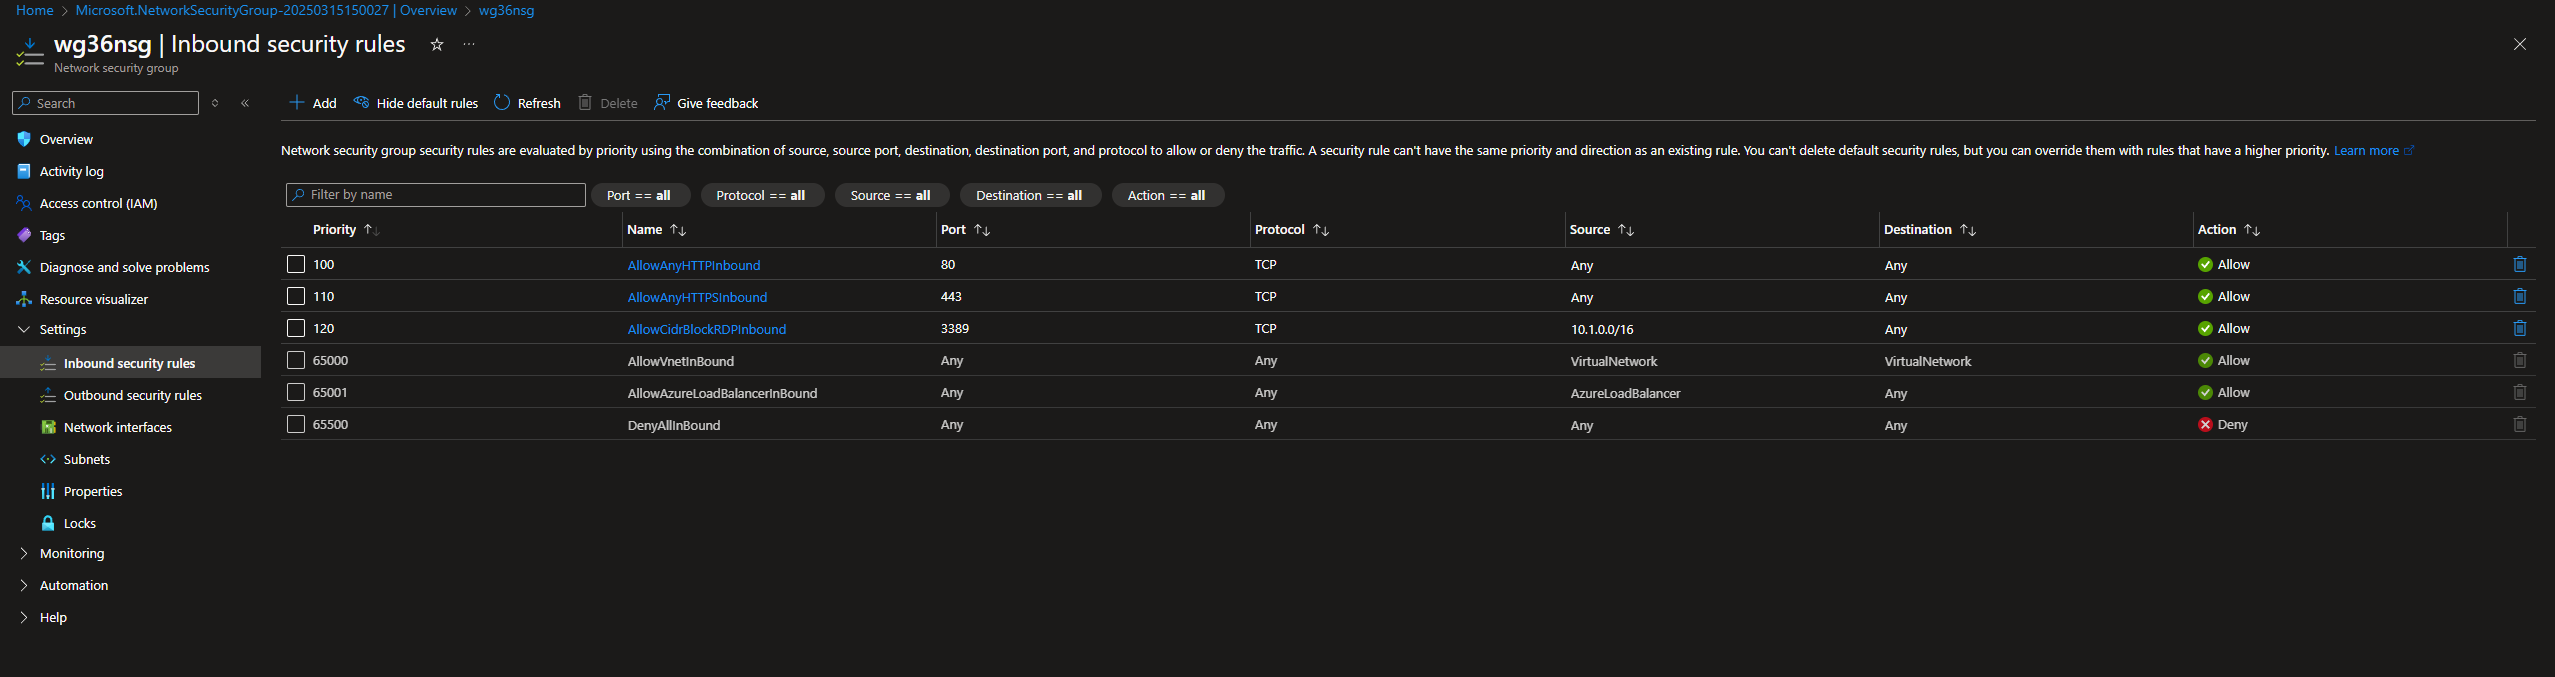
Go to the NSG overview page and head to Settings > Inbound security rules
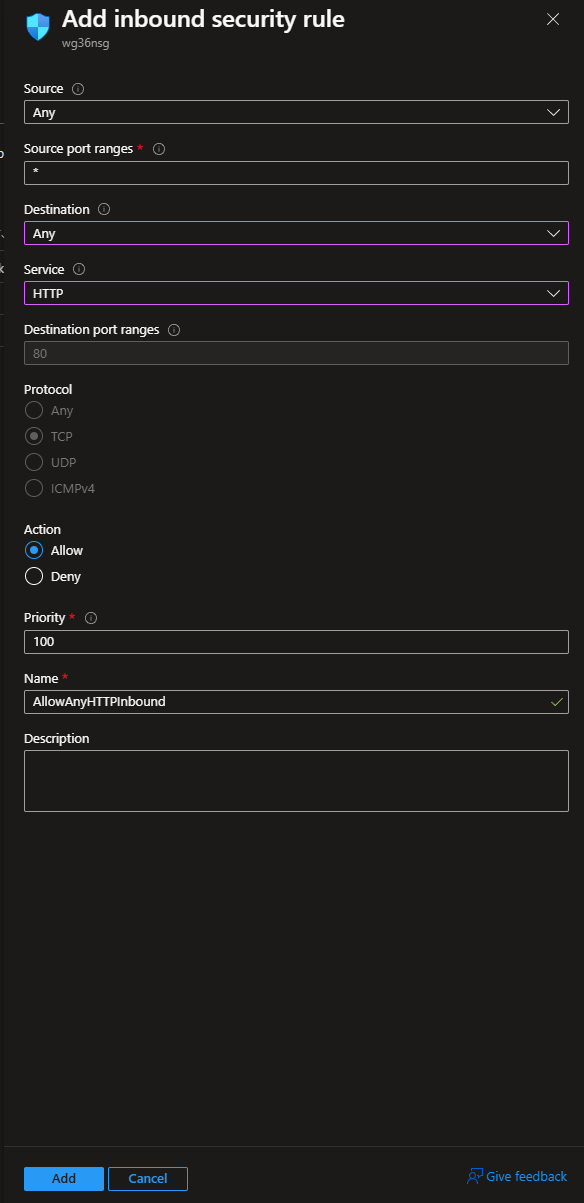
Click Add
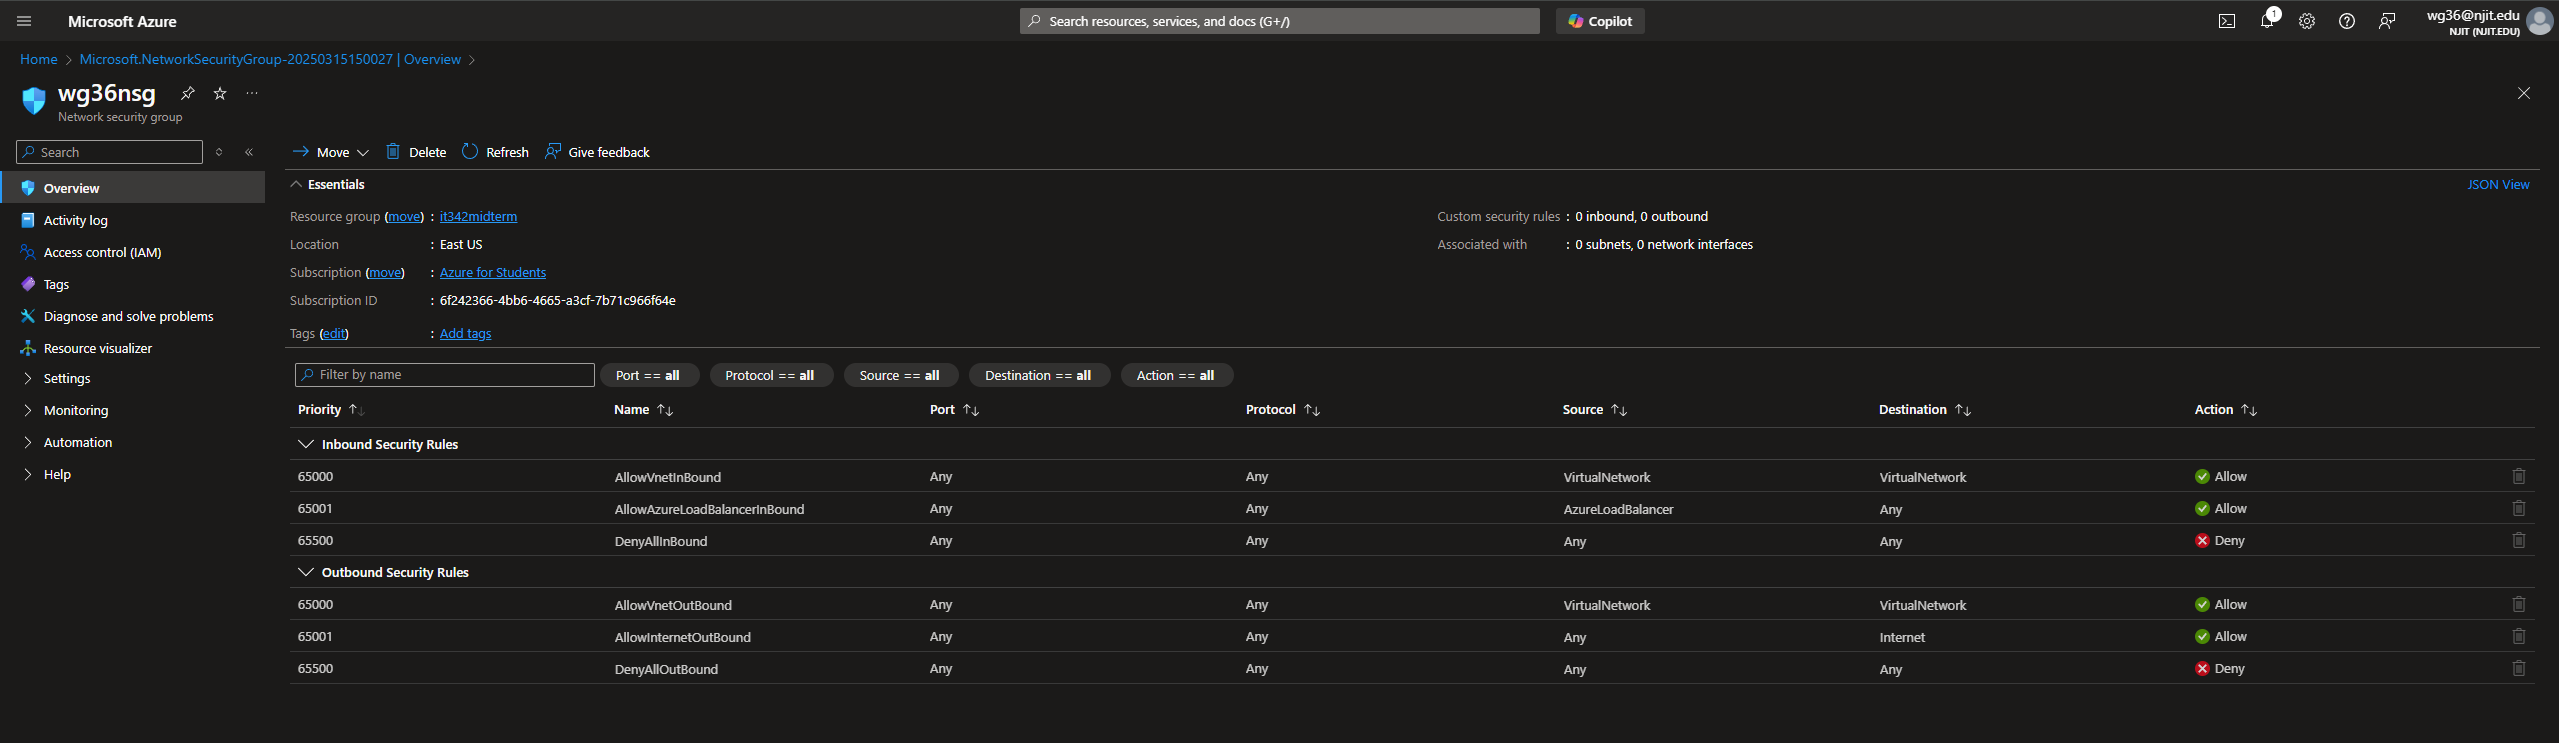
Create the rule to allow incoming HTTP traffic
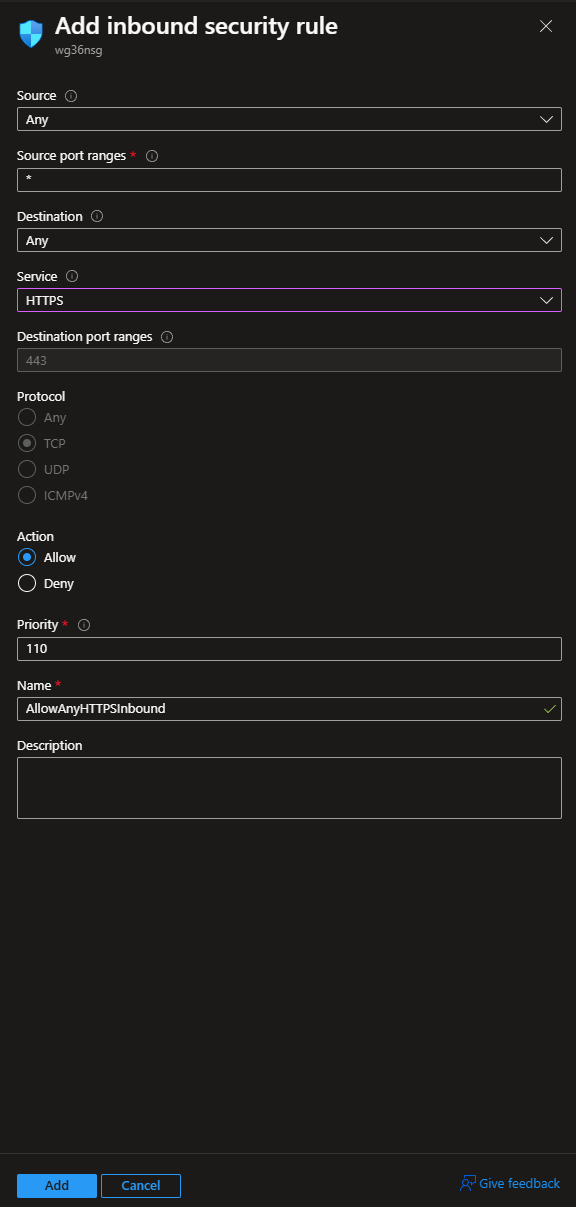
Create another rule to allow incoming HTTPS traffic
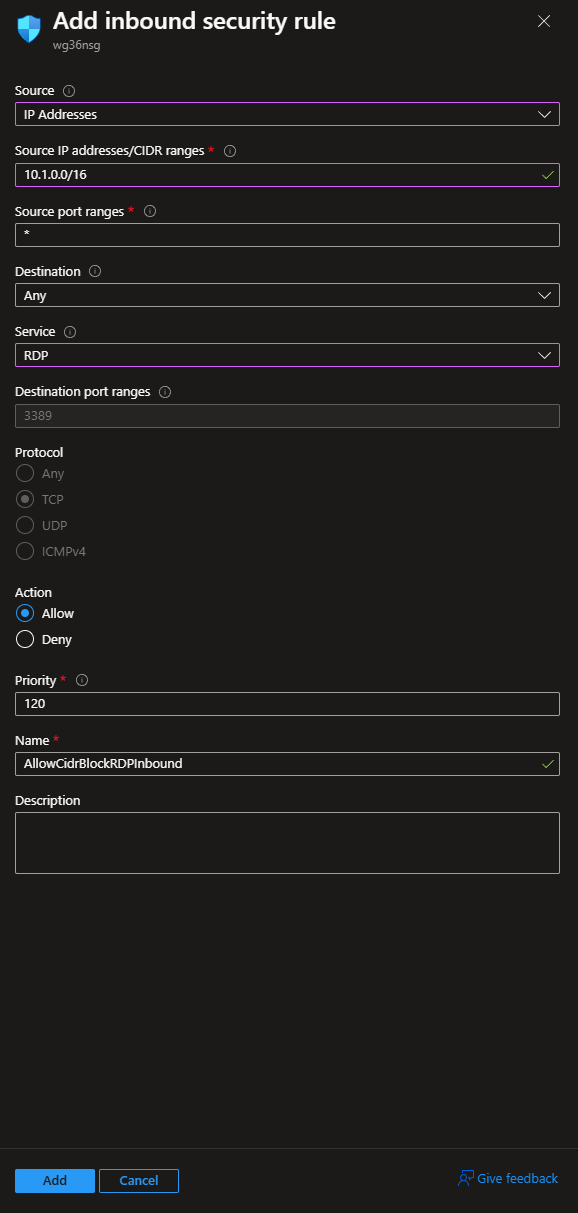
Slight error that I had to fix later on
This rule should allow incoming RDP traffic from your host machine, not the VNet.
Rules Overview Tab
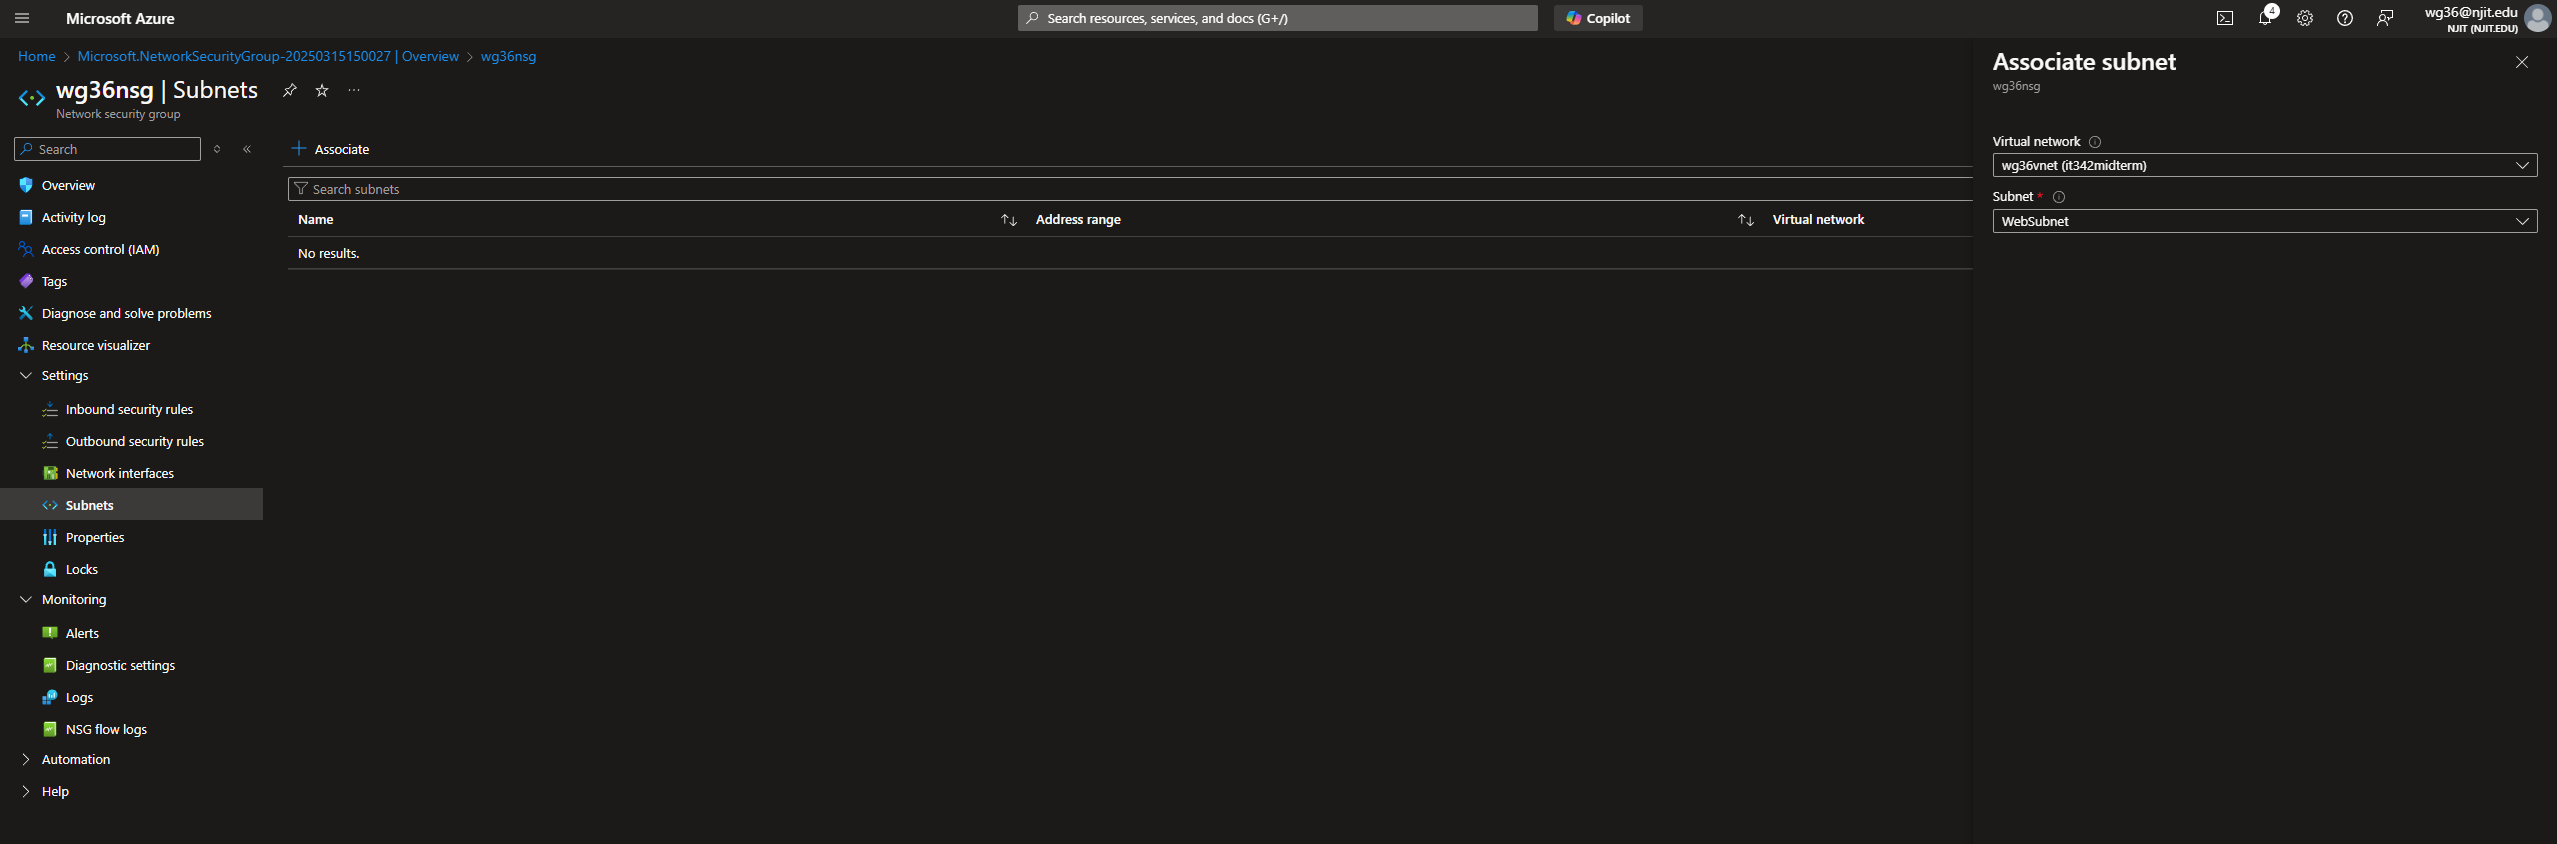
Next, we are going to associate the NSG to the subnet
Under Settings > Subnets, click Associate and set the VNet to wg36vnet and the subnet to WebSubnet
We are going to have to create another NSG and assocate it to the DBSubnet later on, so might as well do it now.
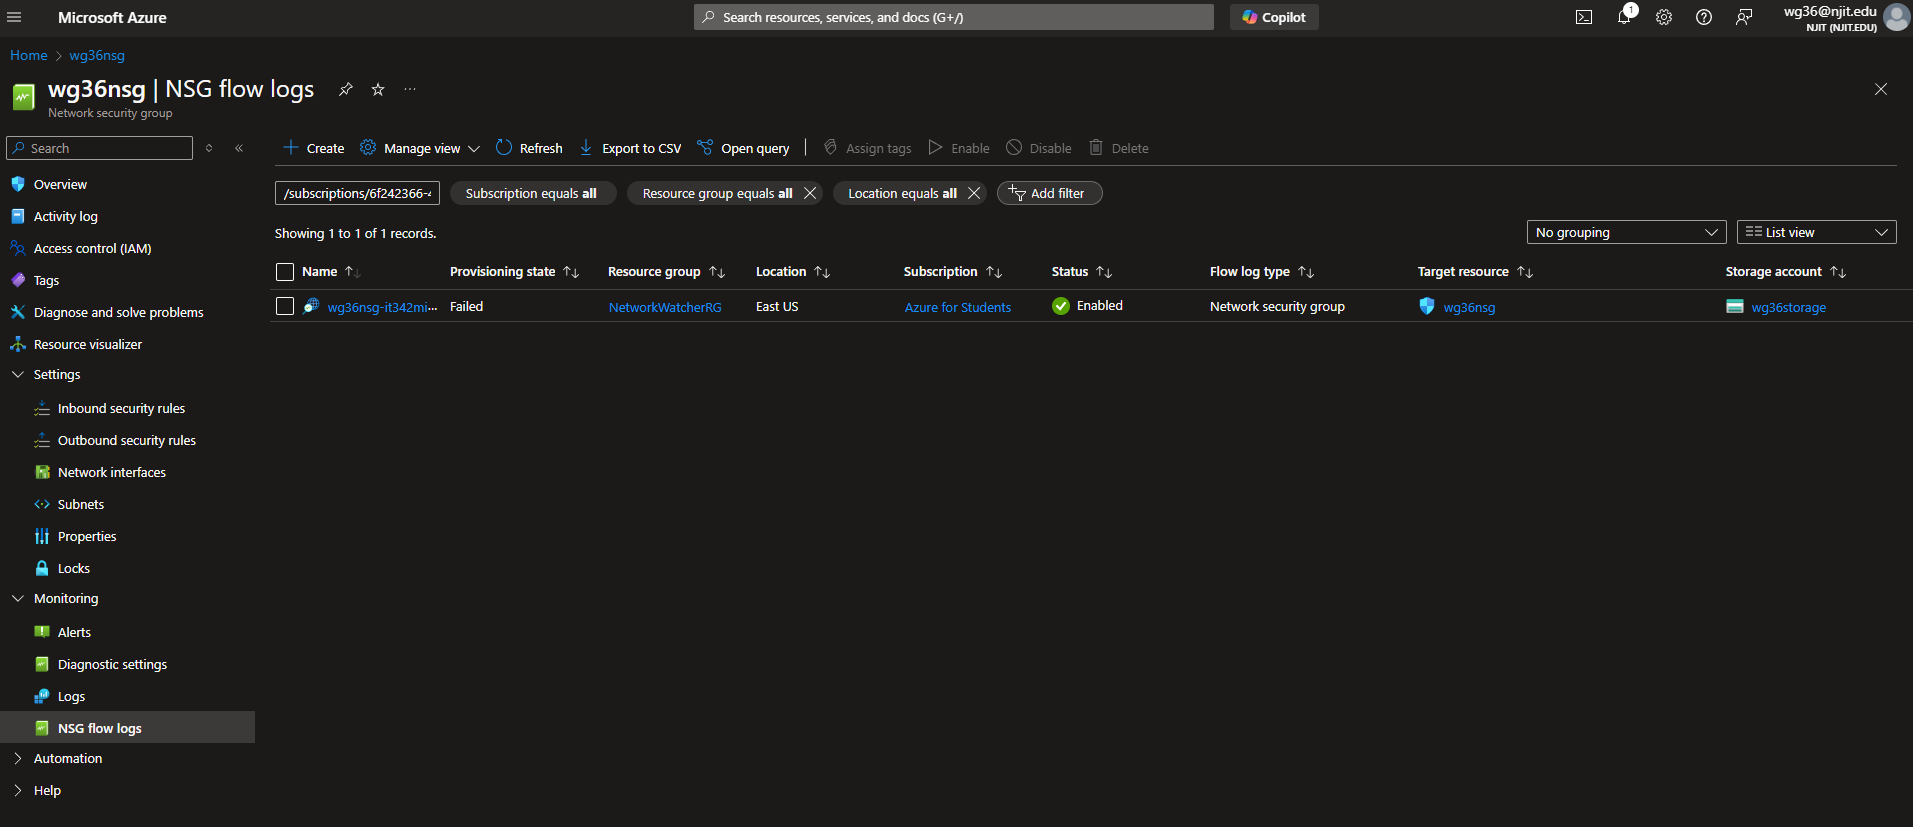
NSG Flow Logs
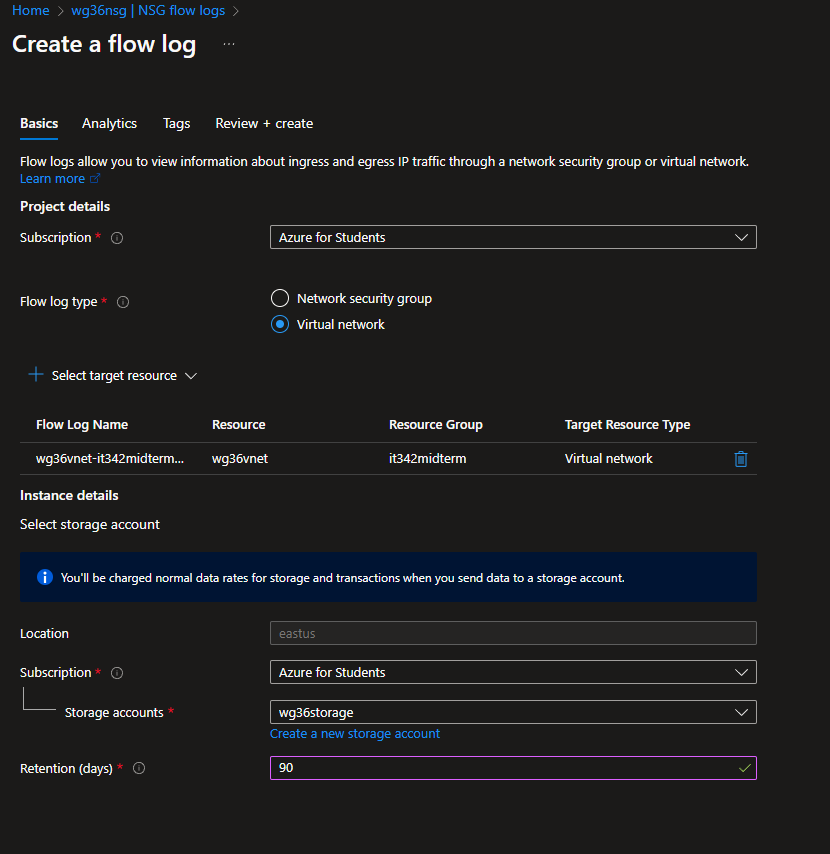
This part was done incorrectly. The flow log type should have been set to Network security group. Additionally, the NSG flow log failed to provision.
Still in the NSG tab, head to Monitoring > NSG flow logs
Create flow log
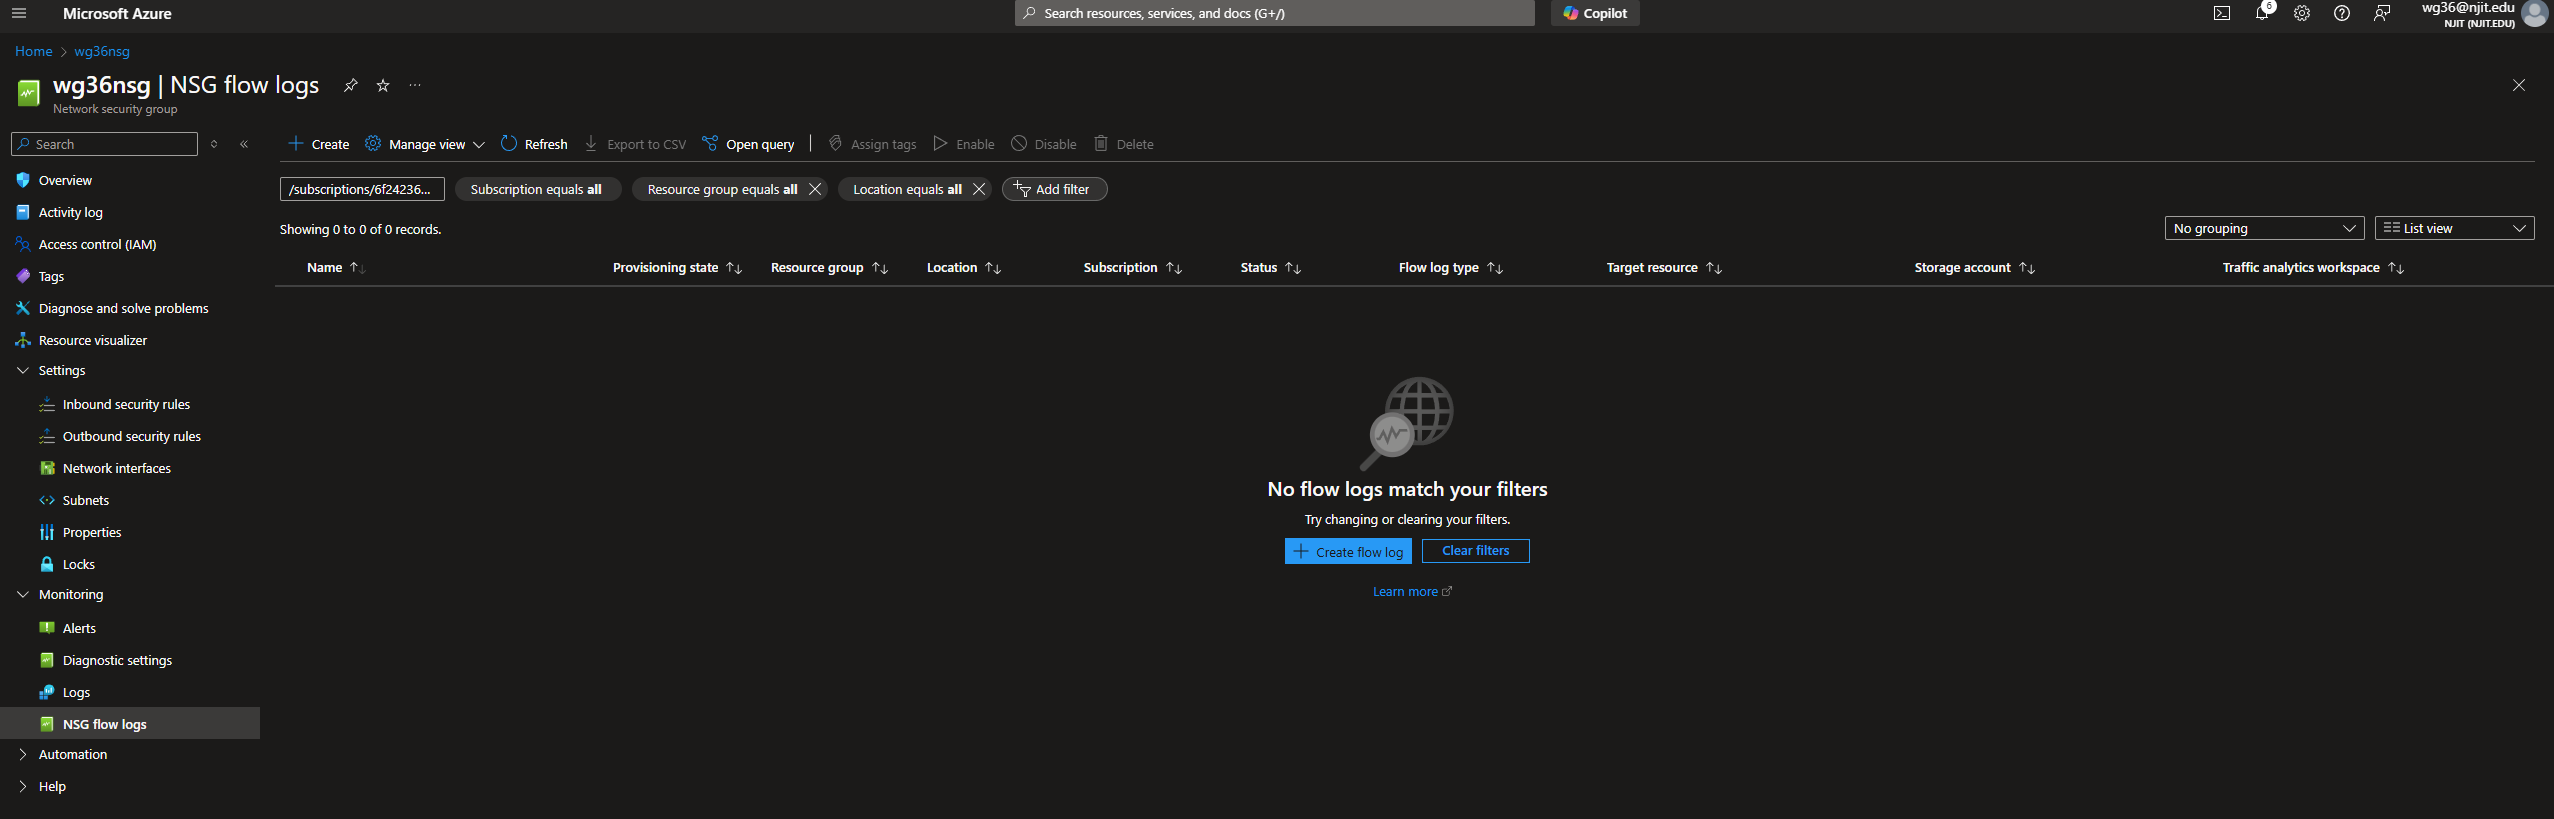
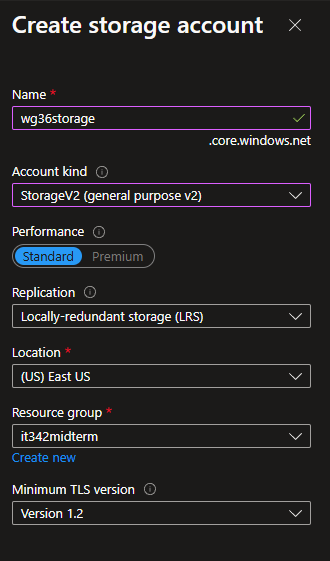
We need to first create a storage account
The storage account kind has to be set to v2
For the flow log, set the type to Virtual network
select nsg for target resource
Deliverable 3/17: NSG Rules

Deliverable 4/17: NSG Subnets
Deliverable 5/17: NSG Flow logs page (Done incorrectly)
3. VM Deployment
Head to Compute Infrastructure and add a new virtual machine
Resource group: it342midterm
VM name: wg36VM (this will be the frontend VM)
Availability Zone: 2
I used Zone 2 instead of Zone 3 because Windows Server 2022 Datacenter was not available in Zone 3.
Image: Windows Server 2022 Datacenter - Azure Edition
Purple outlines indicate changes, while gray outlines indicate default settings
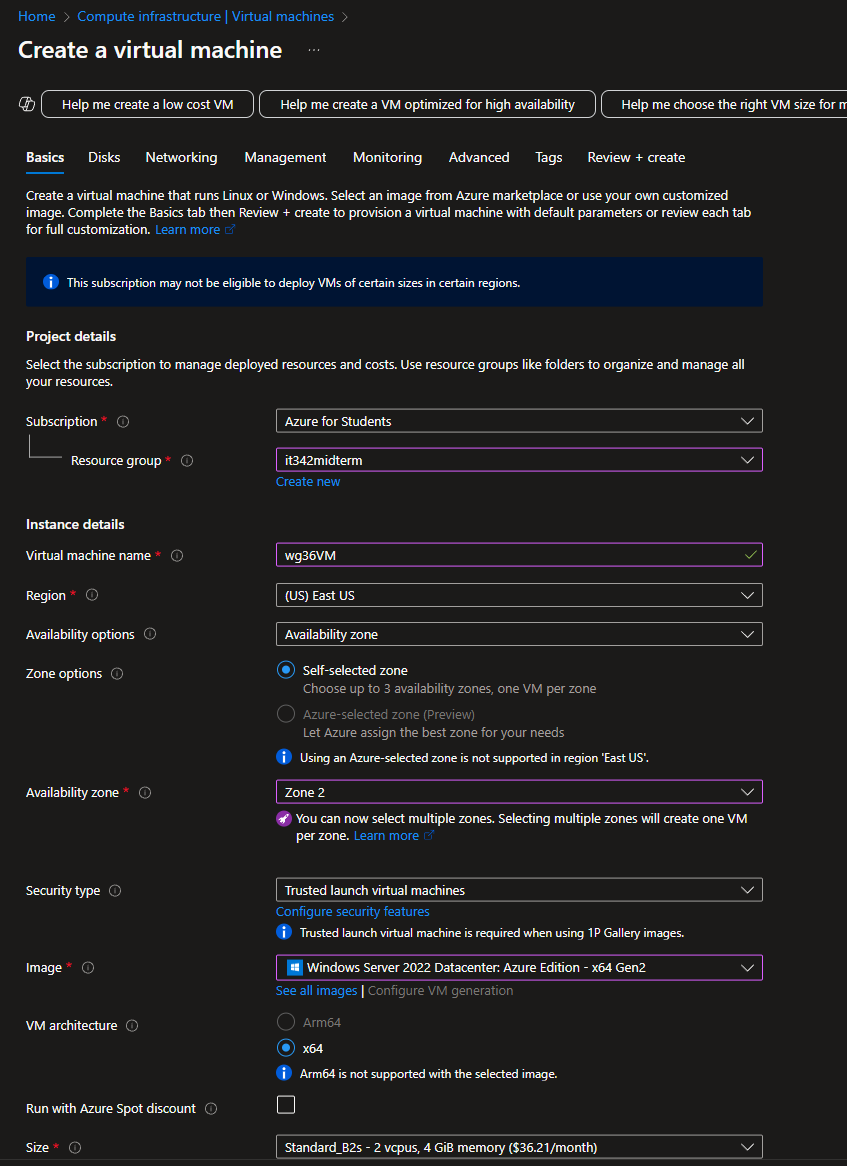
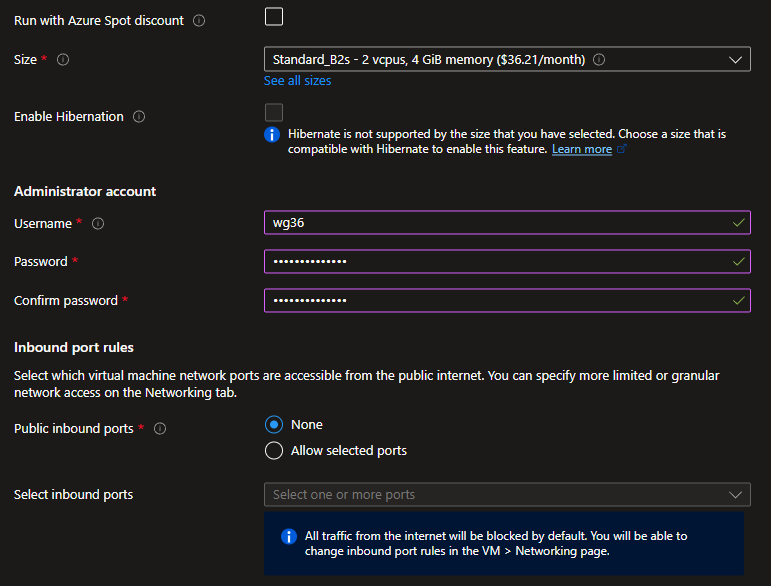
We must use password for authorization type
Set a username and password
Public inbound ports must be set to none
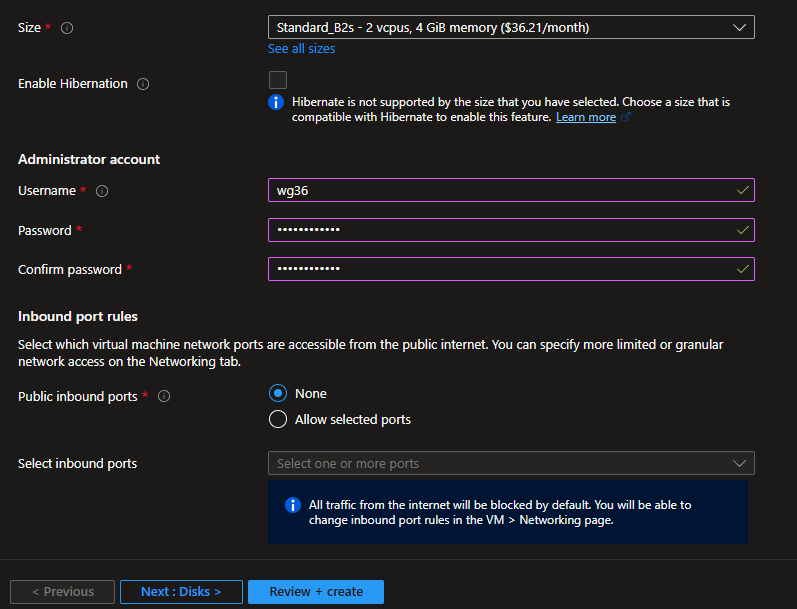
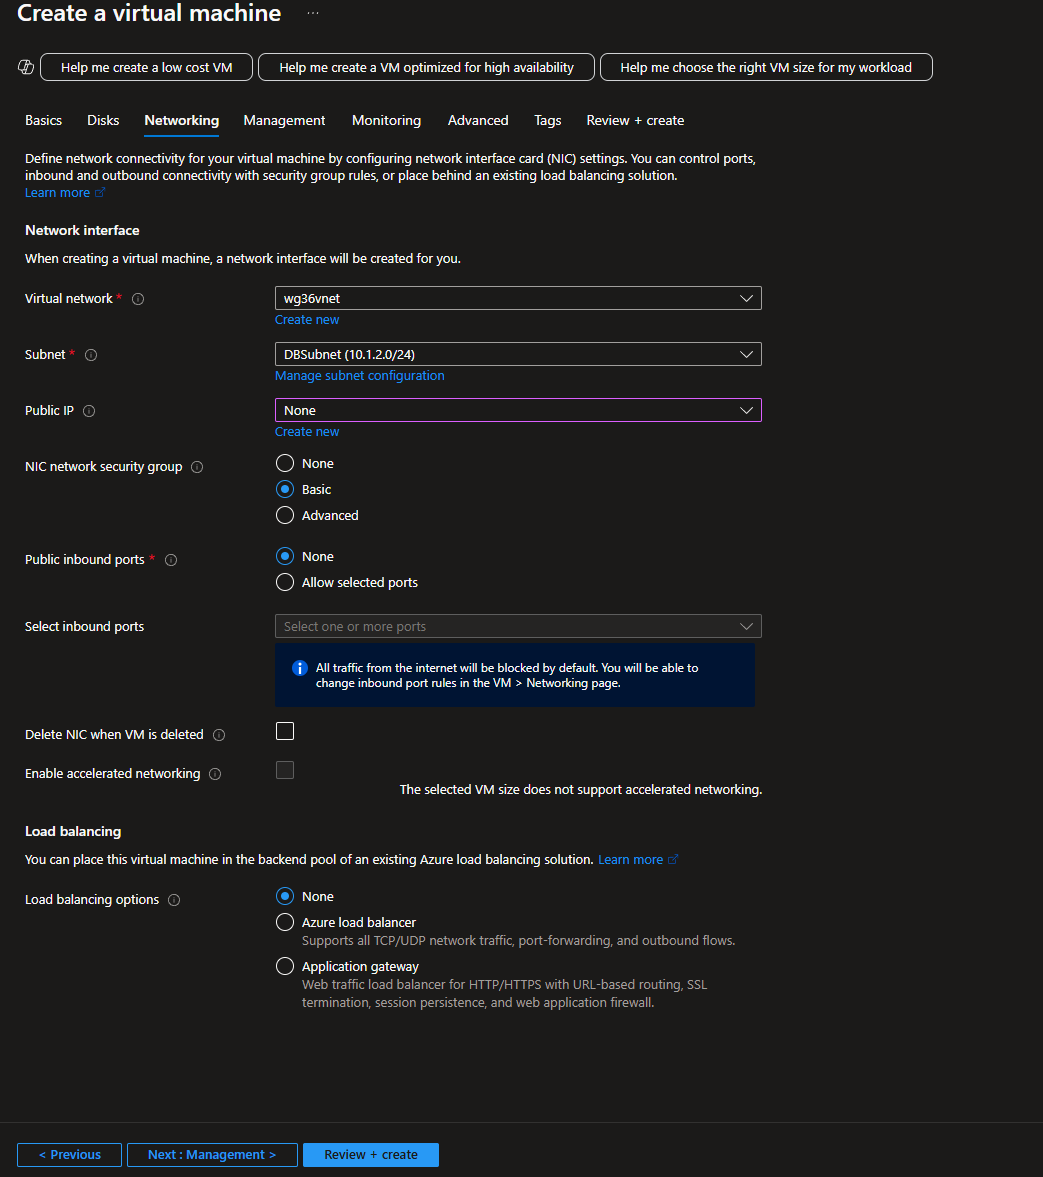
Under Networking, set the VNet to wg36vnet and subnet to WebSubnet
Skip directly to Review + create
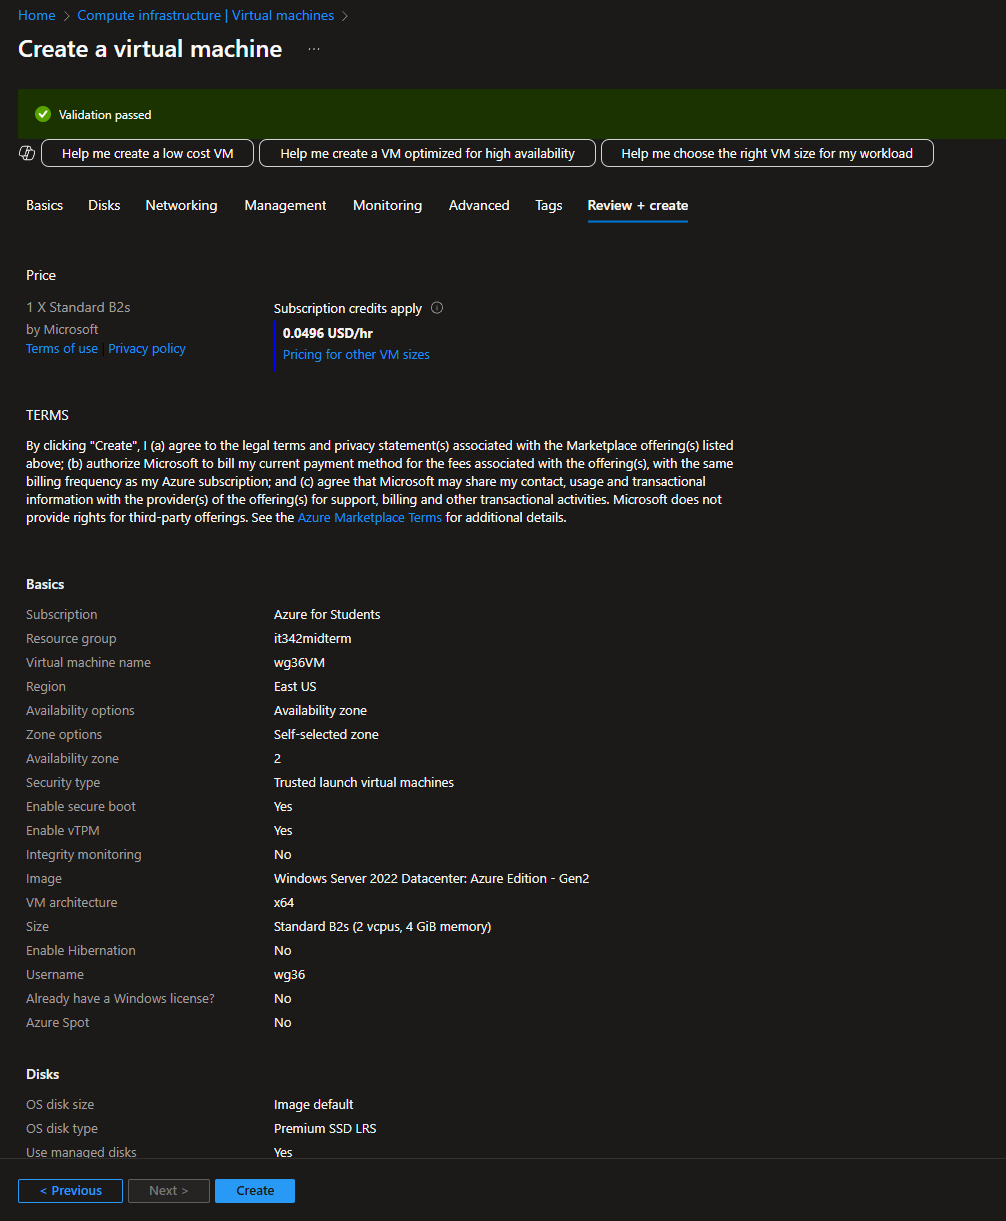
Deliverable 6/17: VM Overview Page
4. Managed Identity
Head to Managed Identity and create new
Resource group: it342midterm
Name: wg36 identity
5. Managed Identity Role for VM
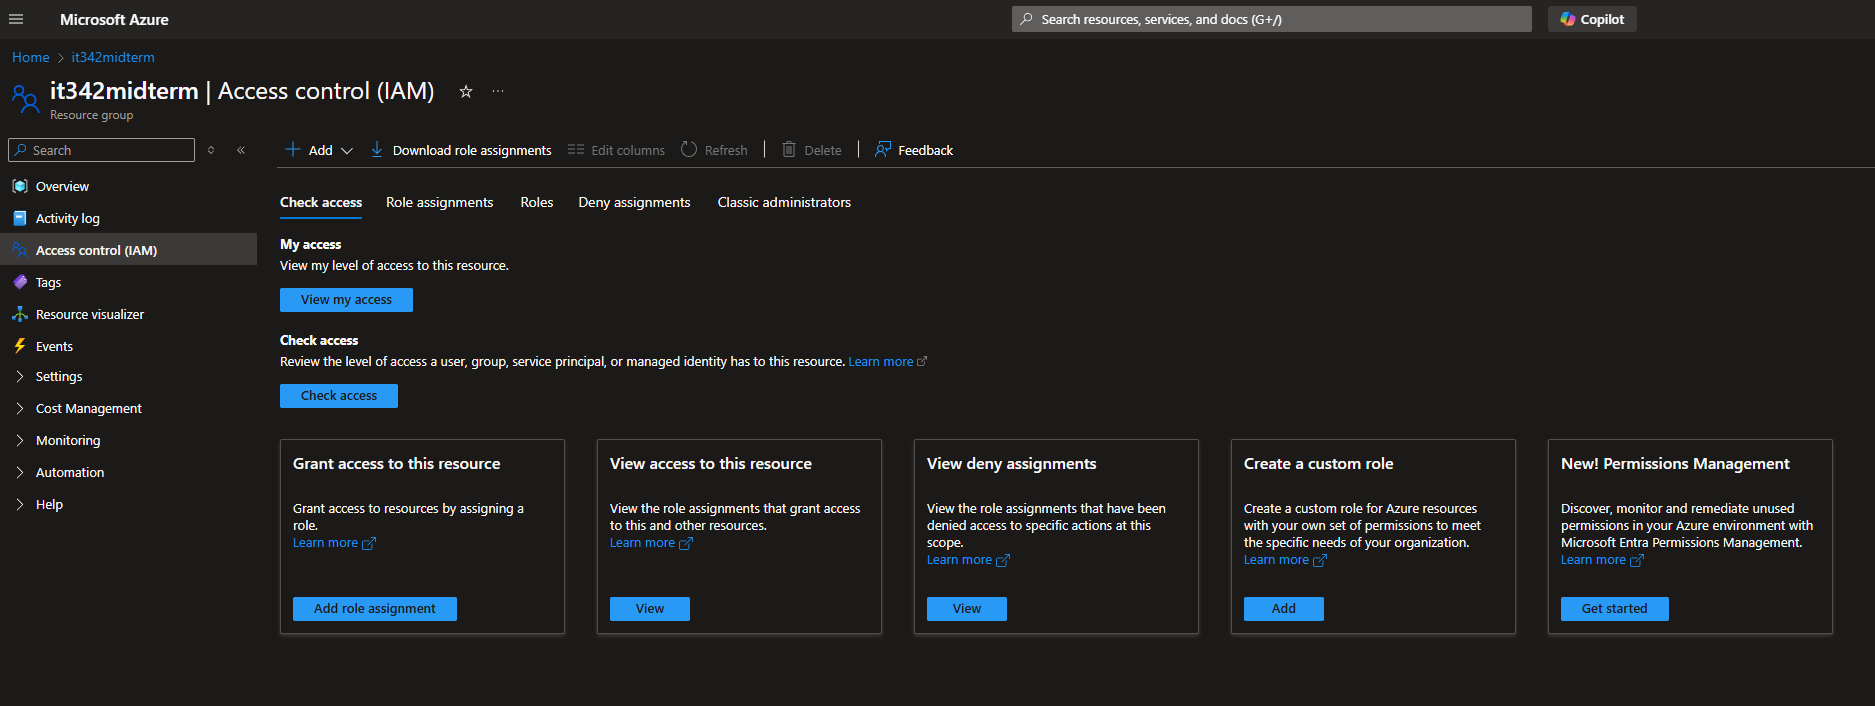
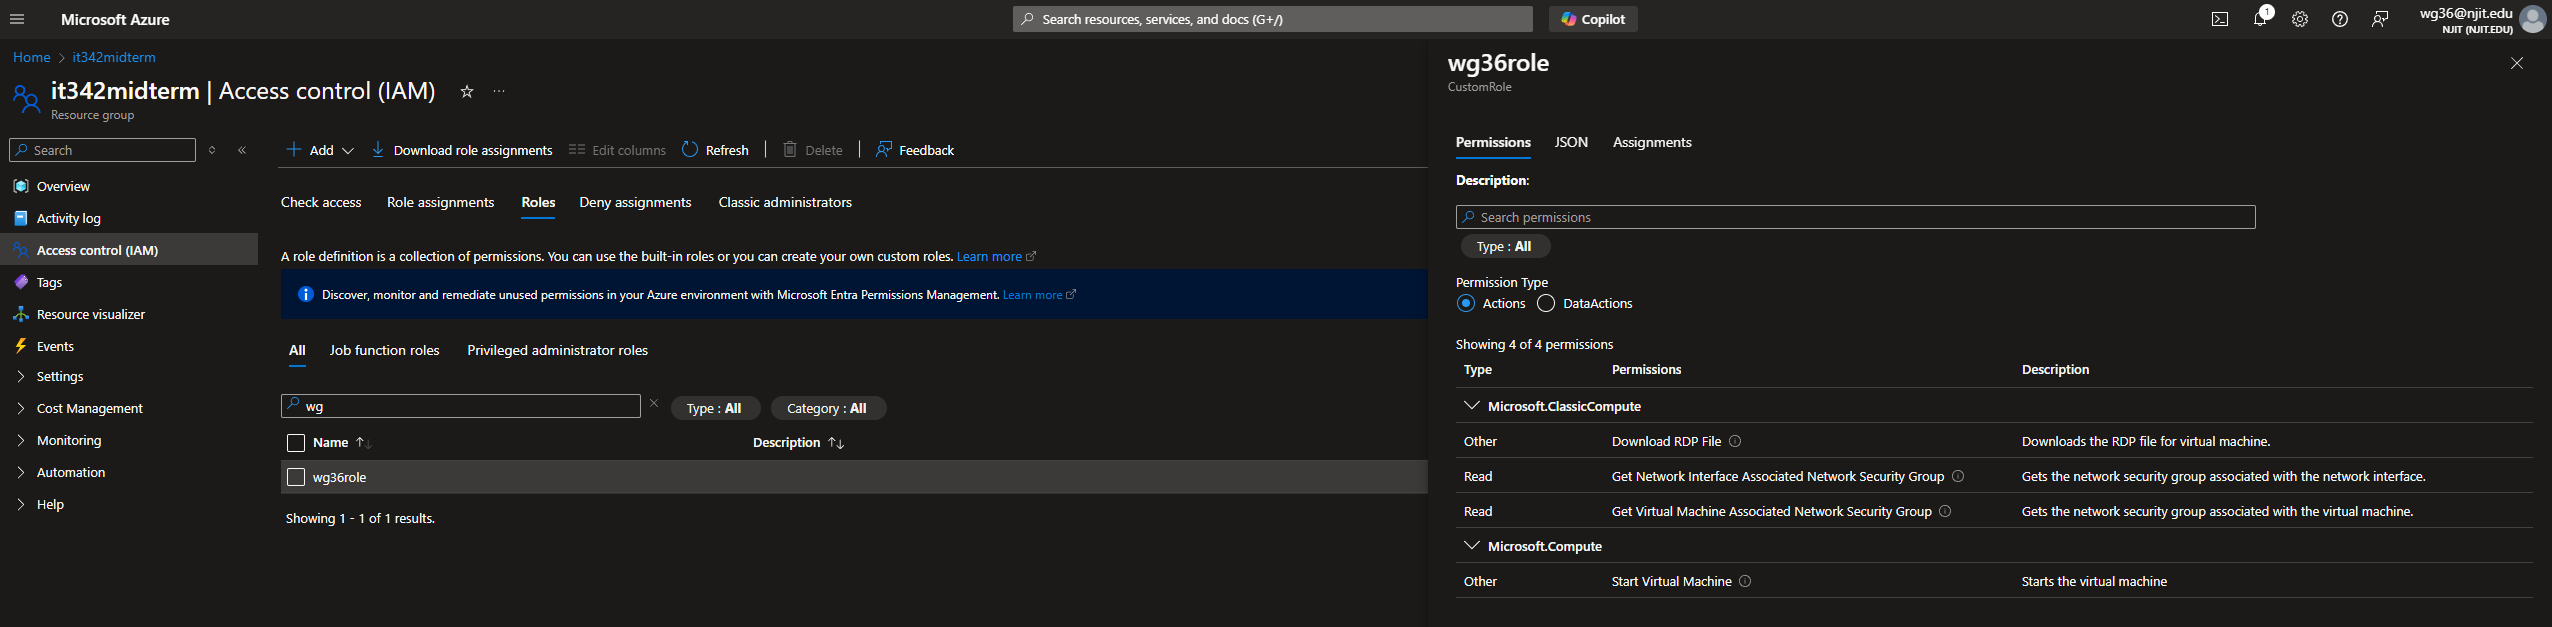
Head to the resource group > Access Control (IAM)
Under create a Custom role, click Add
Add the permissions according to the instructions
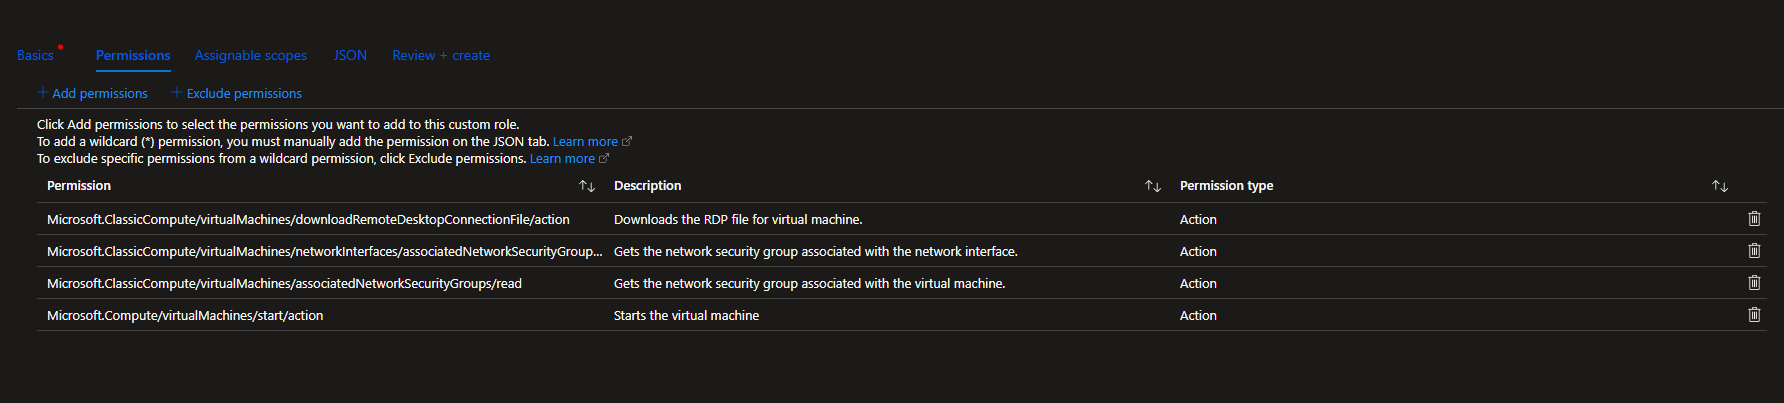
Deliverable 7/17: Role Overview
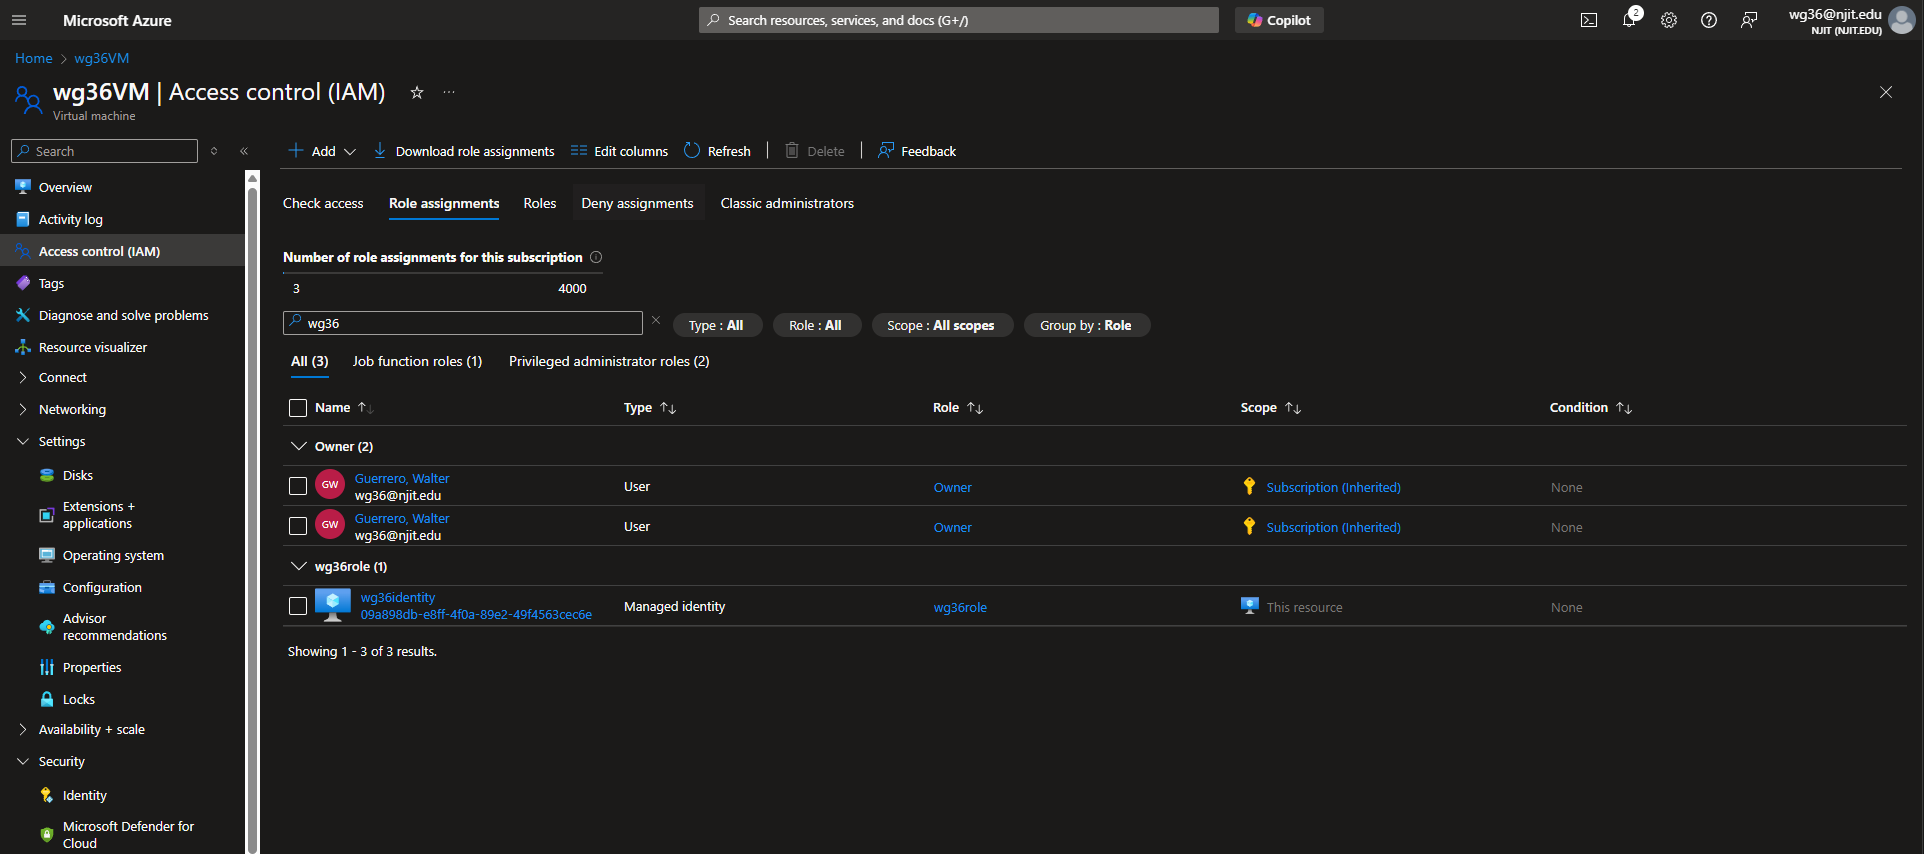
6. IAM
Head to the IAM tab for the VM we created earlier
Click on the roles tab and search for the role we created before
Make sure it is checked

Head to the Role assignments tab and click Add
Under Members, make sure Assign access to is set to Managed Identity
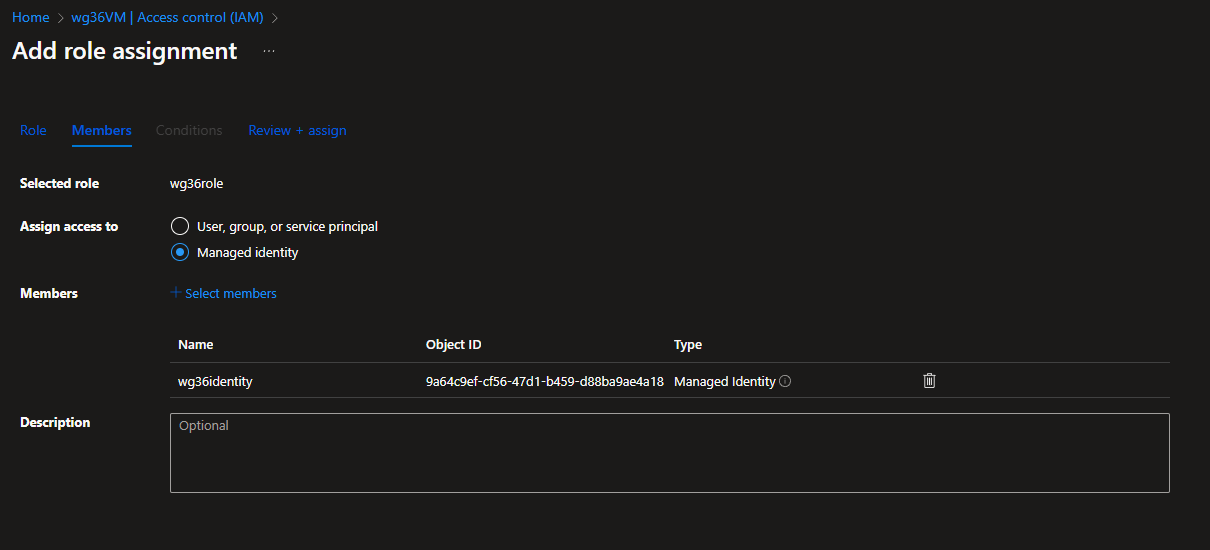
For Members, select the identity we created previously
Then head to Review + assign
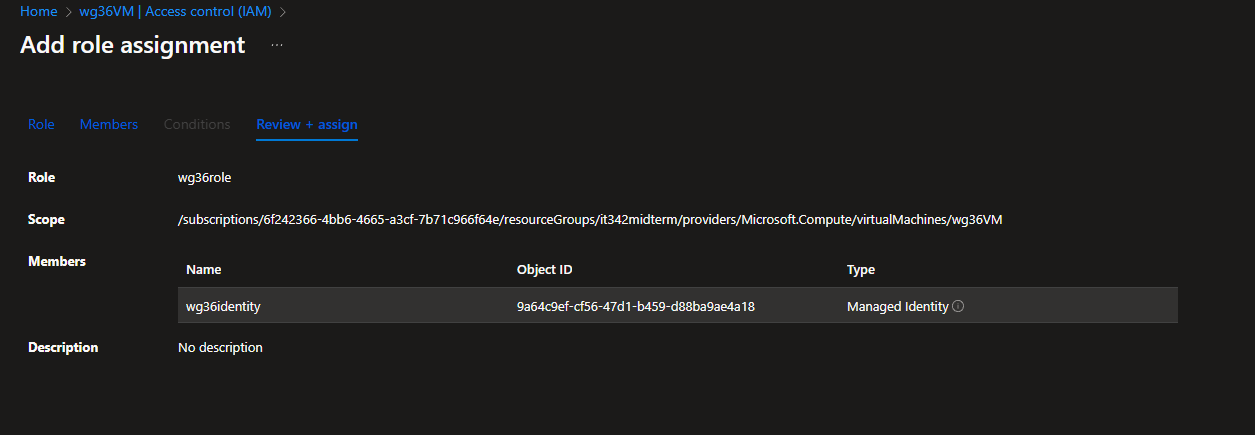
Deliverable 8/17: IAM Overview tab for VM
7. RDP
I went back to the NSG page and changed the RDP rule to only accept incoming RDP traffic from the public IP address of my host machine.
Deliverable 9/17: RDP session with name visible
8. Backend VM Deployment
Head to Compute Infrastructure and add a new virtual machine
Basic settings:
Resource group: it342midterm
VM name: wg36dbvm
Availability zone: Zone 2
Image: Windows Server 2019 Datacenter
Make sure to set an admin username and password and public inbound ports is set to none
Networking
VNet: wg36vnet
Subnet: DBSubnet
Public IP: None
9. Secure Communication between VMs (NSG)
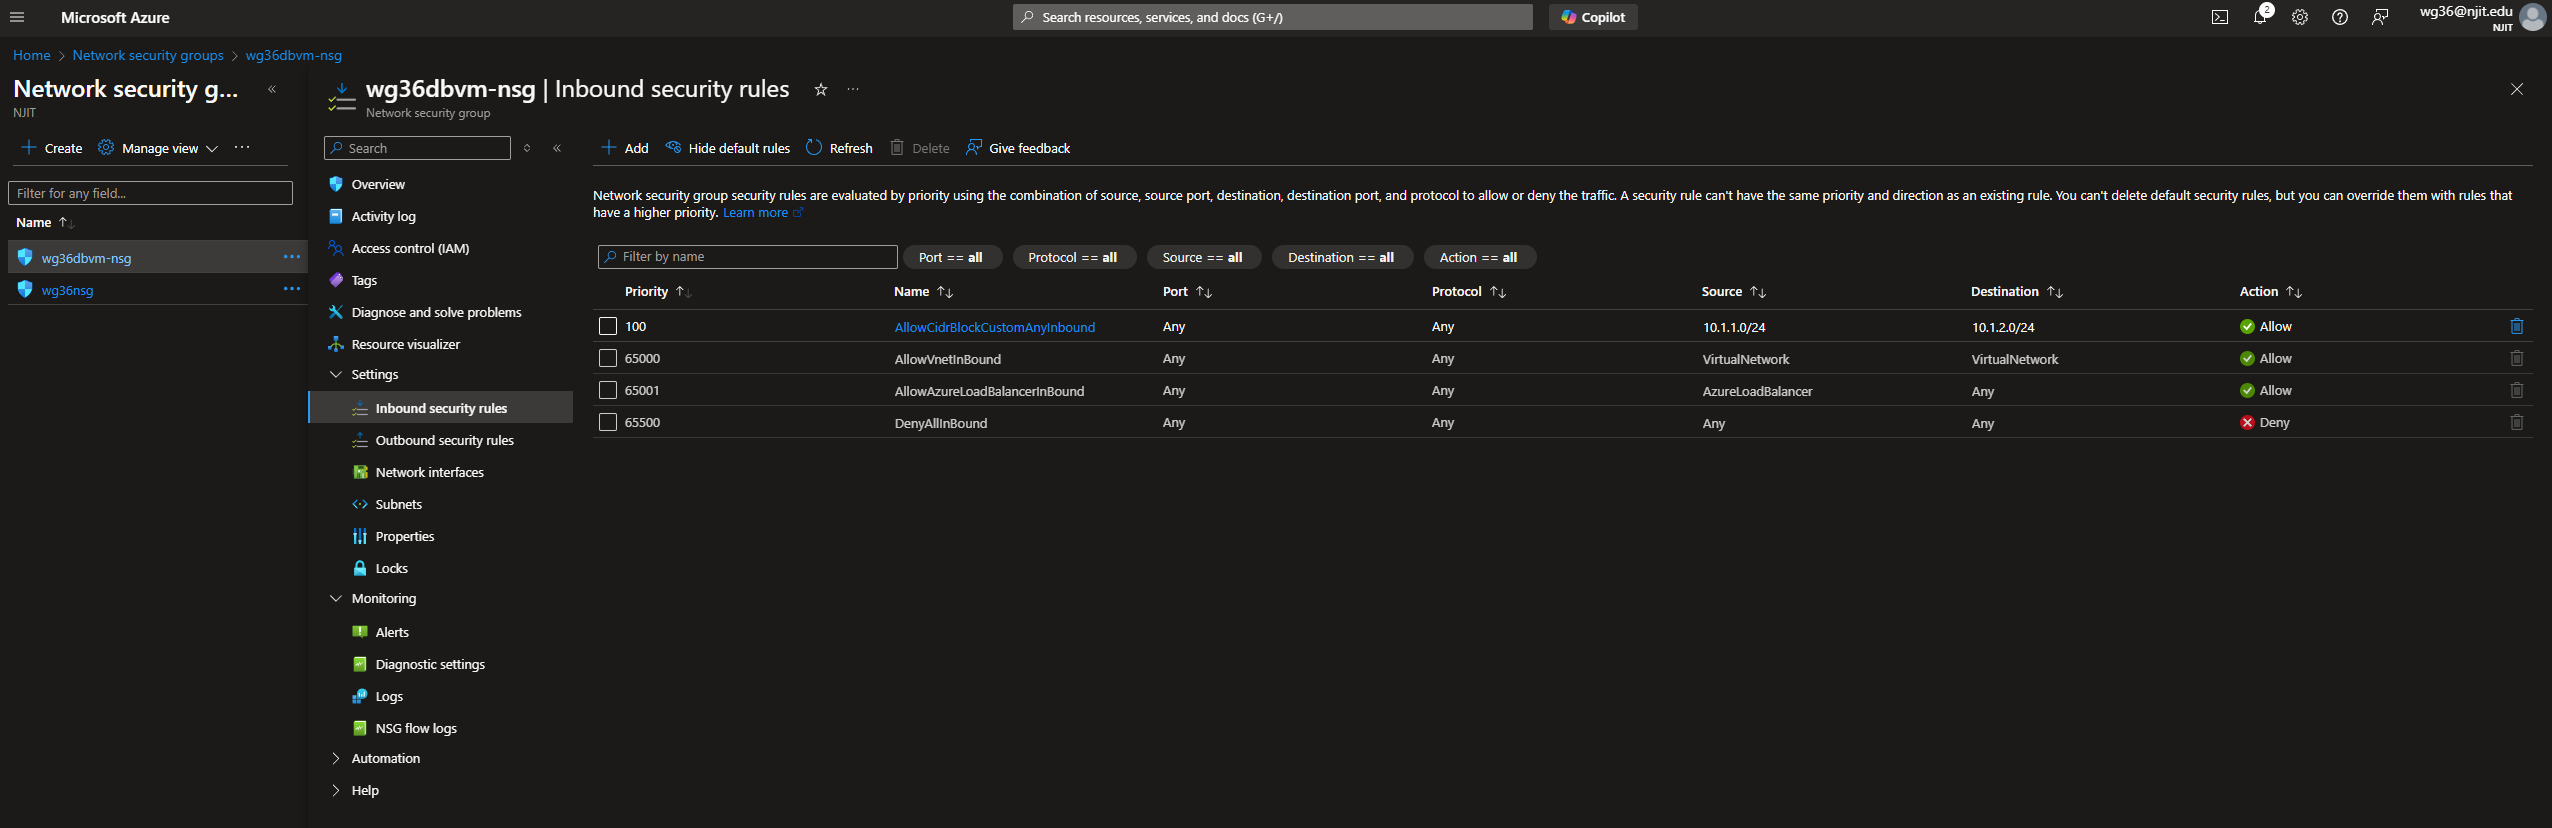
Head to the NSG page for wg36nsg and a new inbound rule
wg36nsg is the nsg for the Webserver VM/ WebSubnet. I created a different NSG for the DB VM, associated it to the DBSubnet, and it named wg36dbvm-nsg.
This is the rule to allow traffic from DBSubnet to WebSubnet

Under wg36dbvm-nsg, add a new inbound security rule
This is the rule to allow traffic from WebSubnet to DBSubnet
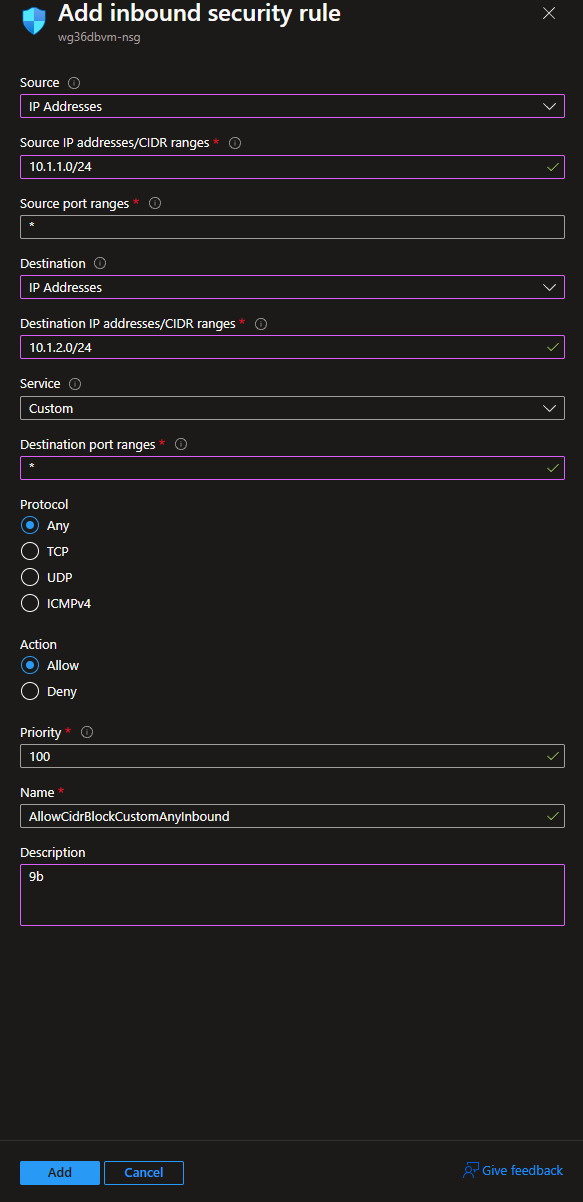
These are the NSG rules for the DB VM
Since we are allowing all traffic, we should be able to RDP into the DB VM from the Webserver VM
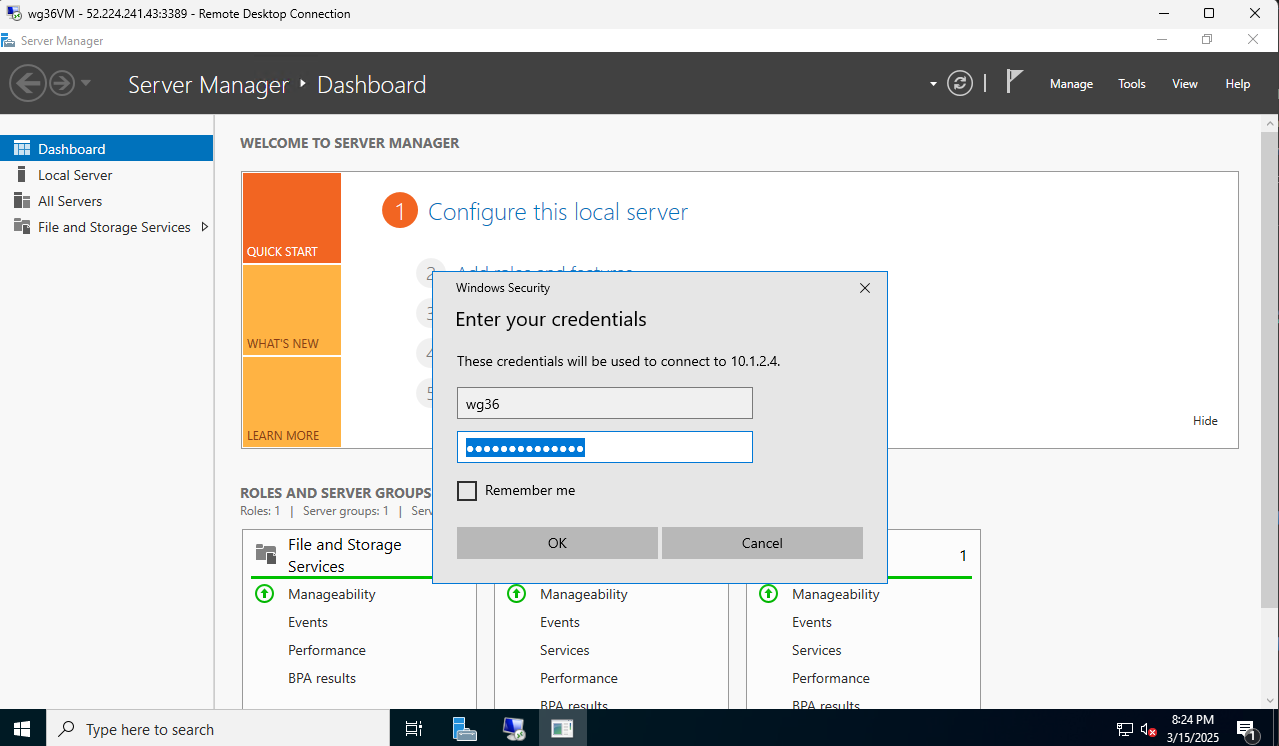
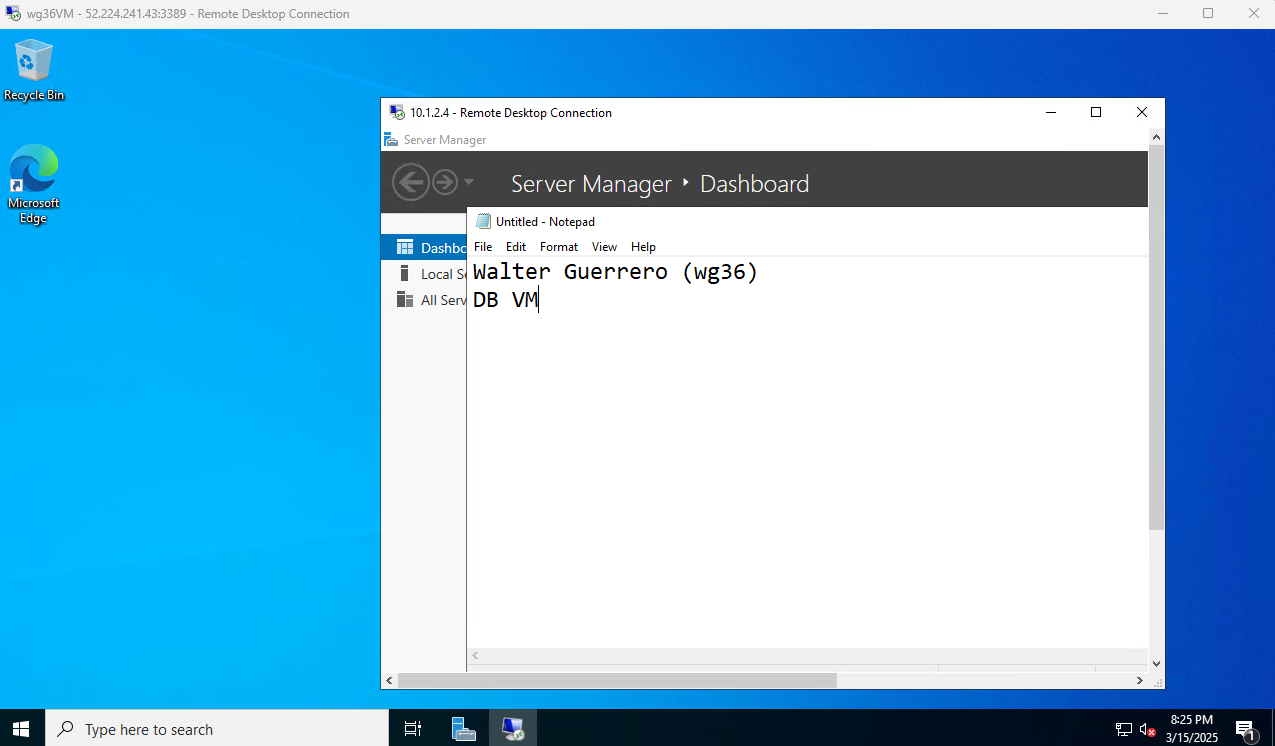
RDP Between VMs Test
This is a nested RDP. I am RDP’d to the webserver VM from my host machine. I then RDP’d into the DB VM from the webserver RDP session.
I would not be able to RDP directly into the DB VM/ DBSubnet from my host machine because of the NSG rules.
Deliverable 10/17: Screenshot of DB VM session with name visible
10. Web App Deployment
Head to App Services
Click Create Web App
I only changed the basic settings
Resource group: it342midterm
Runtime stack: Python 3.13
Region: East US
Then click Review + create

Open a cloud shell session
I am using the Python flask sample app to demonstrate a proof of concept.
Run the following commands:
git clone https://github.com/Azure-Samples/msdocs-python-flask-webapp-quickstartcd msdocs-python-flask-webapp-quickstartpython3 -m venv .venv
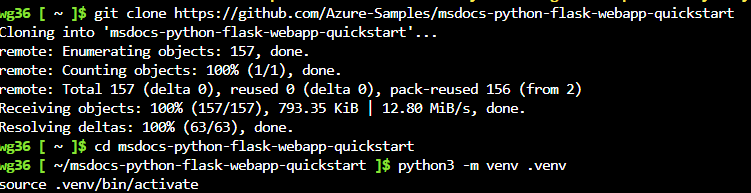
Finally, run az webapp up --name wg36webapp --runtime "PYTHON:3.13" --resource-group it342midterm --location eastus
You can run
az group list --output tableto list out the resource groups and regions

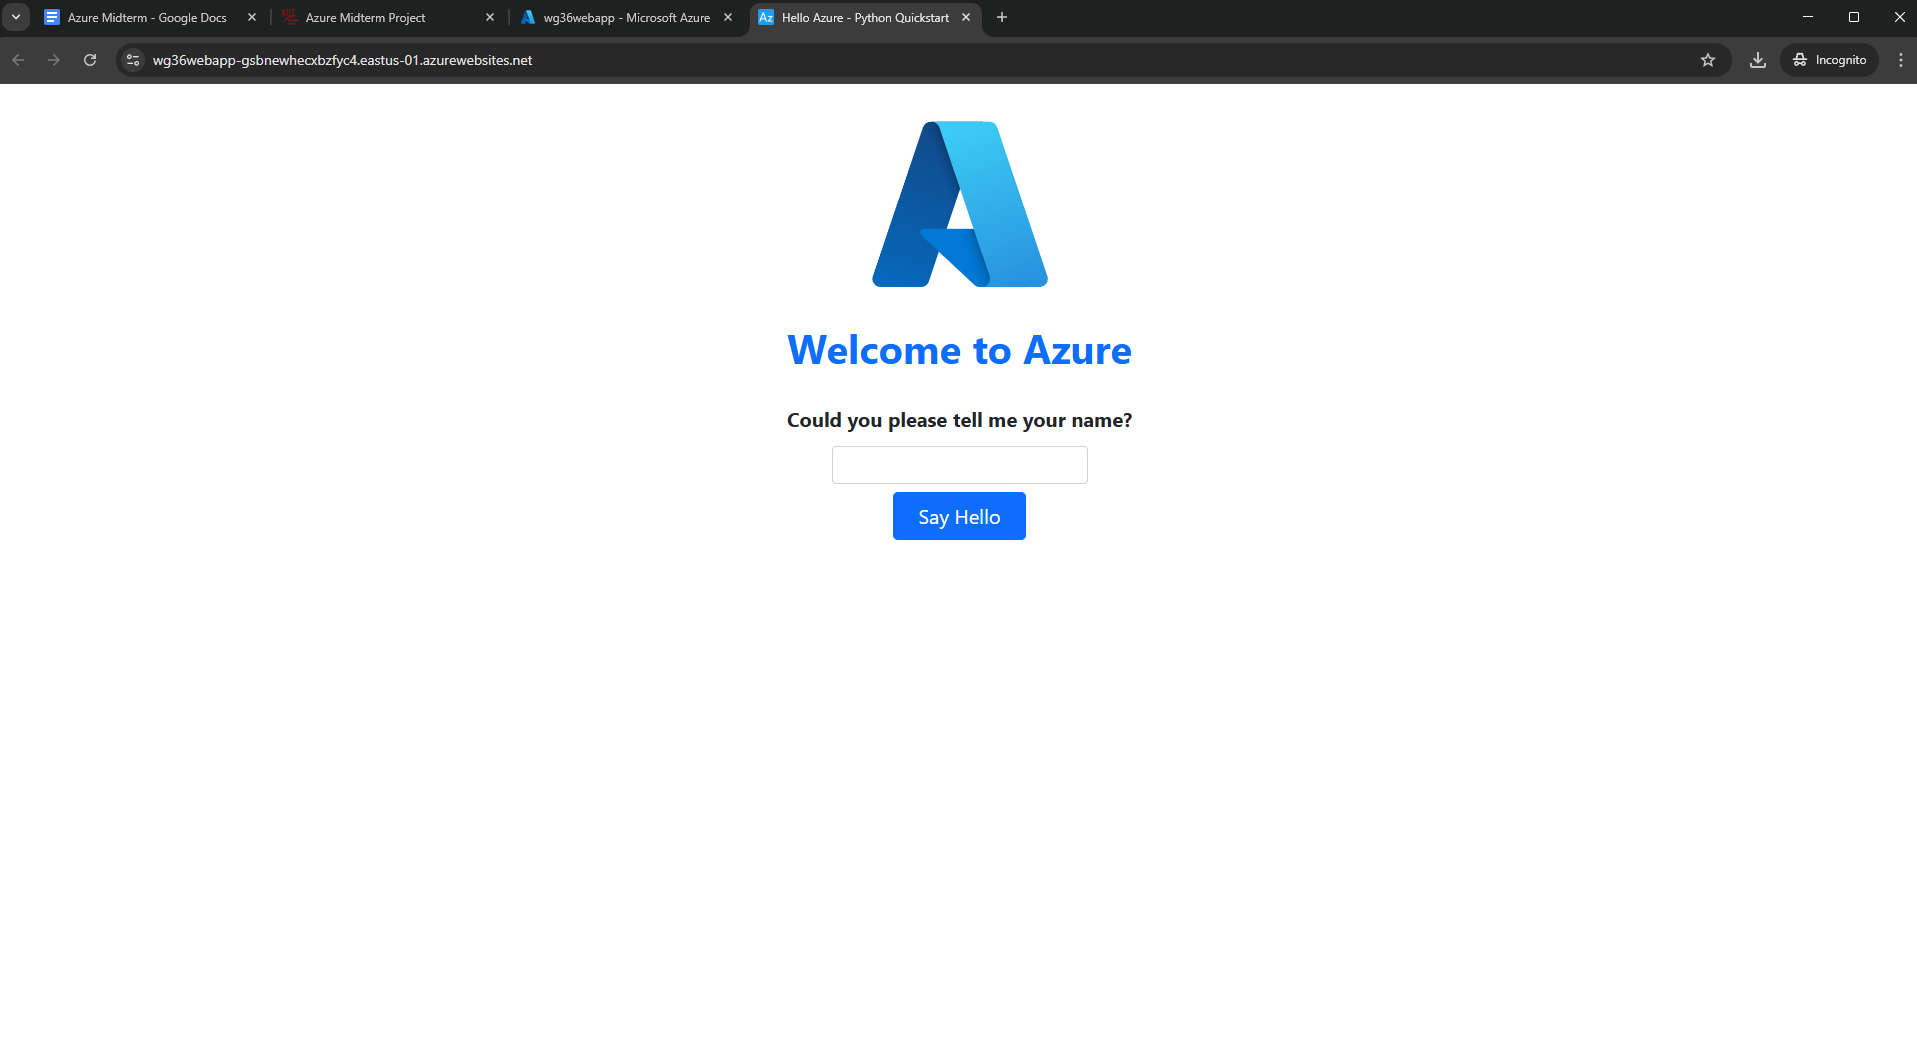
This is the landing page of the Python Flask sample app.
Deliverable 11/17: Screenshoi of landing page
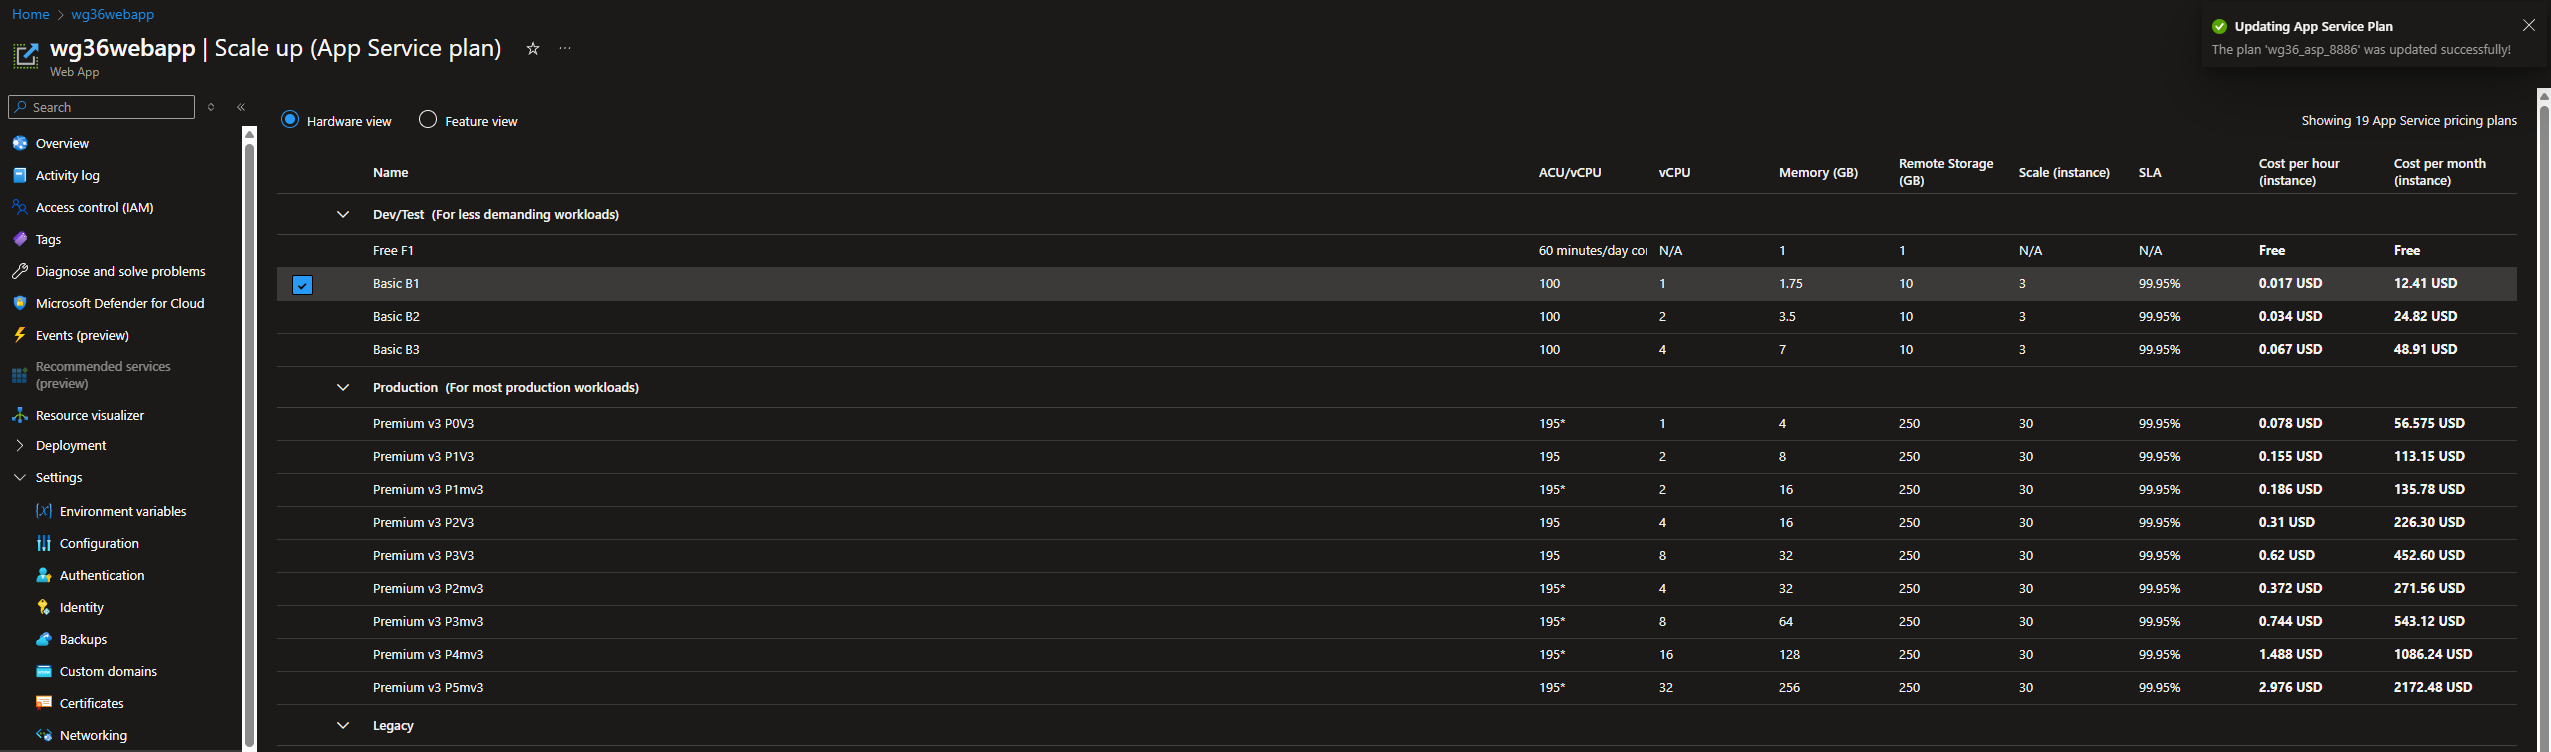
11. Web App Security
To set up the private endpoints, we need to scale up the App service plan.
The free does not allow private endpoints, however the Basic options do.
Under Settings > Networking, click on private endpoints
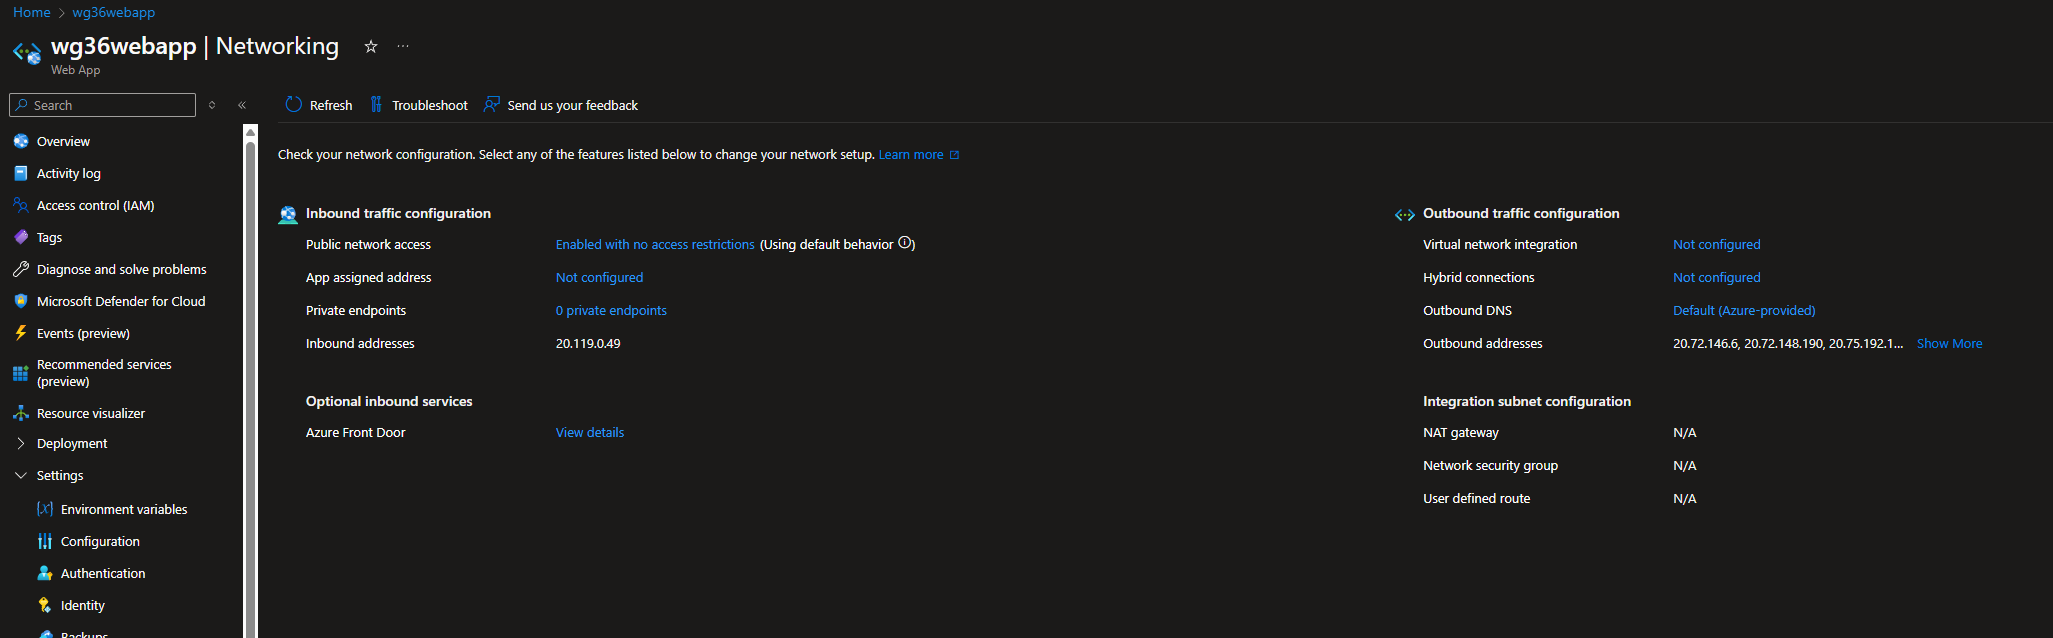
Add endpoint
Name: wg36wae
VNet: wg36vnet
Subnet: DBSubnet
Integrate with private DNS zone: Yes

Deliverable 12/17: Private Endpoint Connections overview
12. Private DNS Zone
Head to Private DNS Zones and click create new
Settings
Resource group: it342midterm
Name: wg36webapp.local
Review + Create
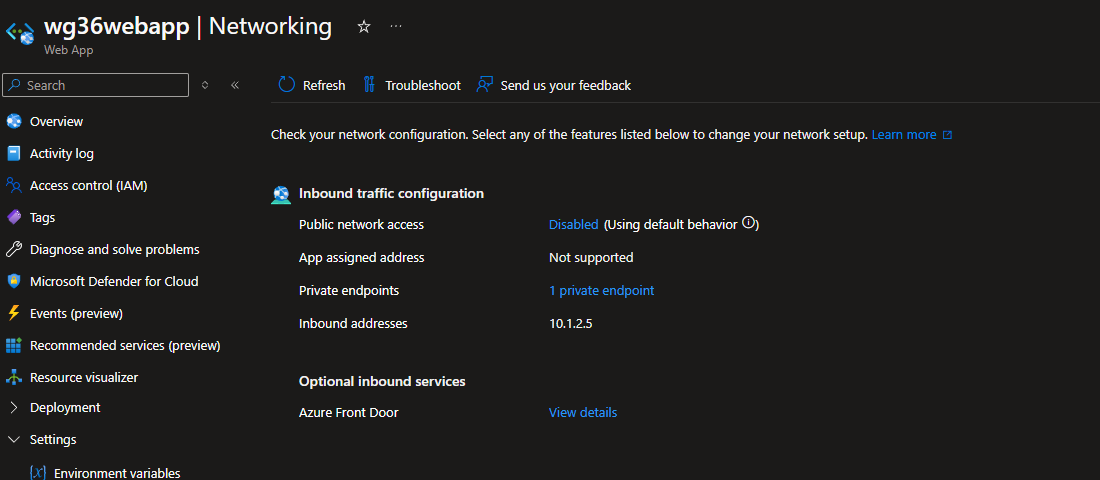
Head to the Networking tab of the web app
Take note of the inbound address (10.1.2.5 in this case)
Head back to the Private DNS Zone we just created
Add a record set
For the IP address, use the inbound address of the webapp (10.1.2.5)
Click Add Virtual Network Link
Set the VNet to wg36vnet
Leave auto registration enabled
Deliverable 13/17: Private DNS zone overview
13. Security Test
When I try to visit the webapp using the public URL/default domain from my host machine, I am denied access
However, I can visit the webapp from the VM (RDP session)
Deliverable 14/17: Web app accessible via public URL from internal network
When running nslookup, the system resolves wg36webapp.local to the IP address 10.1.2.5 (the webapp’s inbound IP address)
Deliverable 15/17: nslookup output
Still unable to access the webapp externally

Missed Deliverable 16/17: RDP session from a different network (not the same network as the host machine)
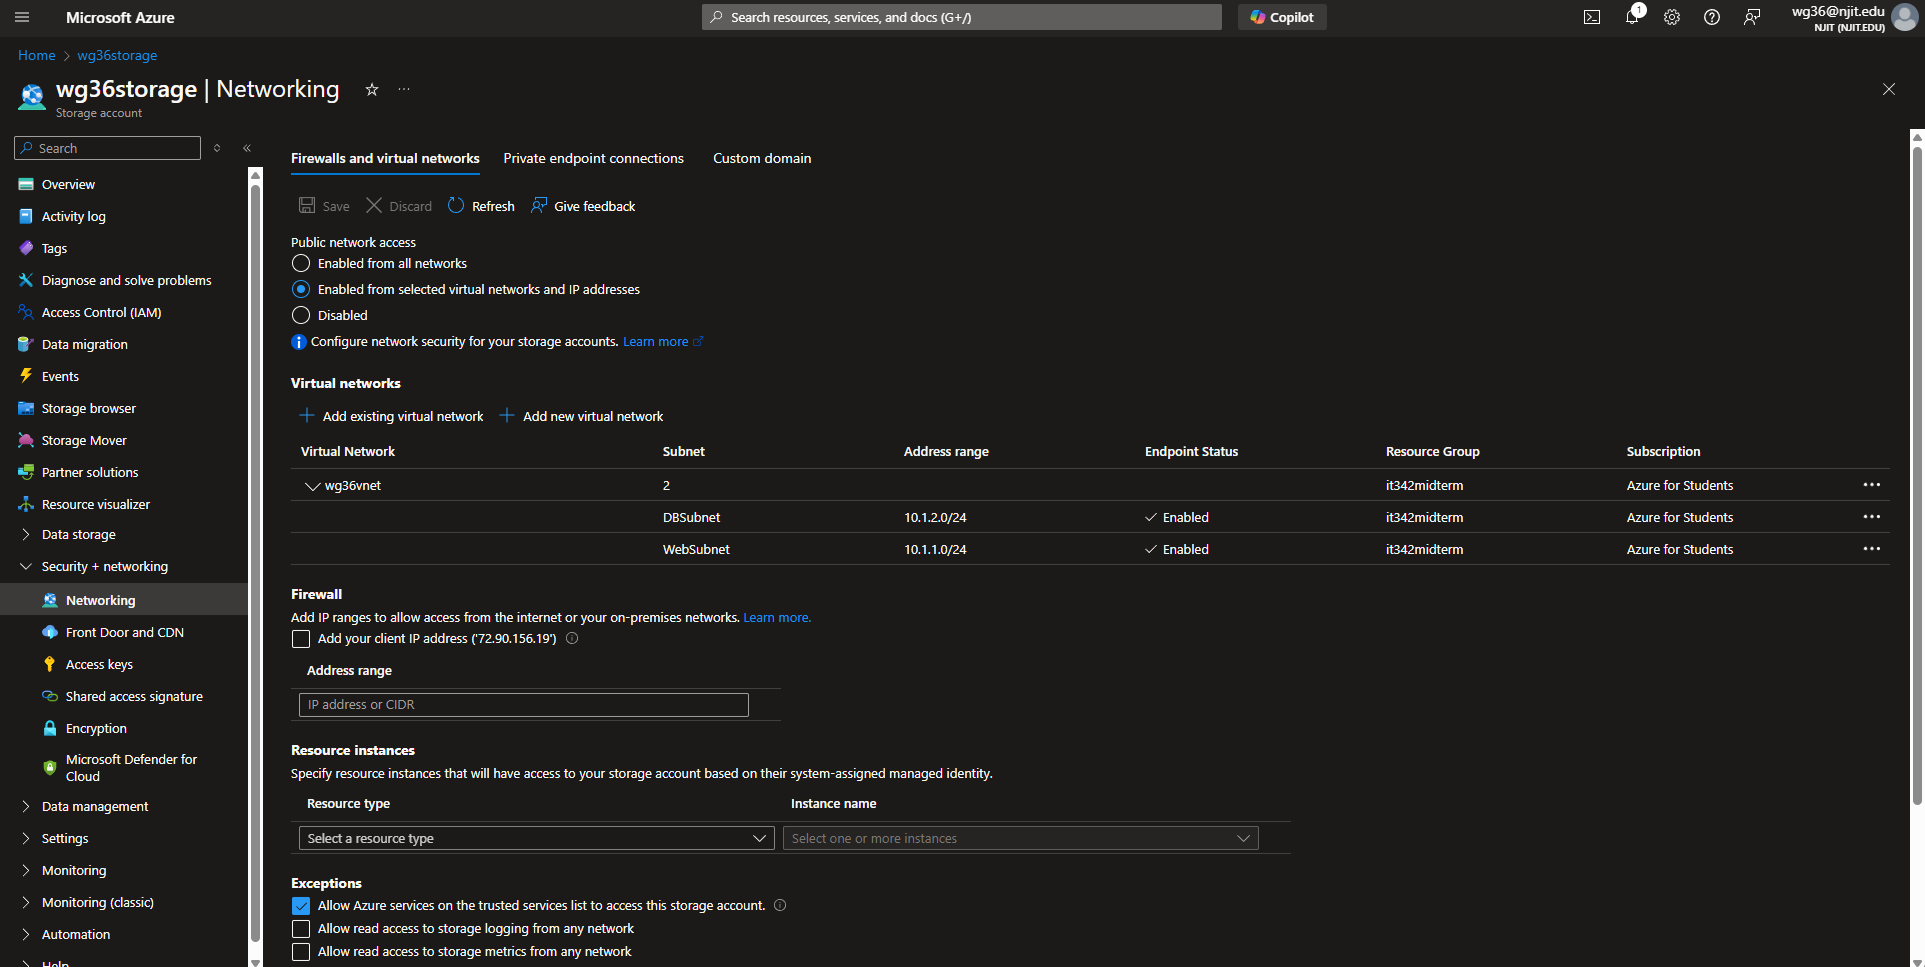
14. CIS Benchmark
I implemented the following benchmark:
4. Storage Accounts
- 4.6 - Ensure that ‘Public Network Access’ is ‘Disabled’ for storage accounts
Head to the storage account page > Security + networking > Networking
The storage account I created earlier had public network access set to ‘Enabled from all networks’ by default. I changed it to ‘Enabled from selected virtual networks and IP addresses,’ added wg36vnet for the virtual networks, and both WebSubnet and DBSubnet. Storage account access should be restricted and not accessible over every public IP address from the Internet.
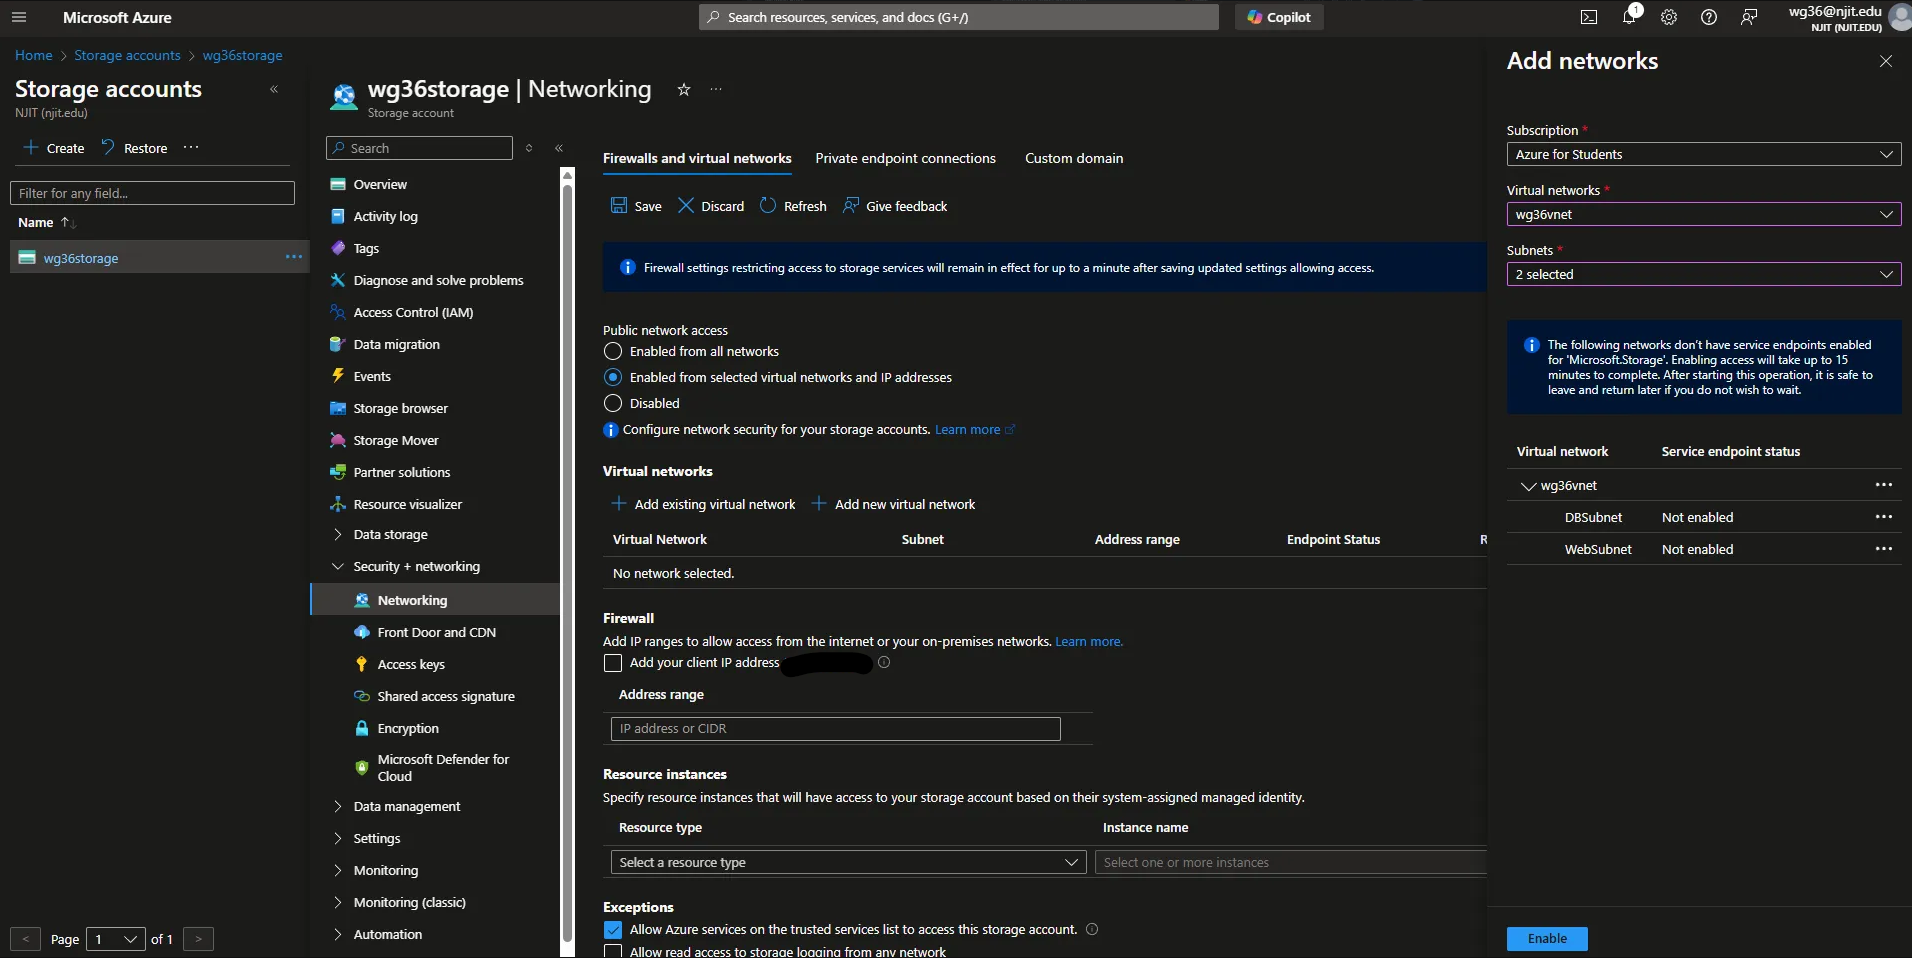
Make sure to click save
Deliverable 17/17: CIS Benchmark implementation and explanation