GCP Project
Setting up a secure, microservice-driven cloud application in Google Cloud Platform.
This project simulates creating a secure cloud application that uses a microservice architecture.
We used buckets, virtual private clouds (VPC), compute engine (VM deployment), configured firewall rules, configured an autoscaling policy, created health checks, and configured BigQuery.

I recommend viewing the Instructions and Walkthrough/ Deliverables together, side-by-side.
Deliverables complete: 22/22
Final Grade: 10/10
The deliverables are screenshots of certain pages to make sure that we completed a task correctly.
Instructions
1
2
3
4
5
6
7
8
9
10
11
12
13
14
15
16
17
18
19
20
21
22
23
24
25
26
27
28
29
30
31
32
33
34
35
36
37
38
39
40
41
42
43
44
45
46
47
48
49
50
51
52
53
54
55
56
57
58
59
60
61
62
63
64
65
66
67
68
69
70
71
72
73
74
75
76
77
78
79
80
81
82
83
84
85
86
87
88
89
90
91
92
93
94
95
96
97
98
99
100
101
102
103
104
105
106
107
108
109
110
111
112
113
114
115
116
117
118
119
120
121
122
123
124
125
126
127
128
129
130
131
132
133
134
135
136
137
138
139
140
141
142
143
144
145
146
147
148
149
150
151
152
153
154
155
156
157
158
159
160
161
162
163
164
165
166
167
168
169
170
171
172
173
174
175
176
177
178
179
180
181
182
183
184
185
186
187
188
189
190
191
192
193
194
195
196
197
198
199
200
201
202
203
204
205
206
207
208
209
210
211
212
213
214
215
For our final project, we are going to launch an application in Google Cloud called Fancy Store.
We will be using their microservice product but will make the modifications to run it on our
VPC properly. We will also configure logging in BigQuery. Ensure you have the Google Cloud
Education Credits to make sure this runs properly. Alternatively, you can use the free tier, but be
very cautious as to not generate a bill on your credit card.
Some of the instructions are purposefully vague. Use Google’s documentation.
1. The first thing we are going to do is create a project to run our web app. Create a new
project and be sure to use the Billing Account for Education.
a. Name the project it342final[YOURUCID]
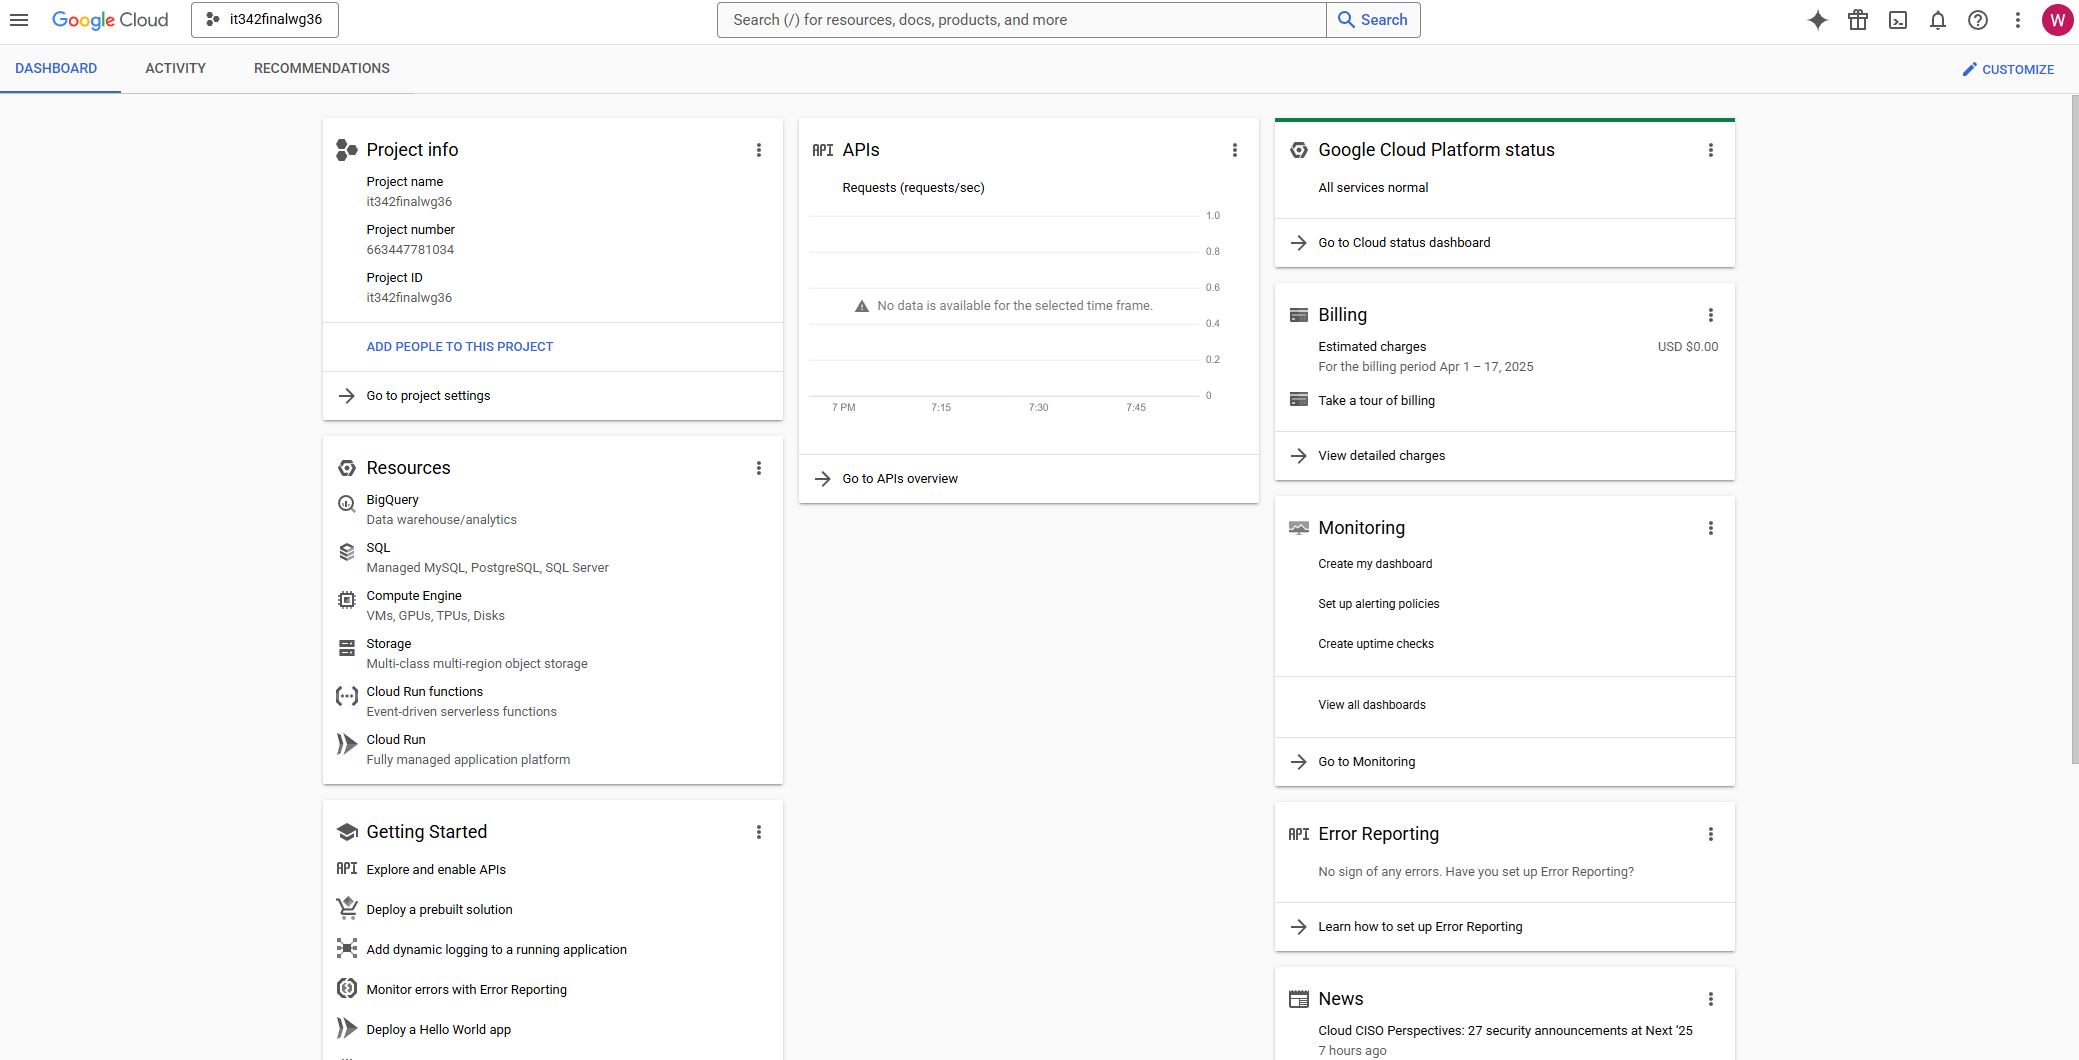
b. Screenshot the dashboard page with the project details INCLUDING
the project info
2. Create a bucket called fancy-store-[PROJECTNAME]
a. Screenshot the bucket details page with the bucket created
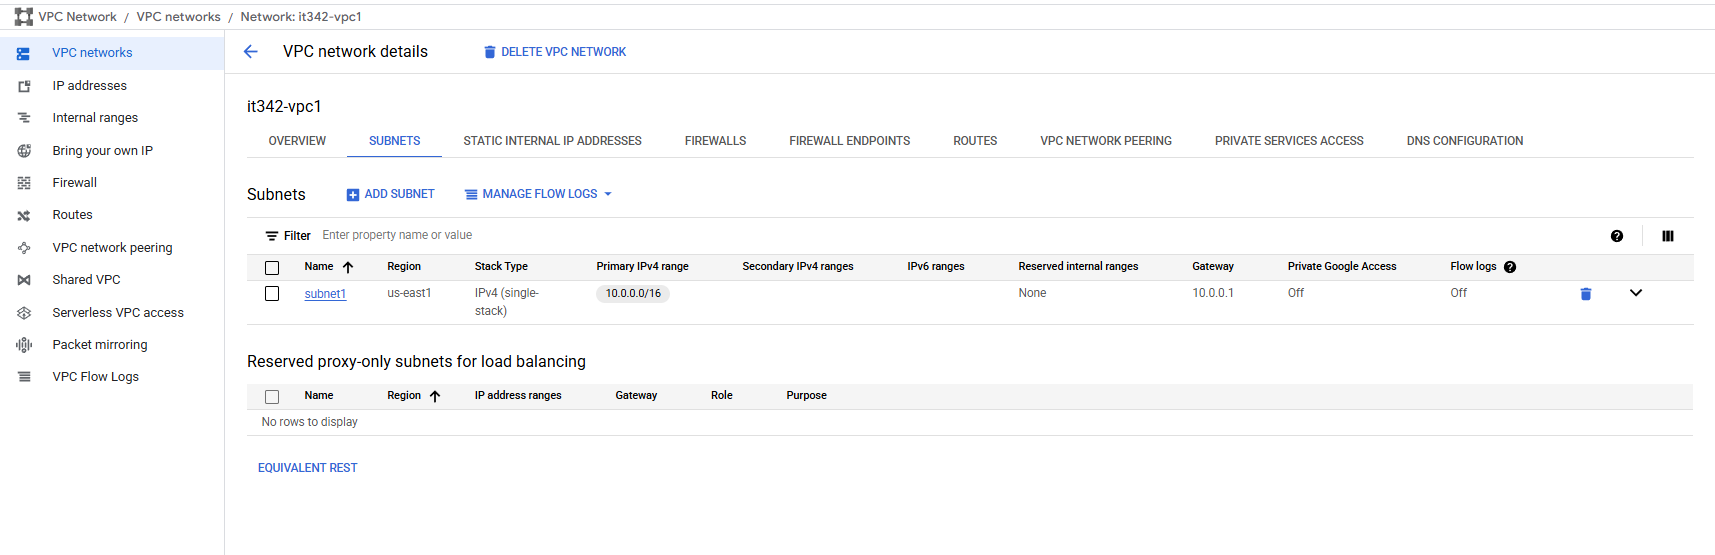
3. Create a subnet with the IP range 10.0.0.0/16
a. Screenshot the VPC Network details page, subnets tab with the newly
created subnet
4. We are going to launch a pre-built app, type the following code in your Cloud Shell
a. git clone https://github.com/googlecodelabs/monolith-to-microservices.git
b. Run the setup script after cloning the repo
c. You can test by running npm start in the microservices directory and using the
web preview feature
d. Screenshot both the terminal after running the npm start command and the
web preview of the page
5. Next we are going to deploy two VMs, one to host the frontend web page and the other to
host backend microservices, but first we need to create a startup script
a. Create a startup-script.sh in the monolith-to-microservices folder (see canvas for
the script) be sure to change project ID to YOUR project ID
i Screenshot the startup-script.sh file inside of the folder in your cloudshell
terminal
b. The startup script performs the following tasks:
● Installs the Logging agent. The agent automatically collects logs from
syslog.
● Installs Node.js and Supervisor. Supervisor runs the app as a daemon.
● Clones the app's source code from Cloud Storage Bucket and installs
dependencies.
● Configures Supervisor to run the app. Supervisor makes sure the app is
restarted if it exits unexpectedly or is stopped by an admin or process. It
also sends the app's stdout and stderr to syslog for the Logging agent to
collect.
6. Copy this startup-script.sh to your bucket in its root directory
a. Screenshot the file located in the bucket
7. Copy all the content from the directory monolith-to-microservices to its own directory in
your bucket called monolith-to-microservices
a. Screenshot the bucket with this folder newly added into the bucket, expand
the folder so that the subfolders are visible
8. Create two Linux VMs e2-medium with the names and tags frontend and backend ensure
then use the startup-script.sh from your bucket as an initialization script, ensure you have
Ops Agent or Logging agent
a. Put them in your subnet you create
b. Make note of their external Ips
c. Screenshot the VM Instances page with the 2 VM’s created
9. Create firewall rules to deny all ingress except for the following (I suggest using target
tags for dynamic IP shenanigans)
a. tcp 8080 traffic to the frontend
b. tcp 8081 and 8082 traffic to the backend
c. tcp ssh traffic only internally
d. Screenshot the firewall rules page showing the new rules created above
10. Modify your .env file in your monolith-to-microservices/react-app to point to your
backend address instead of localhost
a. Screenshot the modifications you made to the .env file
11. Wait a minute or two and try to go to the frontend website via your browser
http://[FRONTEND_ADDRESS]:8080
a. You will see the orders and products are accessible and loaded from the backend
b. Screenshot the webpages showing the products and orders pages
12. Create an autoscaling police for your instances that add instances when utilization is over
70% and removes when under 70%
a. This can be achieved with a Managed Instance Group
b. Run the following commands in the cloudshell AND screenshot the outputs for
ALL of them (3 total)
i gcloud compute instance-templates list
ii gcloud compute instance-groups managed describe [name of MIG] --
zone=[zone for your project]
a You should run the above for both front and back end MIG’s
13. Create health checks that repairs the instances if their services are not in Running state
(microservices run on 8080 for front end and 8081 for backend)
a. You might need firewall rules to allow the probes to verify
i Run the command gcloud compute health-checks list AND screenshot the
output from it
14. Create a new service account to attach to the VMs with the roles Monitoring Metric
Writer and Logs Writer
a. Be sure to update .env IP’s on reboot of instances in your bucket
b. Screenshot under the Instance details for both front and back end instances
the API and Identity management section with the new service account in
place
15. Create a dataset called itfinal[UCID] in BigQuery
a. Set up a sink to forward instance logs with a severity info or higher to the
BigQuery dataset
b. Screenshot the Dataset Info of the new dataset created as well as a screenshot
of the newly created logging sink
16. Using the CIS Benchmarks for Google Cloud, you are to pick one of substance and
implement it into this environment that we have built
a. Screenshot the areas of implementation and screens that correspond to it, as
well as write the benchmark and summary of what it does
Startup Script
startup-script.sh:
1
2
3
4
5
6
7
8
9
10
11
12
13
14
15
16
17
18
19
20
21
22
23
24
25
26
27
28
29
30
31
32
33
34
35
36
37
38
39
40
41
42
#!/bin/bash

if [ "$(id -u)" -ne 0 ]; then
	echo "This script must be run as root!"
	exit 1
fi

curl -sSO https://dl.google.com/cloudagents/add-logging-agent-repo.sh
sudo bash add-logging-agent-repo.sh --also-install
sudo service google-fluentd restart &
sudo apt-get update
sudo apt-get install -yq ca-certificates git build-essential supervisor psmisc

mkdir -p /opt/nodejs
curl https://nodejs.org/dist/v16.14.0/node-v16.14.0-linux-x64.tar.gz | sudo tar -xvzf - -C /opt/nodejs --strip-components=1

sudo ln -sf /opt/nodejs/bin/node /usr/bin/node
sudo ln -sf /opt/nodejs/bin/npm /usr/bin/npm

mkdir -p /fancy-store
sudo gsutil -m cp -r gs://[BucketName]/monolith-to-microservices/microservices/* /fancy-store/

cd /fancy-store/
sudo npm install

sudo useradd -m -d /home/nodeapp nodeapp
sudo chown -R nodeapp:nodeapp /fancy-store /opt/nodejs
sudo bash -c 'cat > /etc/supervisor/conf.d/node-app.conf << EOF
[program:nodeapp]
directory=/fancy-store
command=npm start
autostart=true
autorestart=true
user=nodeapp
environment=HOME="/home/nodeapp",USER="nodeapp",NODE_ENV="production"
stdout_logfile=syslog
stderr_logfile=syslog
EOF'

sudo supervisorctl reread
sudo supervisorctl update
Walkthrough & Deliverables
1. Creating the GCP Project
In Azure, a group of resources is referred to as a subscription. In GCP, it is called a project.
Head to IAM & Admin > Create a Project
Name the project according to the instructions and make sure the Billing Account for Education is used
Click Create
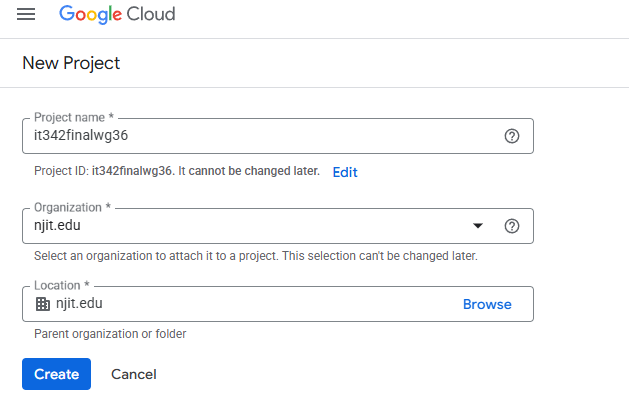
Deliverable 1/22: Dashboard page with project details
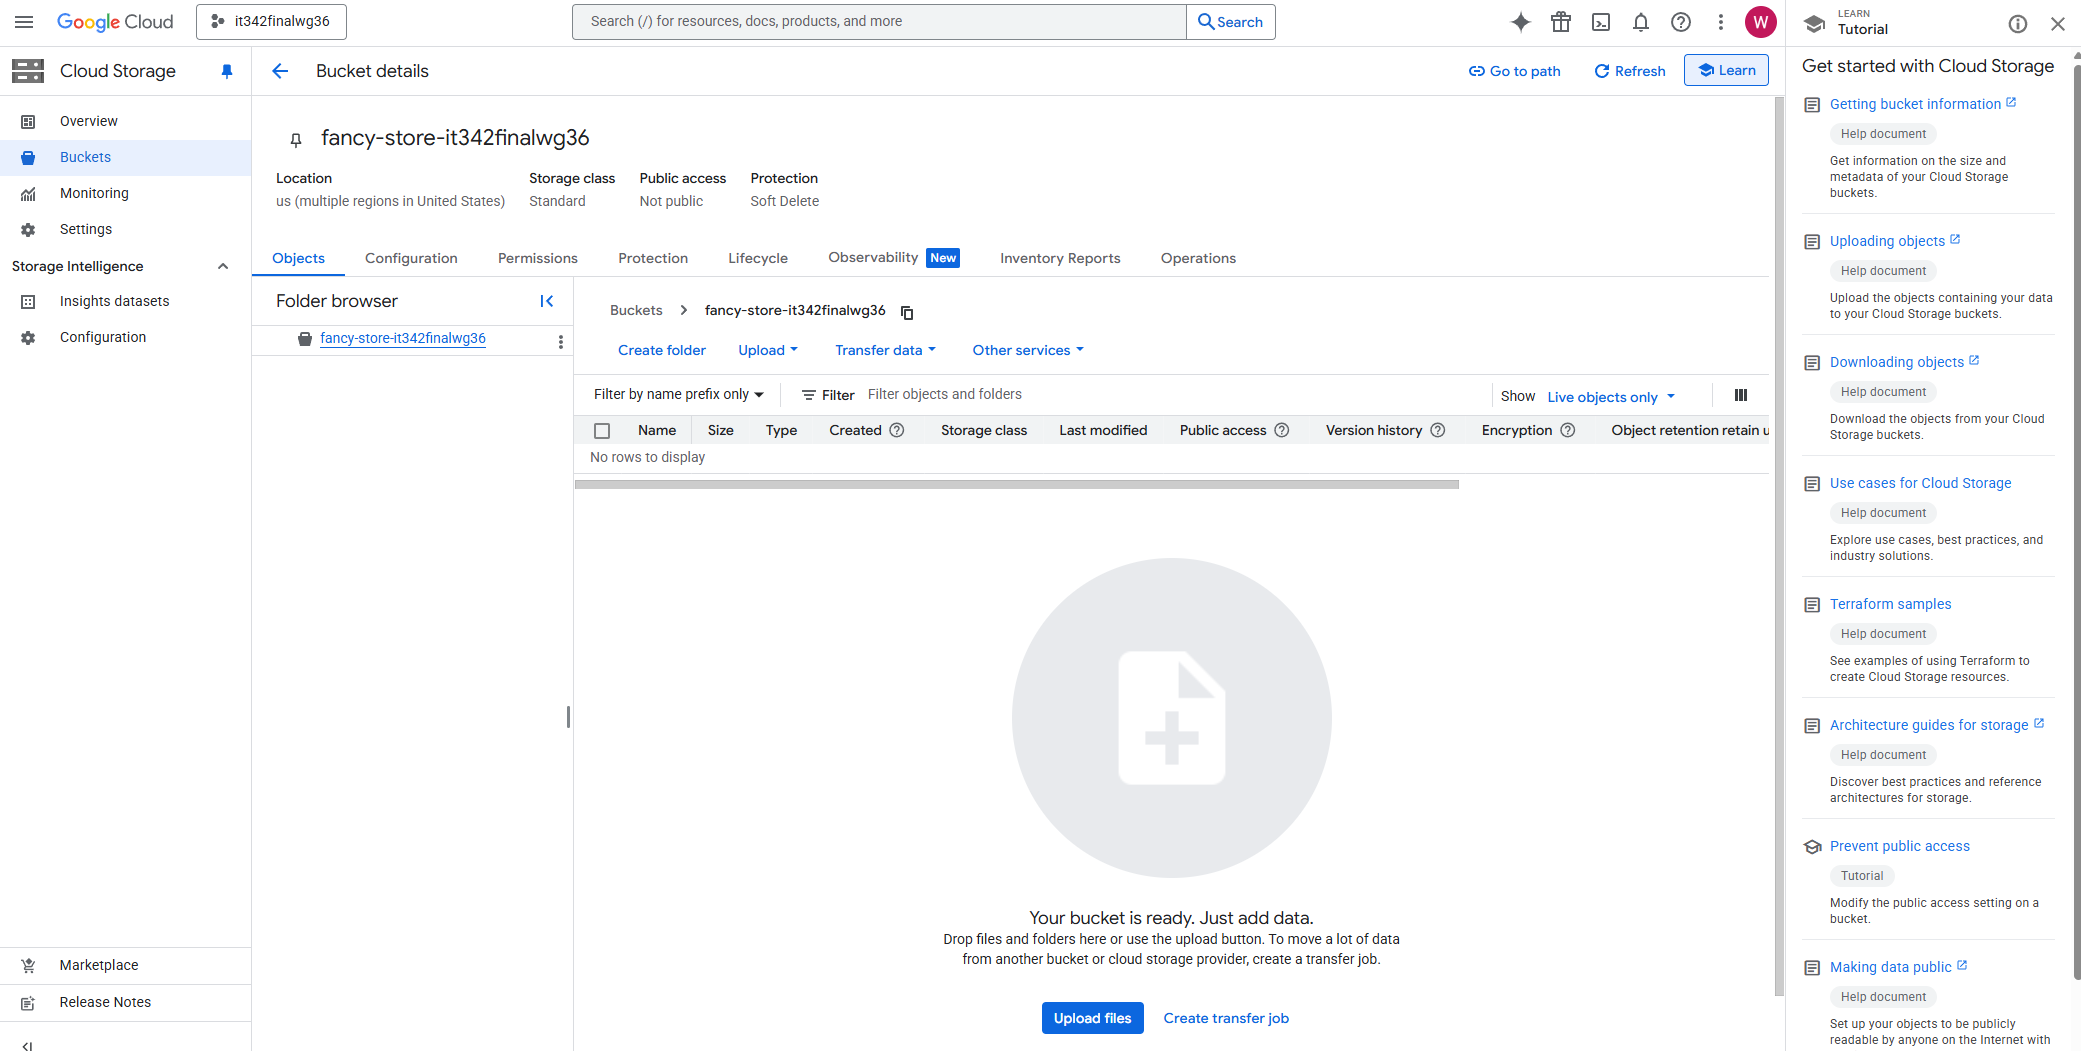
2. GCP Bucket
Head to the Cloud Storage console/dashboard
Make sure you are using the correct project (displayed on the top left). In this case, the name of my project is it342finalwg36.
Name the bucket according to the instructions
Create
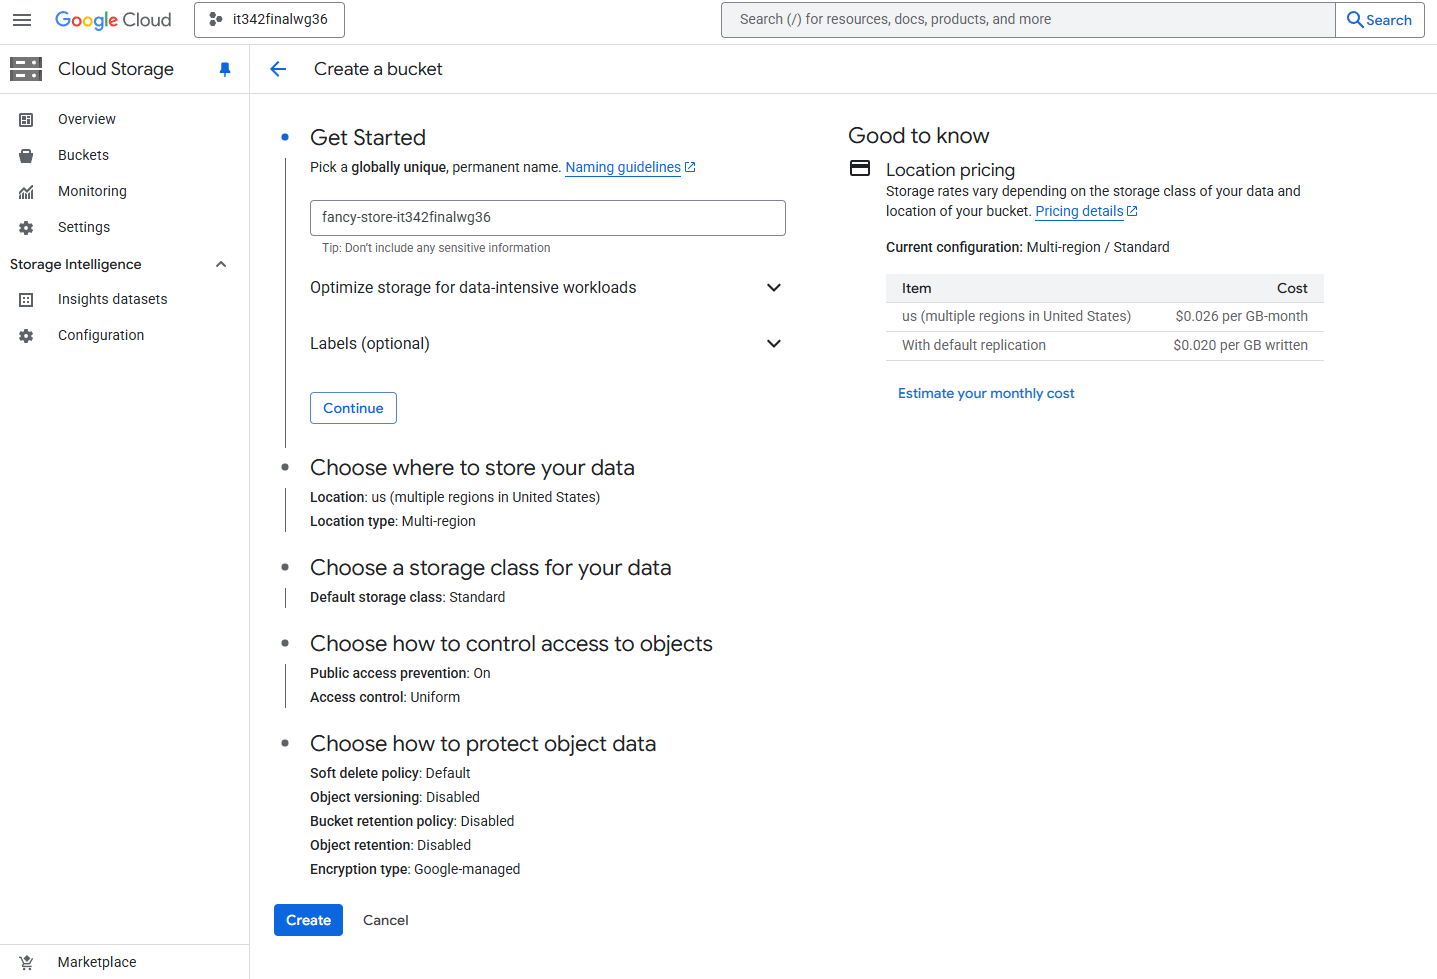
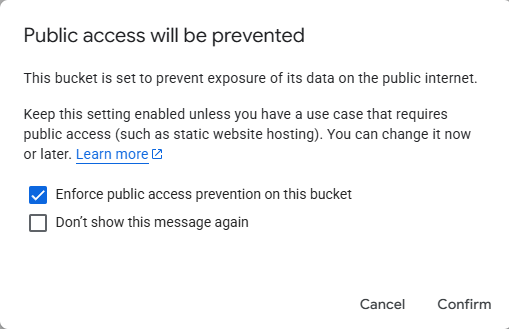
Leave Enforce public access prevention on this bucket enabled
Confirm
Deliverable 2/22: Bucket details page with the bucket created
3. Virtual Private Cloud (VPC)
First, we need to enable the Compute Engine API to use the VPC feature.
Just use the search bar to look for the Compute Engine API, and enable it
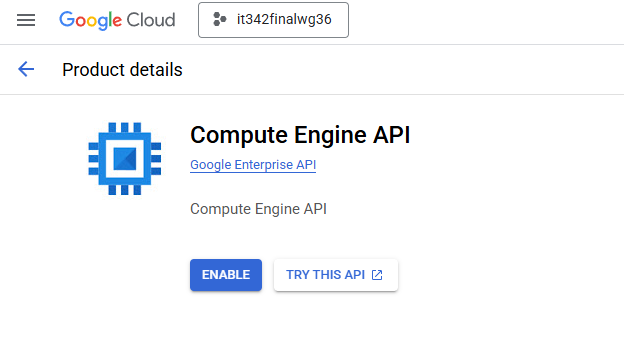
Then, head to the VPC Network console
“Console” is Google’s way to refer to the GUI dashboard. I will try to stick to Google’s terminology throughout this writeup.
Click on VPC networks and create a new VPC
I named my VPC it342-vpc1
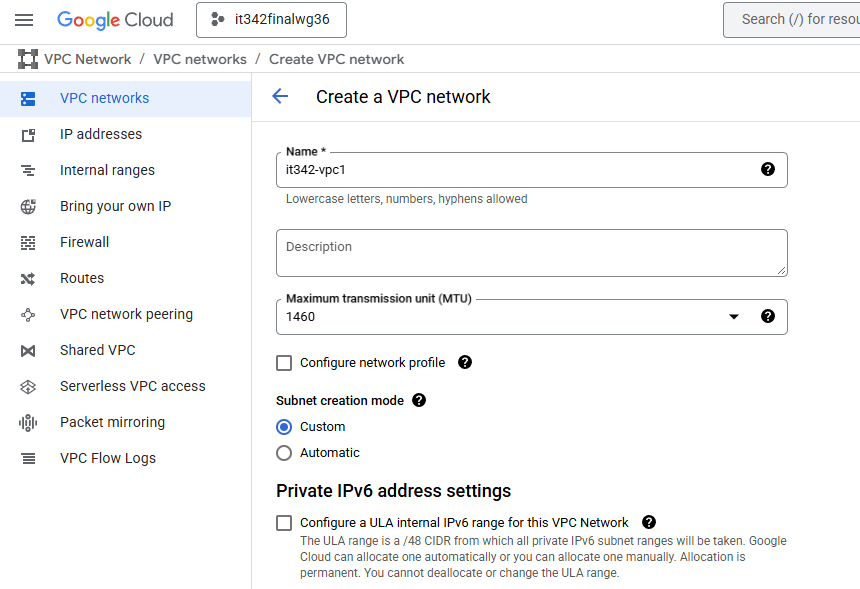
Under subnets, create a new subnet according to the instructions
IPv4 range: 10.0.0.0/16
Make sure the region matches that of the project (us-east1)
These are the subnet settings:
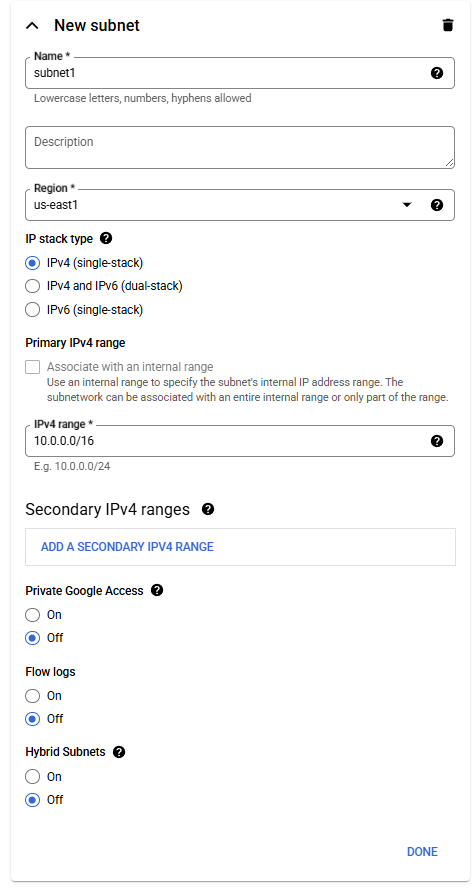
Deliverable 3/22: VPC Network details page, subnets tab with the newly created subnet
4. App Deployment
Open a cloud shell session and then run git clone https://github.com/googlecodelabs/monolith-to-microservices.git
After the repo is done cloning, change your working directory to monolith-to-microservices and run setup.sh
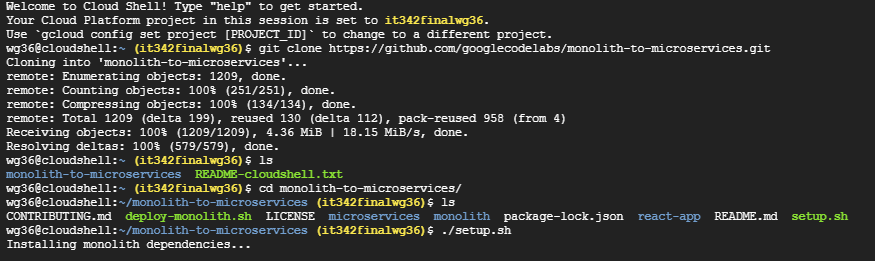
Then, run npm start
Deliverable 4/22: Terminal after running npm start
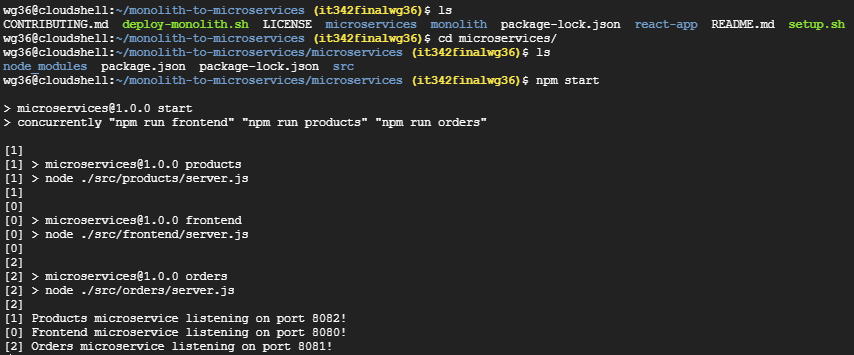
Click web preview on the cloud shell (top right) > Port 8080
Deliverable 5/22: Web preview page
5. VM Deployment (Startup Script)
Create the startup script (startup-script.sh) in the monolith-to-microservices folder
Just create a file called startup-script.sh and paste the contents
The script is provided in the instructions
I used the nano text editor to quickly paste the contents and save the file
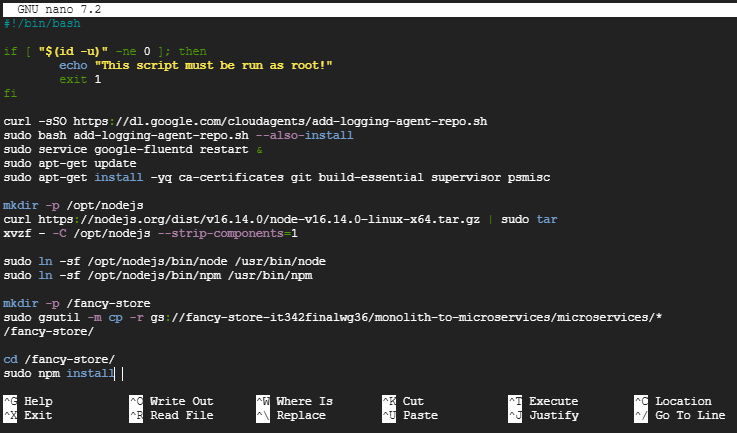
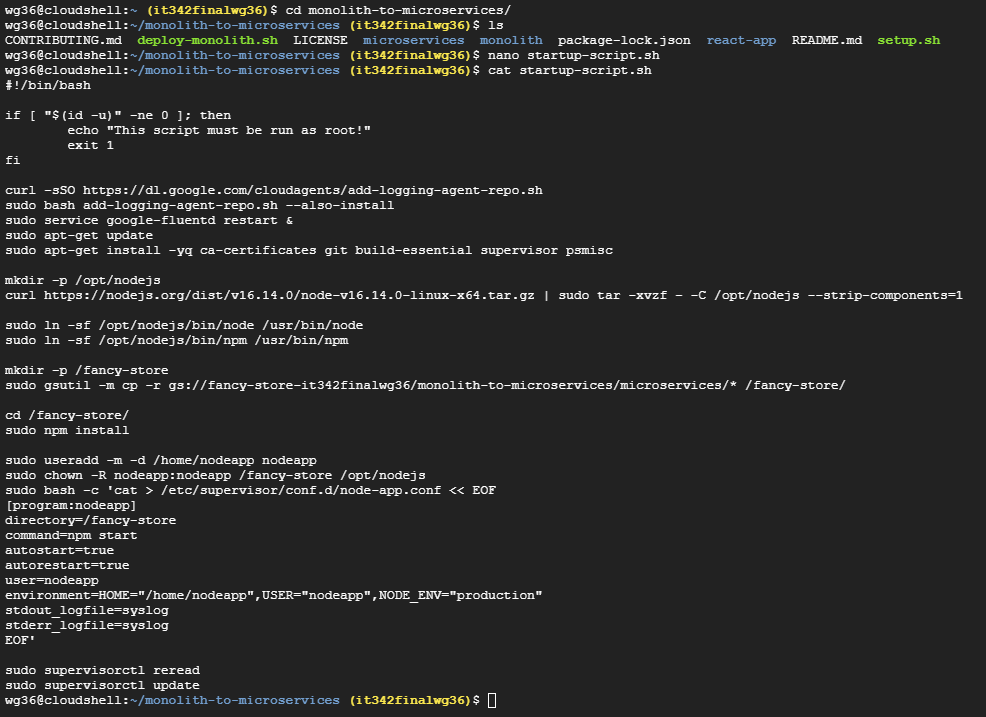
Deliverable 6/22: startup-script.sh file inside of the folder in cloudshell terminal
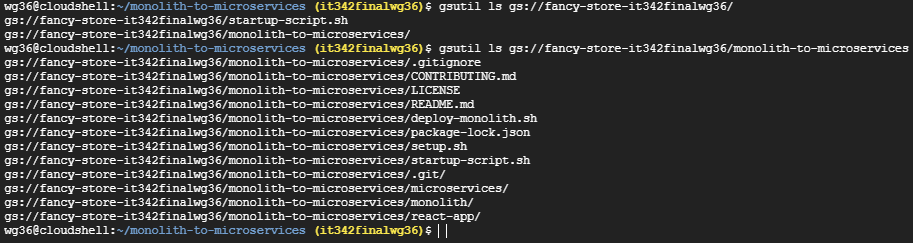
6. Adding Files to the Bucket
I ran the following command in the same cloud shell session: gsutil cp [startup-script.sh](http://startup-script.sh) gs://fancy-store-it342finalwg36/
This copies the startup script to the root directory of the bucket we created earlier
Deliverable 7/22: File in bucket

7. Adding Files to the Bucket (Part 2)
I ran the following command: gsutil -m cp -r . gs//fancy-store-it342finalwg36/monolith-to-micoservices
This copies all files in the current directory (monolith-to-microservices) to a new directory, monolith-to-microservices, located in the bucket we created earlier

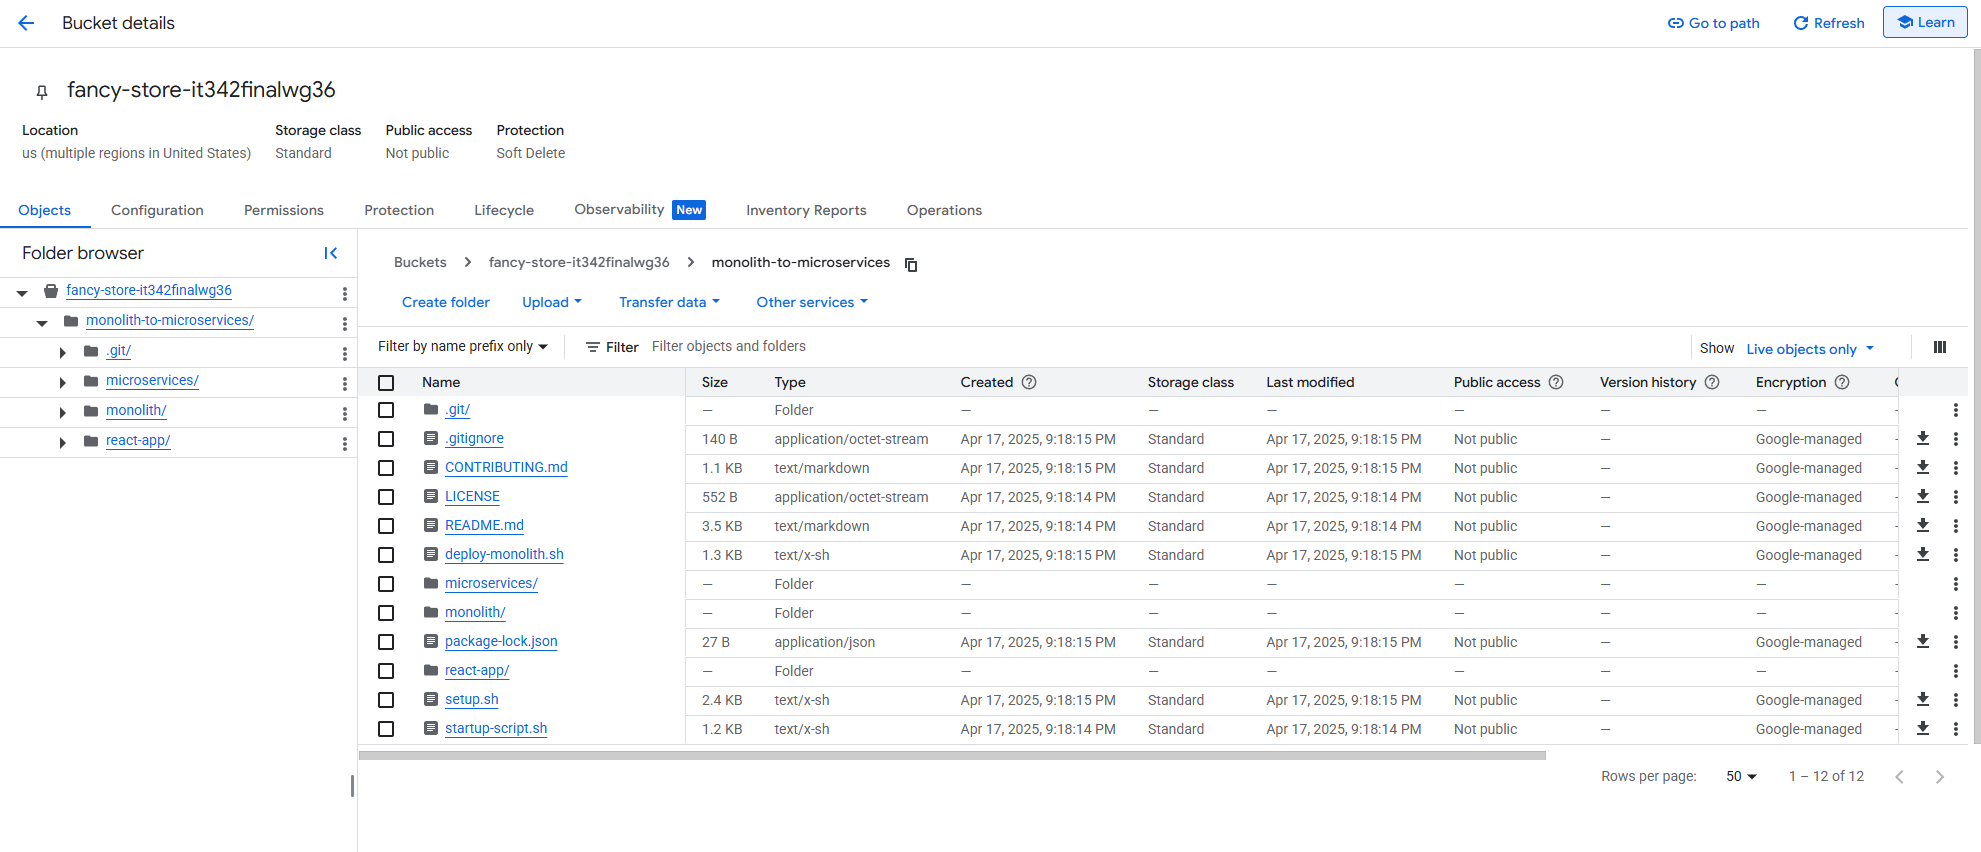
Deliverable 8/22: Bucket with newly added folder, including the contents/subfolders
Terminal view
Console/ GUI view
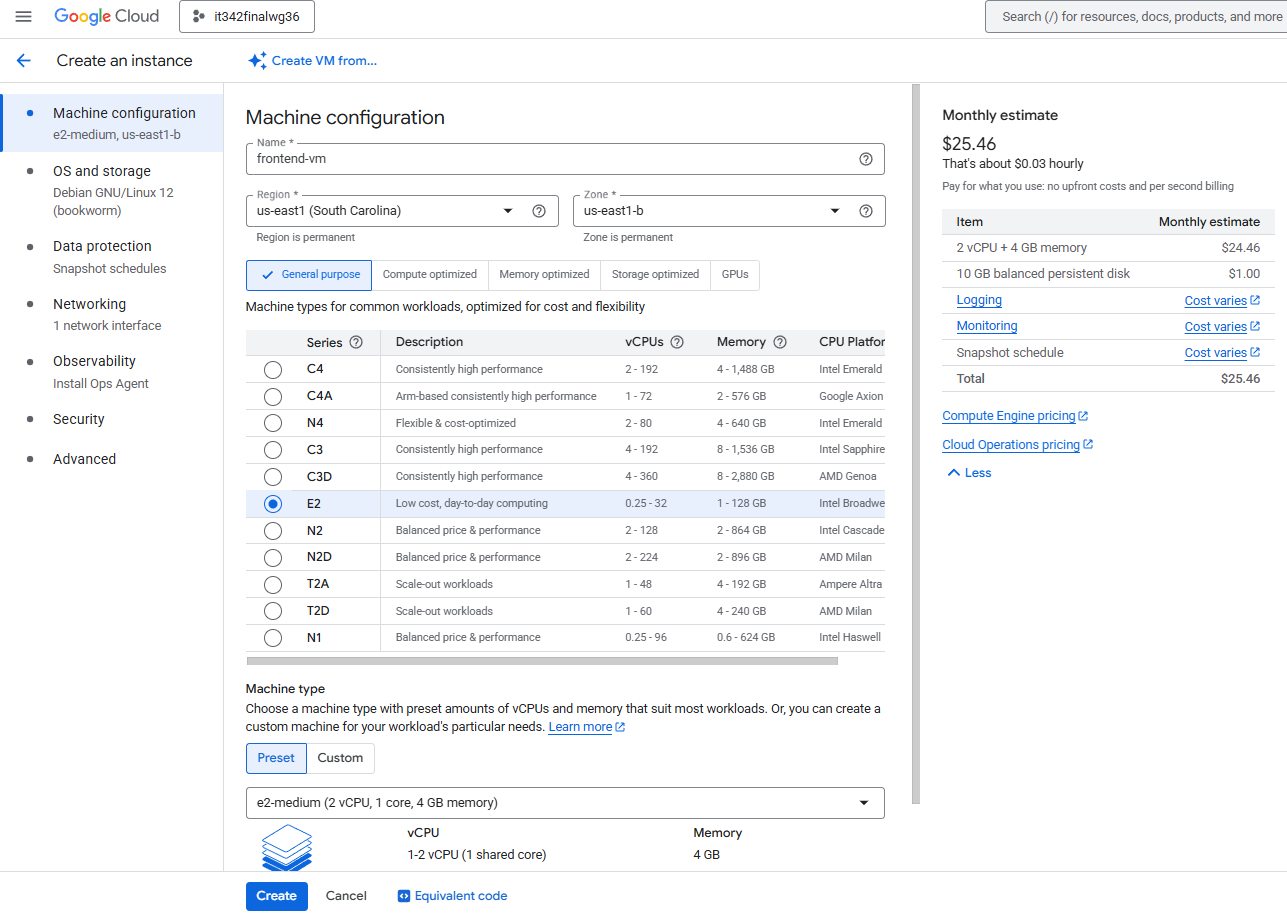
8. VM Deployment
Head to the Compute Engine console and create a new VM
VM1 (frontend) Settings:
Machine configuration
Region: us-east1
Zone: us-east1-b
Machine type: e2-medium
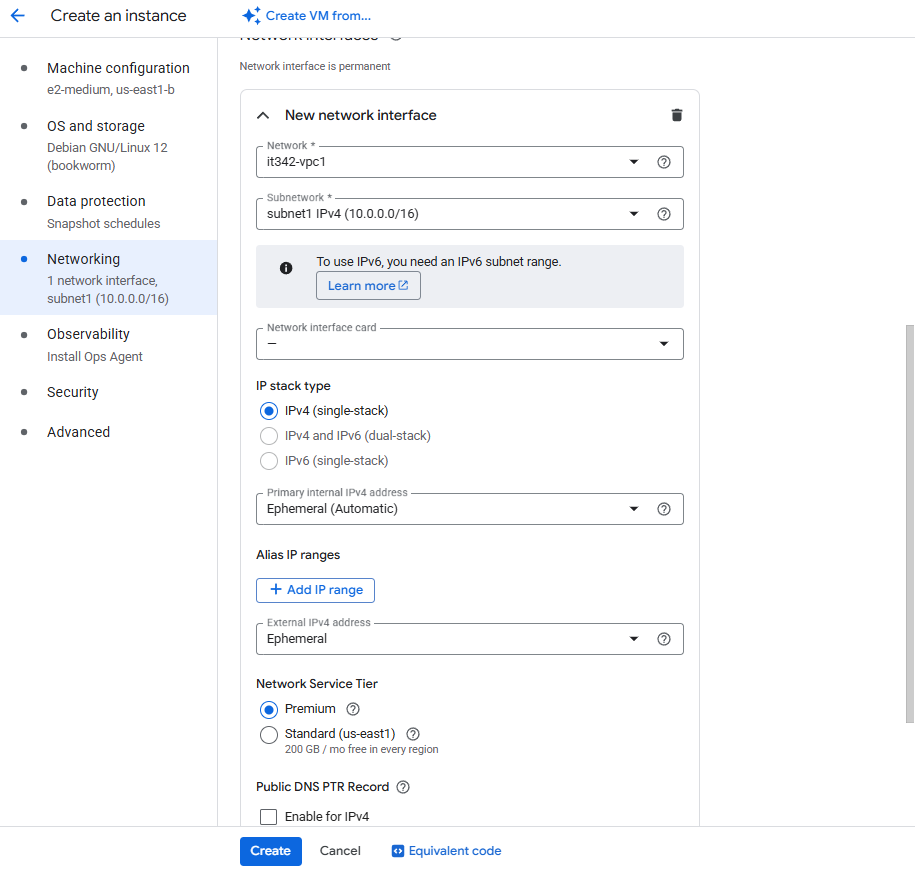
Networking
Select the VPC (it342-vpc1) and subnet (subnet1) we created earlier
Leave the rest of the settings to default

Observability
Make sure to leave Install Ops Agent for Monitoring and Logging checked

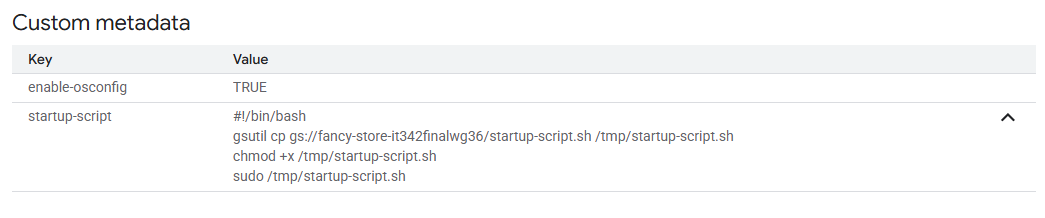
Advanced
This is what I pasted into the startup script for the VM:
1
2
3
4
#!/bin/bash
gsutil cp gs://fancy-store-it342finalwg36/startup-script.sh /tmp/startup-script.sh
chmod +x /tmp/startup-script.sh
sudo /tmp/startup-script.sh
This script just copies the startup script provided from the instructions into the /tmp directory, gives it execute permissions, then executes the script
VM2 (backend) Settings
Machine Configuration
Same as VM1
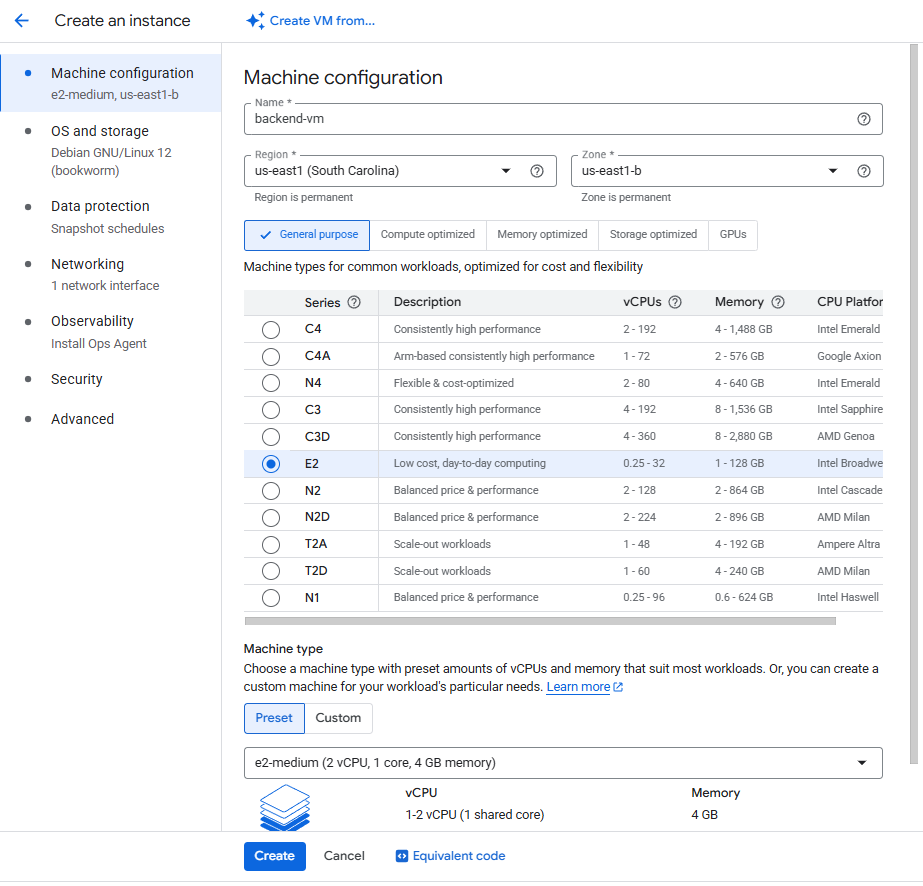
Networking
Make sure to put this VM in the VPC and subnet we created earlier
Make sure to enable the Ops Agent and put the startup script like we did for VM1
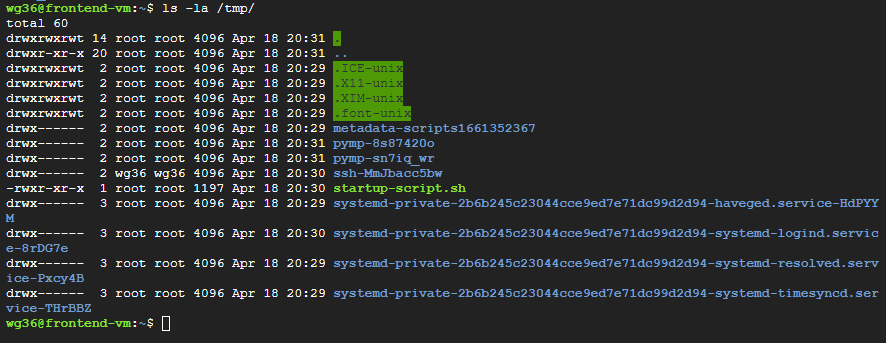
After booting up VM1, the startup script I made was successful and all the files from the fancy-store directory is in our VM
For clarification, the start up script for the VM copies and executes startup-script.sh into the /tmp directory of the VM. startup-script.sh was the script provided in the instructions. startup-script.sh copies the fancy-store directory from the bucket into the VM, downloads npm, and sets up Node.js.

startup script in /tmp directory
VM2
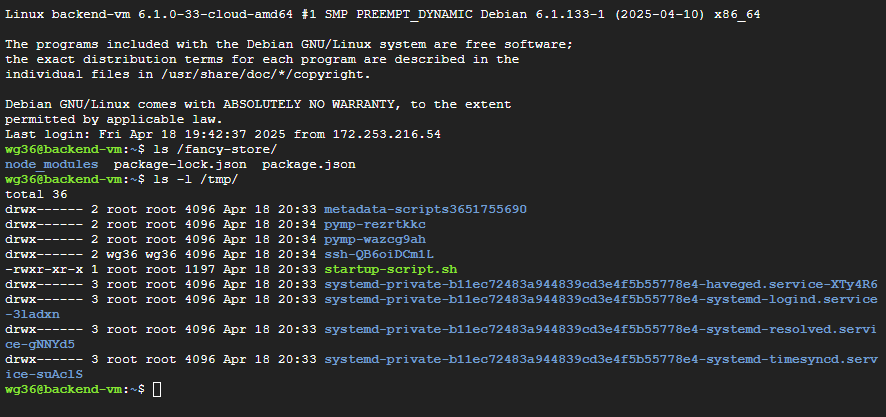
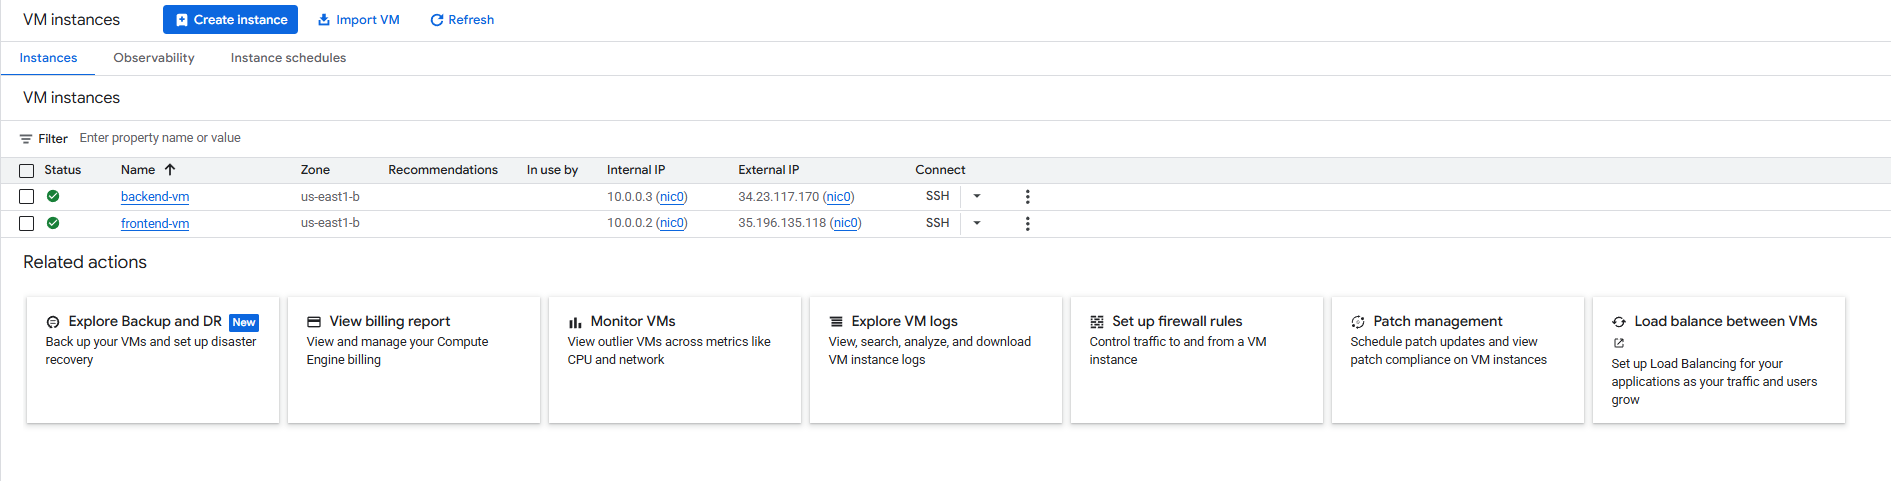
Deliverable 9/22: VM instances page with 2 VMs created
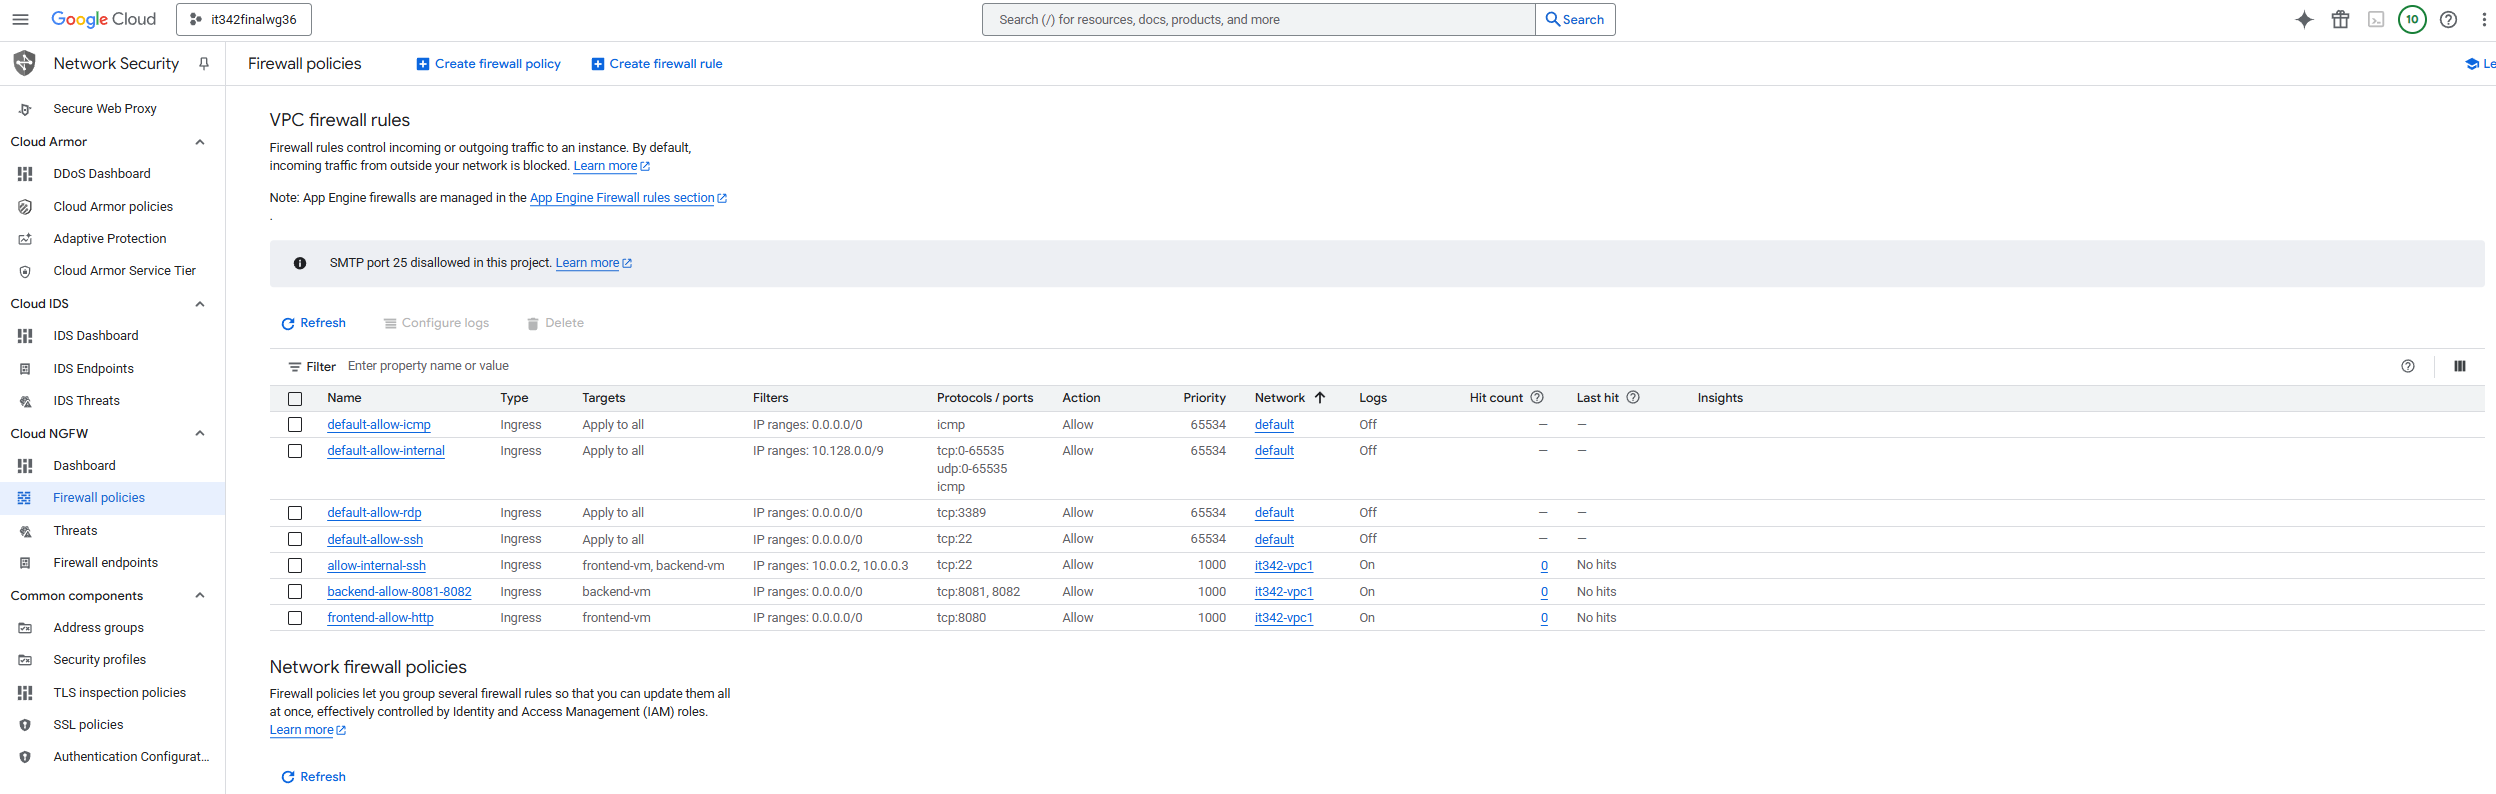
9. Firewall Rules
This project is using an implicit deny policy by default, so we must explicitly allow web traffic for the VMs.
I used target tags instead of specifying the IP of the VMs. I have not set up target tags for this VM at this point, and did it later on.
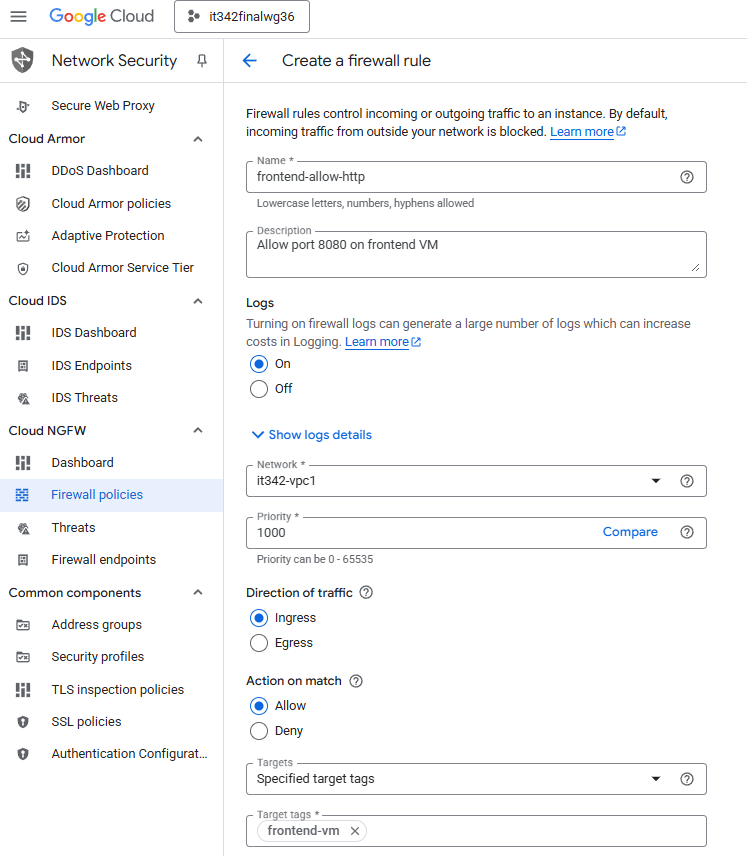
Head to the Network Security console > Cloud NGFW > Firewall policies
Create a firewall rule
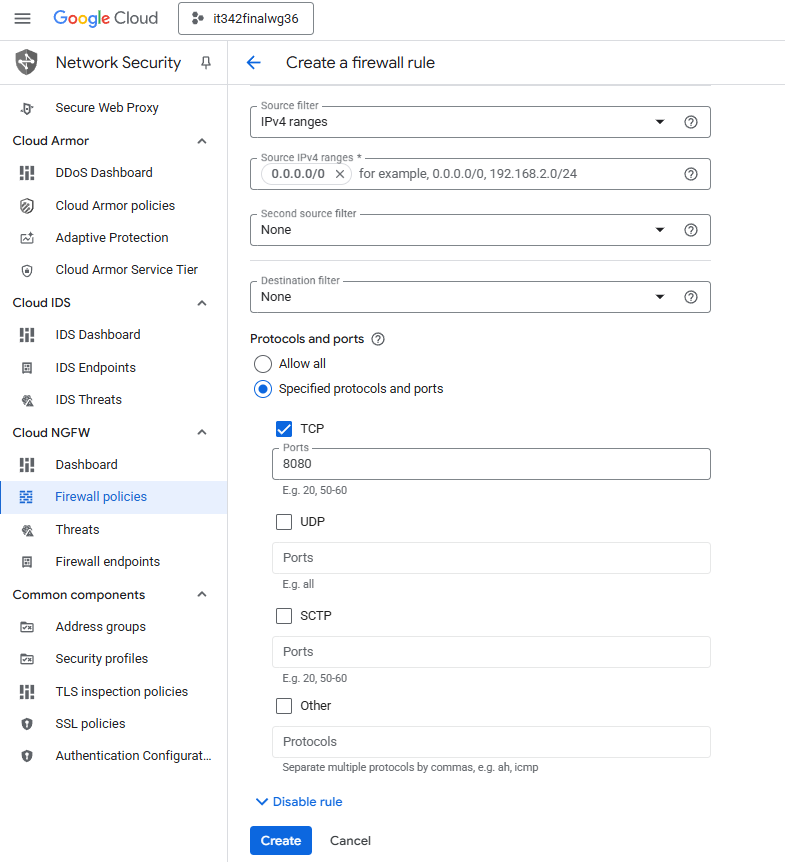
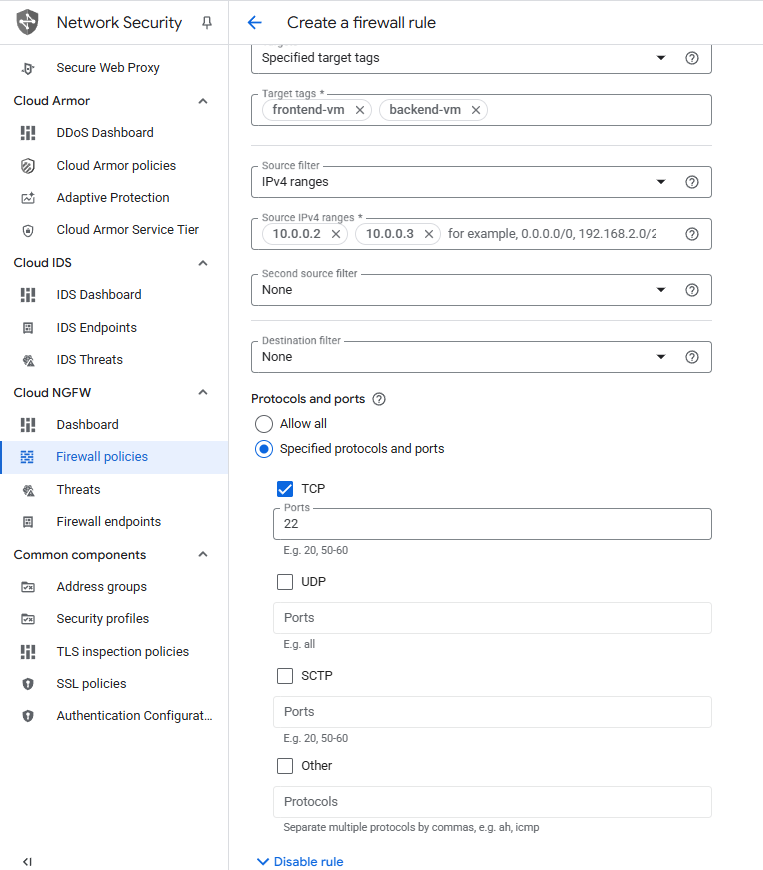
Rule 1: Allow incoming HTTP traffic to the frontend VM
Rule 1 Configuration (1/2):
Rule 1 Configuration (2/2)
Click Create
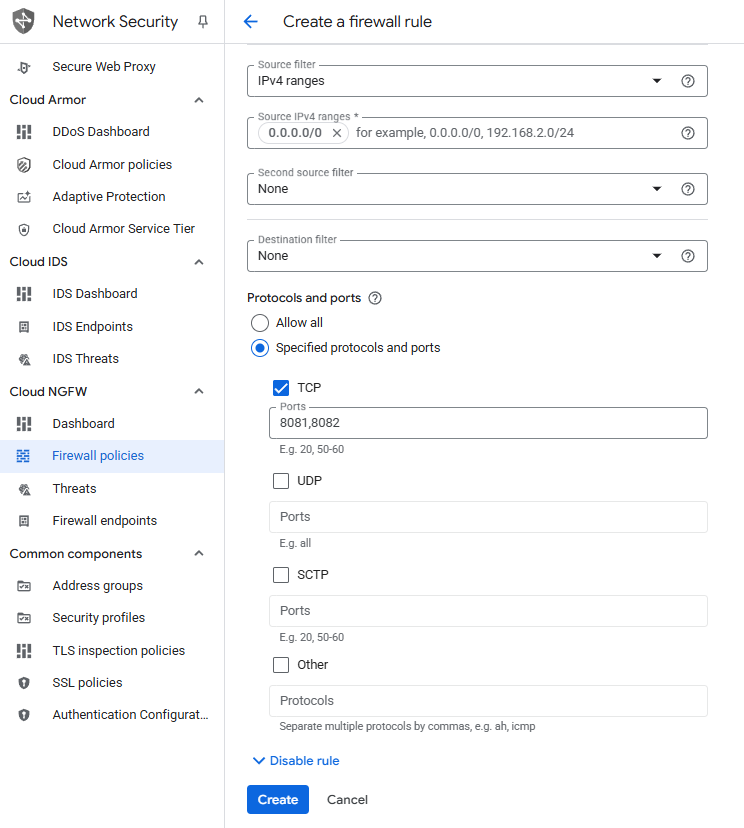
Rule 2: Allow incoming traffic on ports 8081 and 8082 into the backend VM
These ports are used for some of the Fancy Store services.
Rule 2 Configuration (1/2):
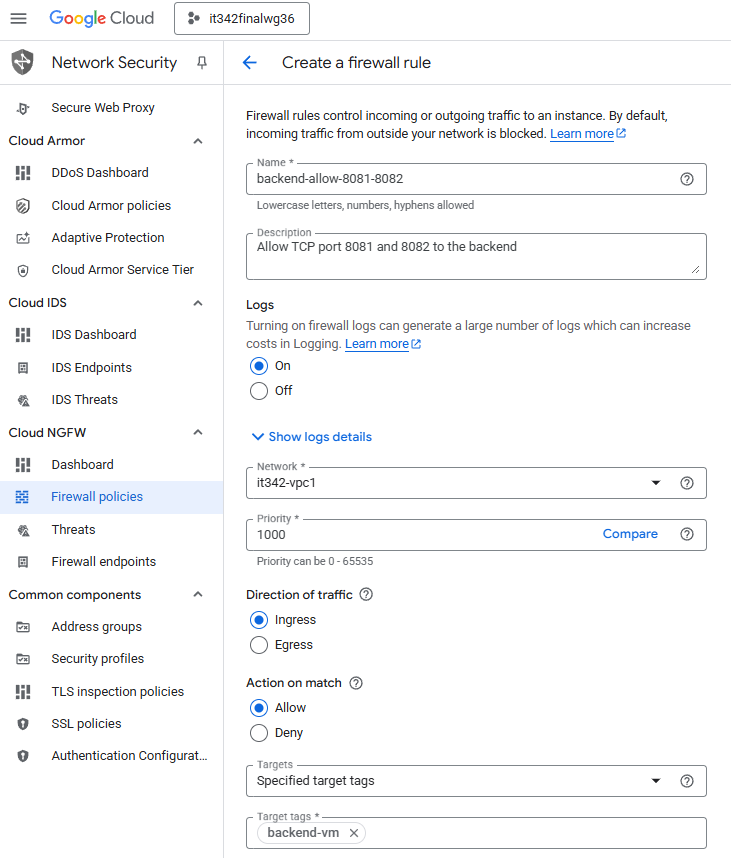
Rule 2 Configuration (2/2):
Click Create
Rule 3: Allow internal SSH traffic between both VMS
Rule 3 Configuration (1/2):
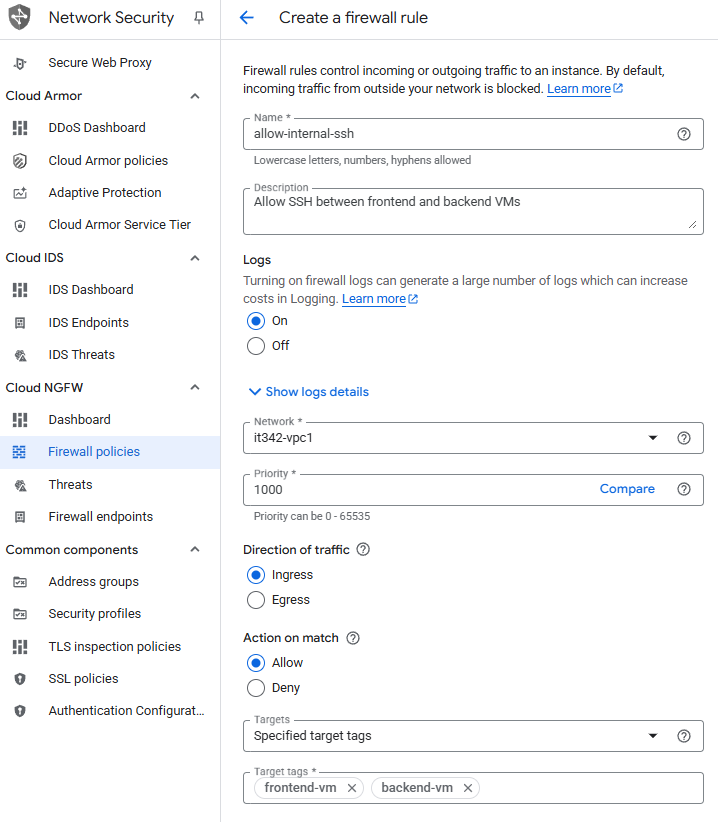
Rule 3 Configuration (2/2):
Click Create
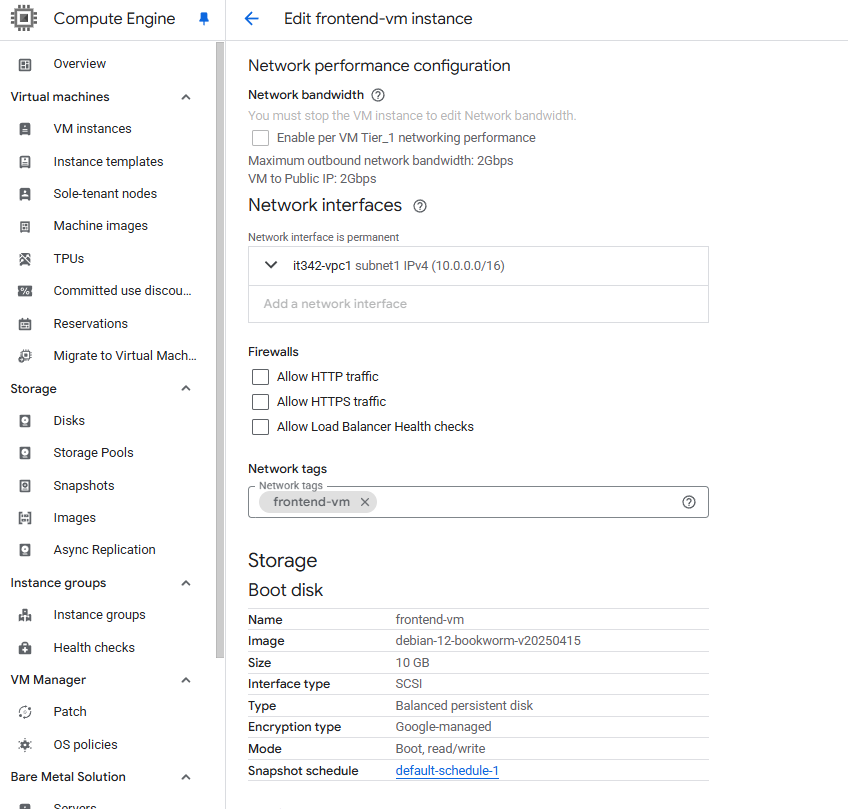
Creating Network Tags
We are using network/target tags for the firewall rules instead of static IPs because the IPs of our VMs may change.
Head to the Compute Engine console and click on one of the VMs > Edit > Scroll down
This is for the frontend VM, so I gave it the Network tag frontend-vm
Make sure to do the same for the backend VM, giving it the tag backend-vm
Deliverable 10/22: Firewall rules page showing the new rules created
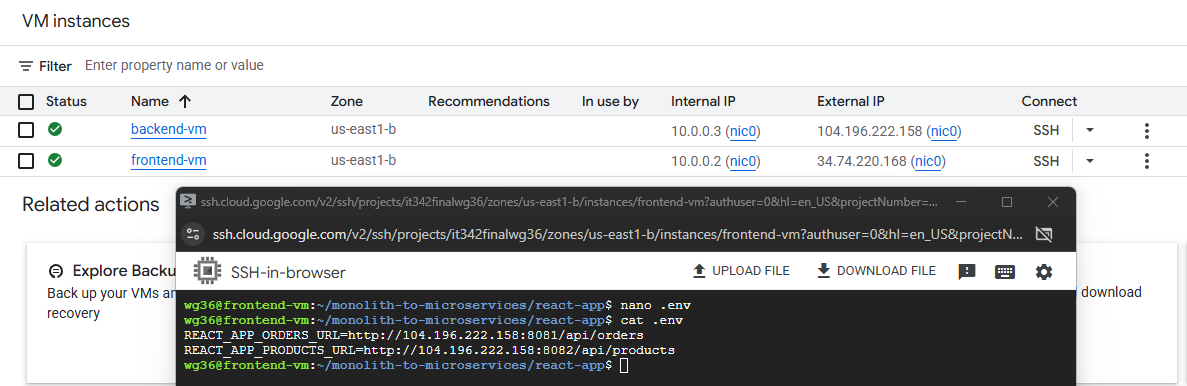
10. Microservice Configuration
On the frotnend VM, I cloned the monolith-to-microservices repository, the same way we did on the cloud shell terminal.
Link: https://github.com/googlecodelabs/monolith-to-microservices
In the .env file of the react-app directory, I changed the environment variables to point to the public IP of the backend VM (104.196.222.150) instead of the default of localhost.
run npm build afterwards to make the changes take place
Deliverable 11/22: Modifications made to the .env file
11. Web App Test
We have to first install serve
On the frontend VM, run npm install —prefix ~/.npm-global -g serve
Then run echo ‘export PATH=$PATH:~/.npm-global/bin’ >> ~/.bashrc
This is so that we can run npm commands in any directory

Afterwards, run serve -s build -l 8080 to serve the frontend
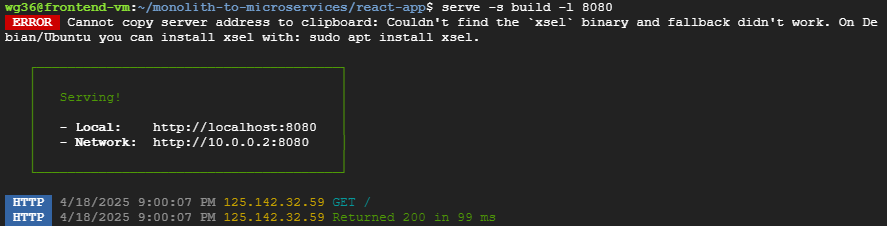
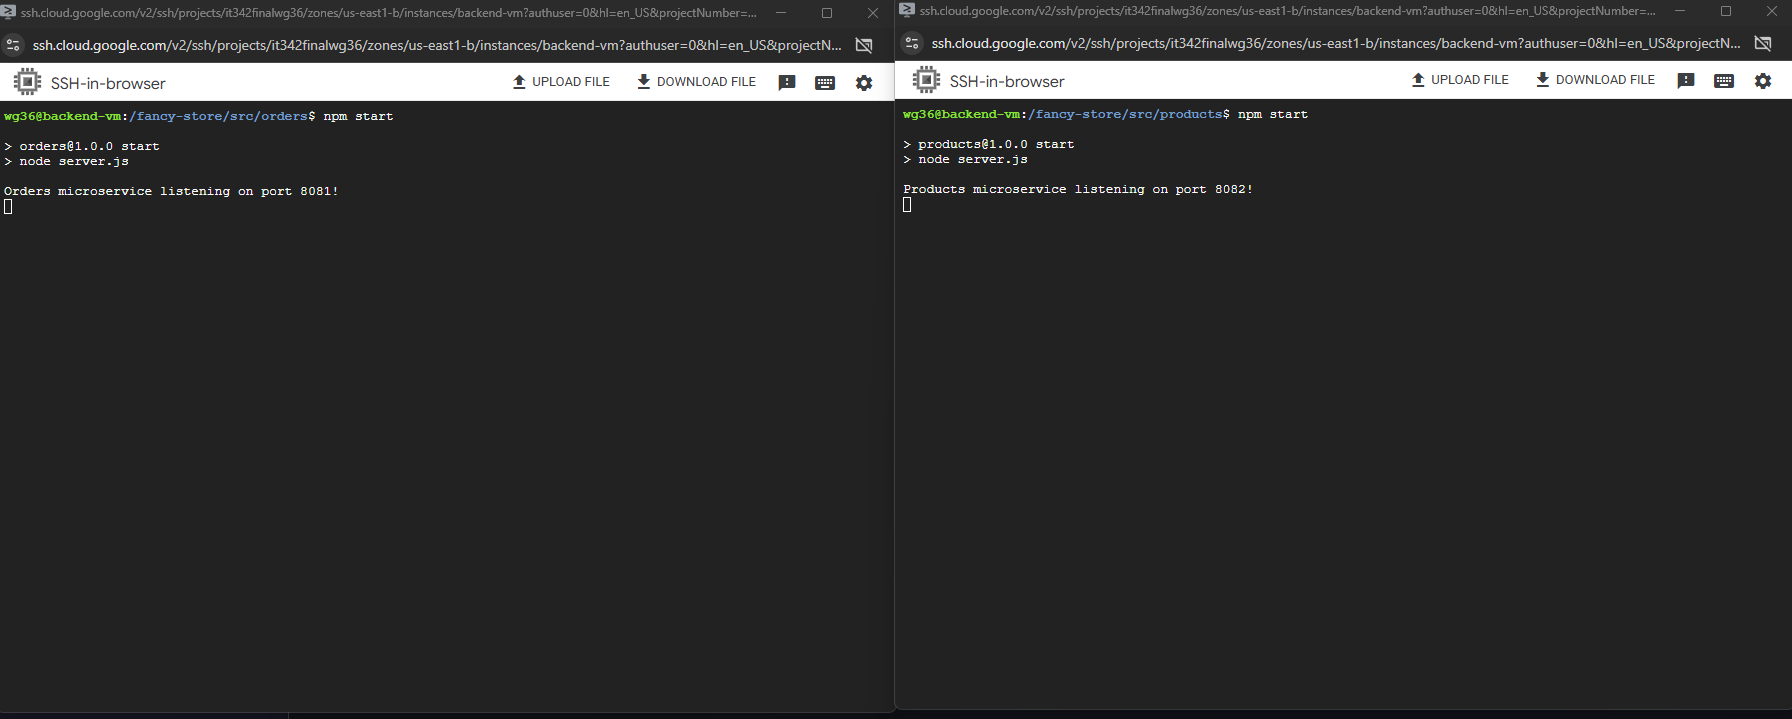
On the backend VM, head to /fancy-store/src
In one terminal, head to the orders directory and run npm start
In another terminal, head to the products directory and run npm start
You can also just run both commands in the background
Notice that both services are running on ports 8081 and 8082
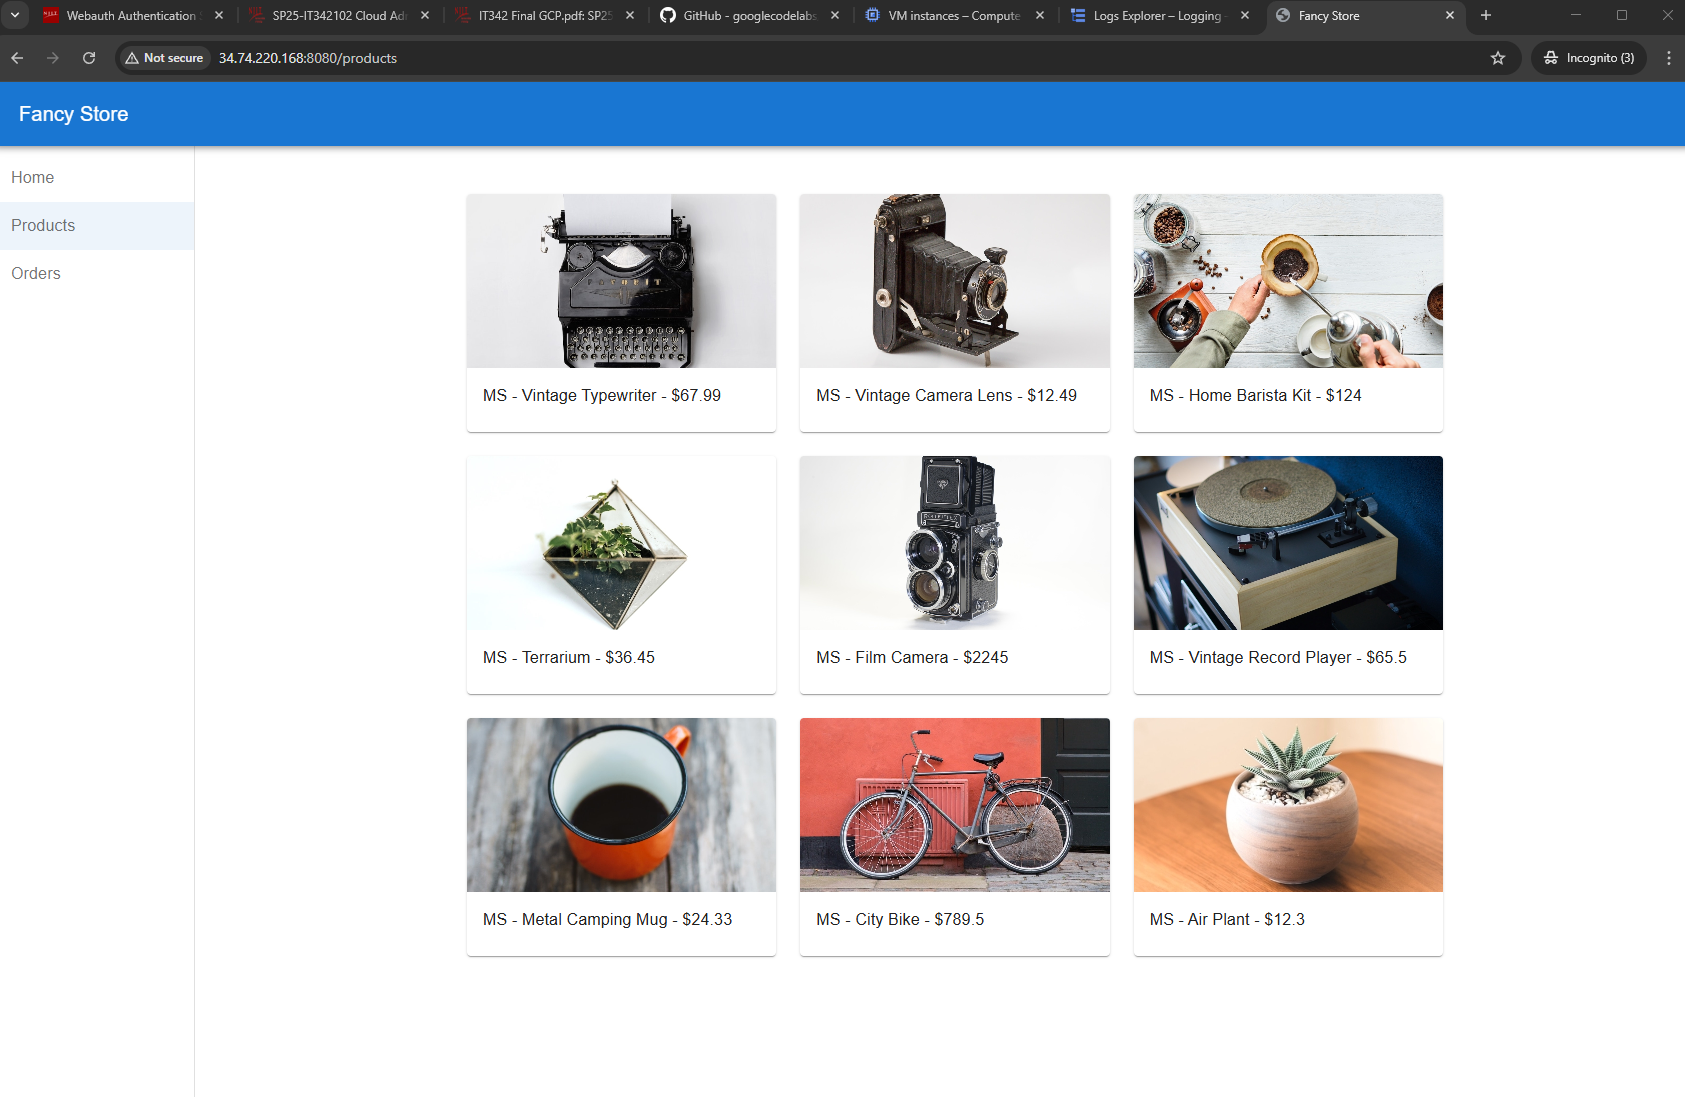
Deliverable 12/22: Products page, viewed from the public frontend
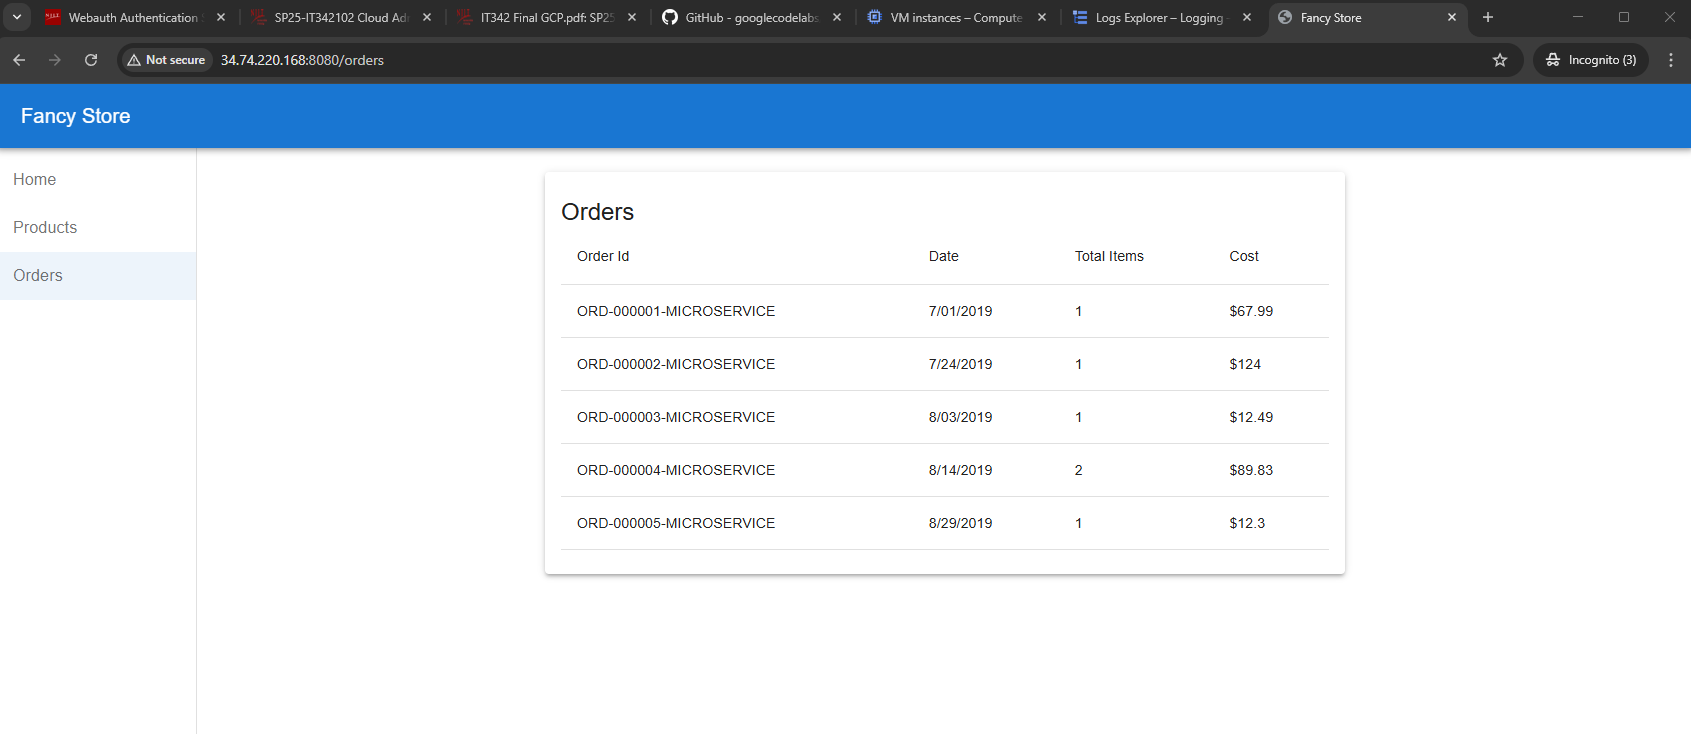
Deliverable 13/22: Orders page, viewed from the public frontend
12. Autoscaling Policy
In order for the autoscaling policy to work, we need to create instance templates for both of our VMS
Create Instance Templates
Head to the Compute Engine console
Under Virtual machines > Instance templates, Create a new instance template
Frontend VM Template Settings (1/5):
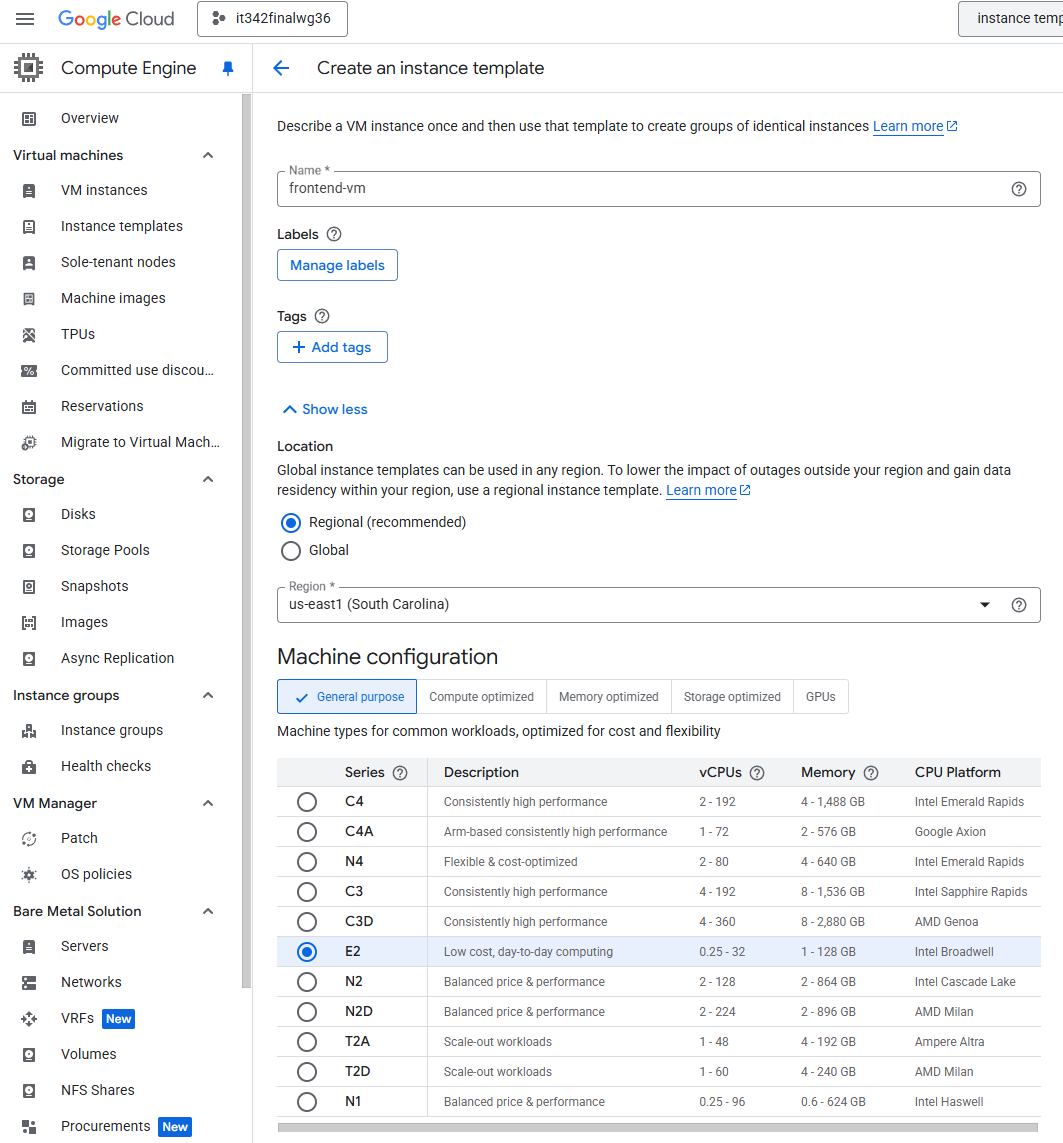
Frontend VM Template Settings (2/5):

Frontend VM Template Settings (3/5):
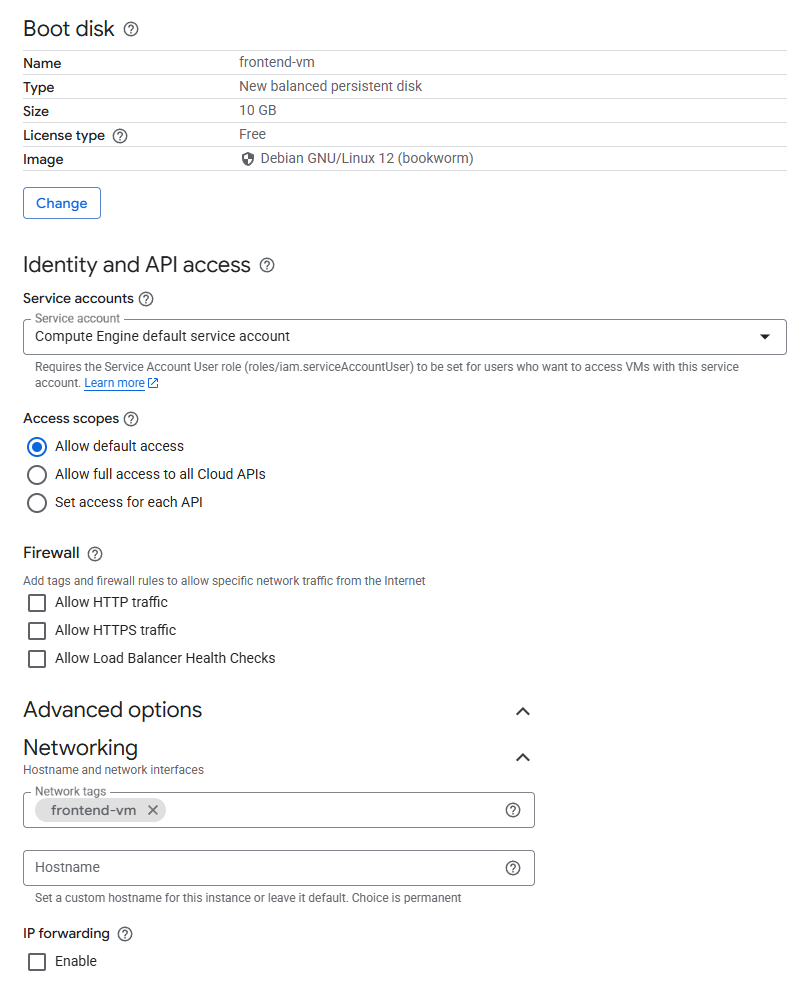
Frontend VM Template Settings (4/5):
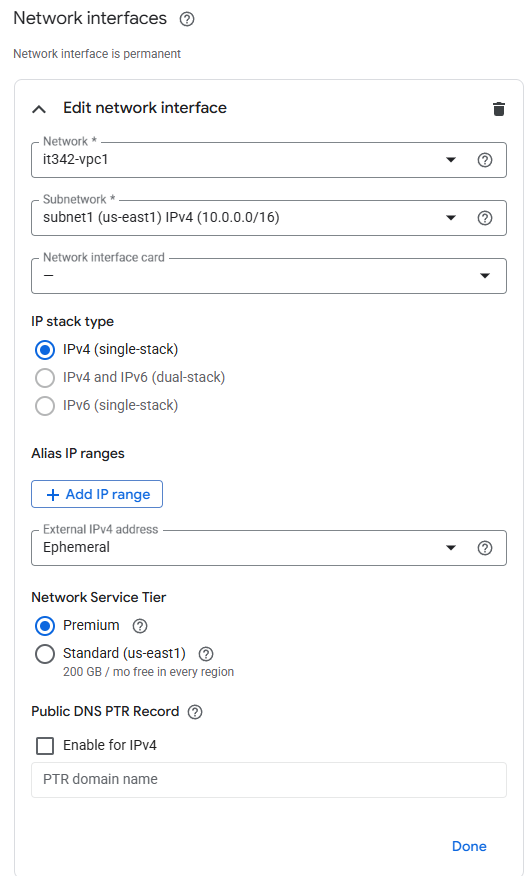
Frontend VM Template Settings (5/5):
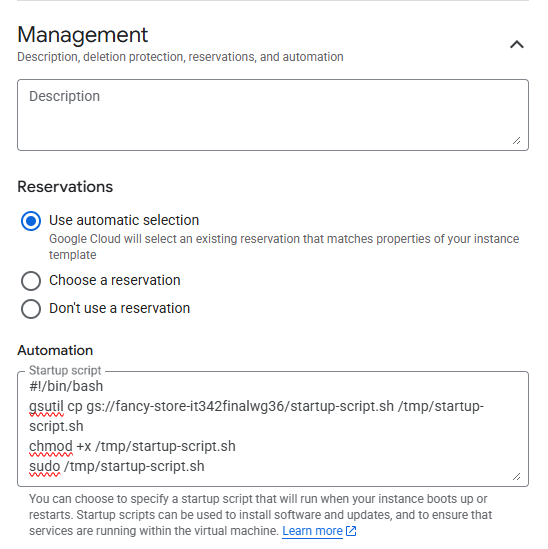
Startup script:
1
2
3
4
#!/bin/bash
gsutil cp gs://fancy-store-it342finalwg36/startup-script.sh /tmp/startup-script.sh
chmod +x /tmp/startup-script.sh
sudo /tmp/startup-script.sh
Repeat the same process for the backend VM, just make sure the network tag for the backend VM template is backend-vm and the template is named backend-vm.
Instance templates overview

Creating Managed instance groups (MIG)
Head to Instance groups and click Create instance group
We are using the stateless setting since we are only using 1 region and zone for this project
For the frontend MIG, use the frontend-vm instance template
The location settings should match the VPC settings
Region: us-east1 (South Carolina)
Zone: us-east1-b
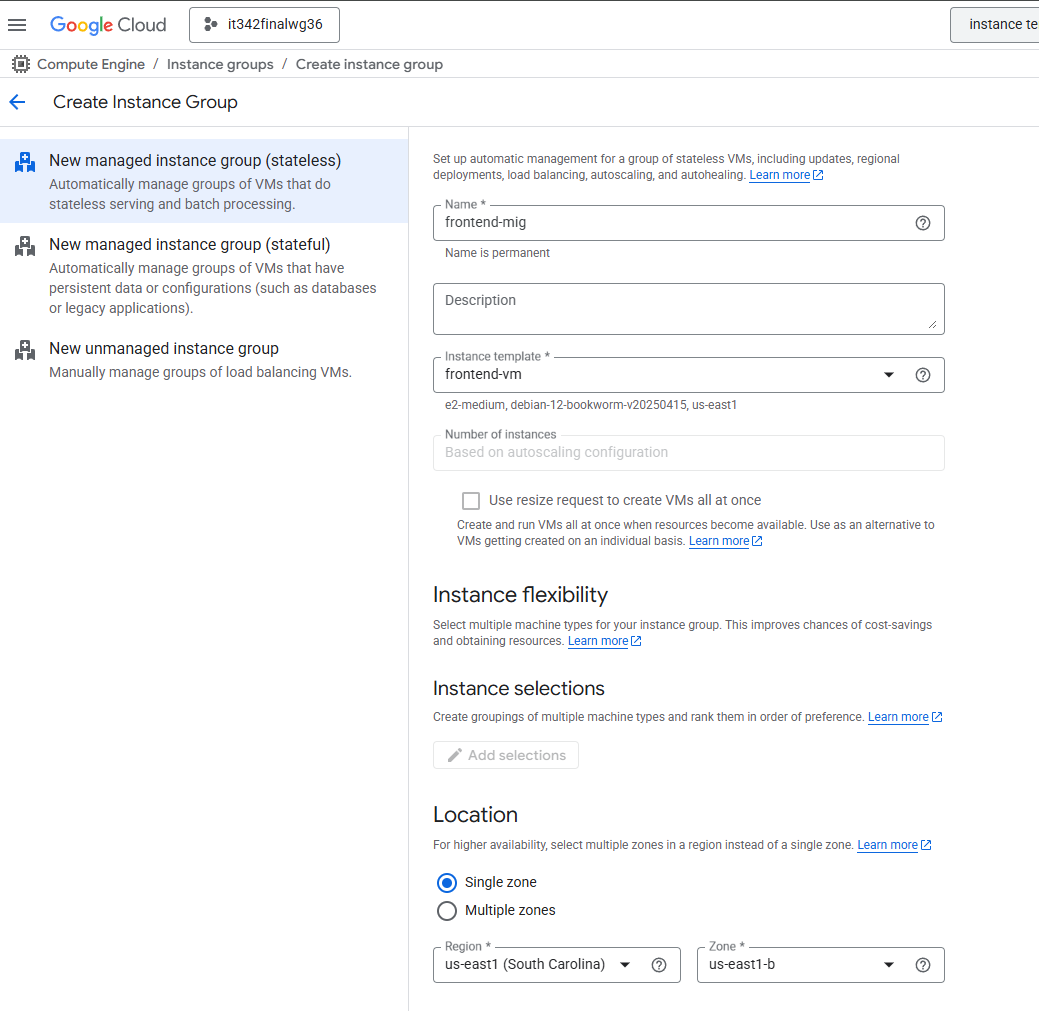
Autoscaling settings, according to the instructions
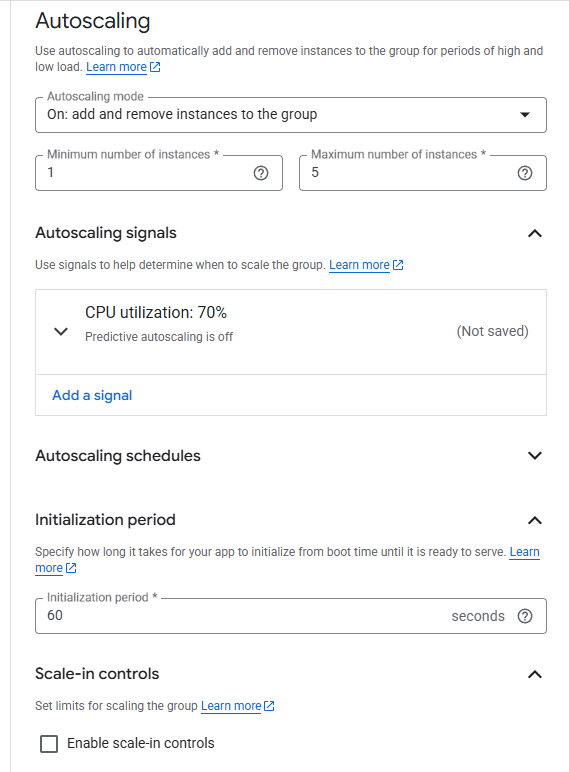
Follow the same process for the backend VM, just adjust the name of the MIG and the template

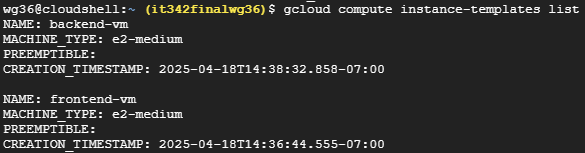
Deliverable 14/22: Output of gcloud compute instance-templates list
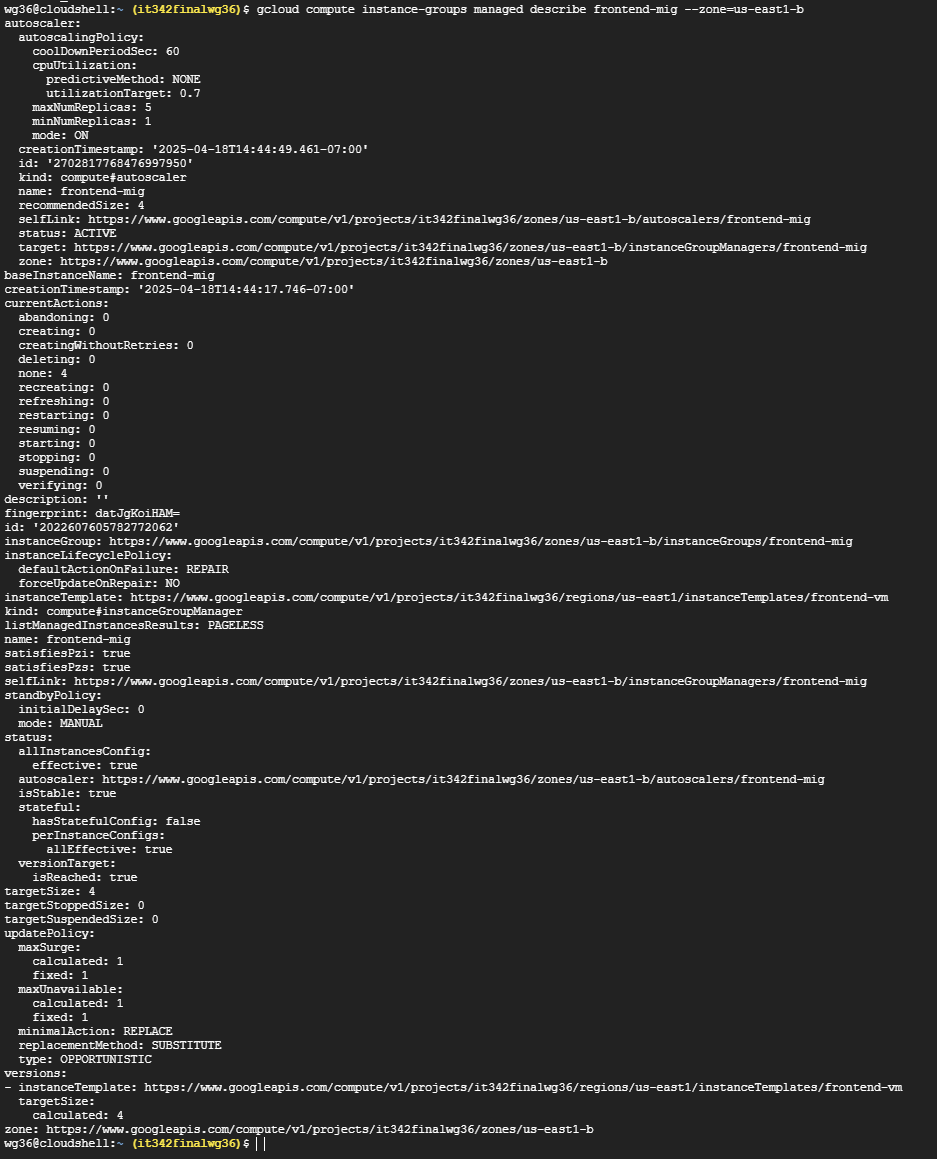
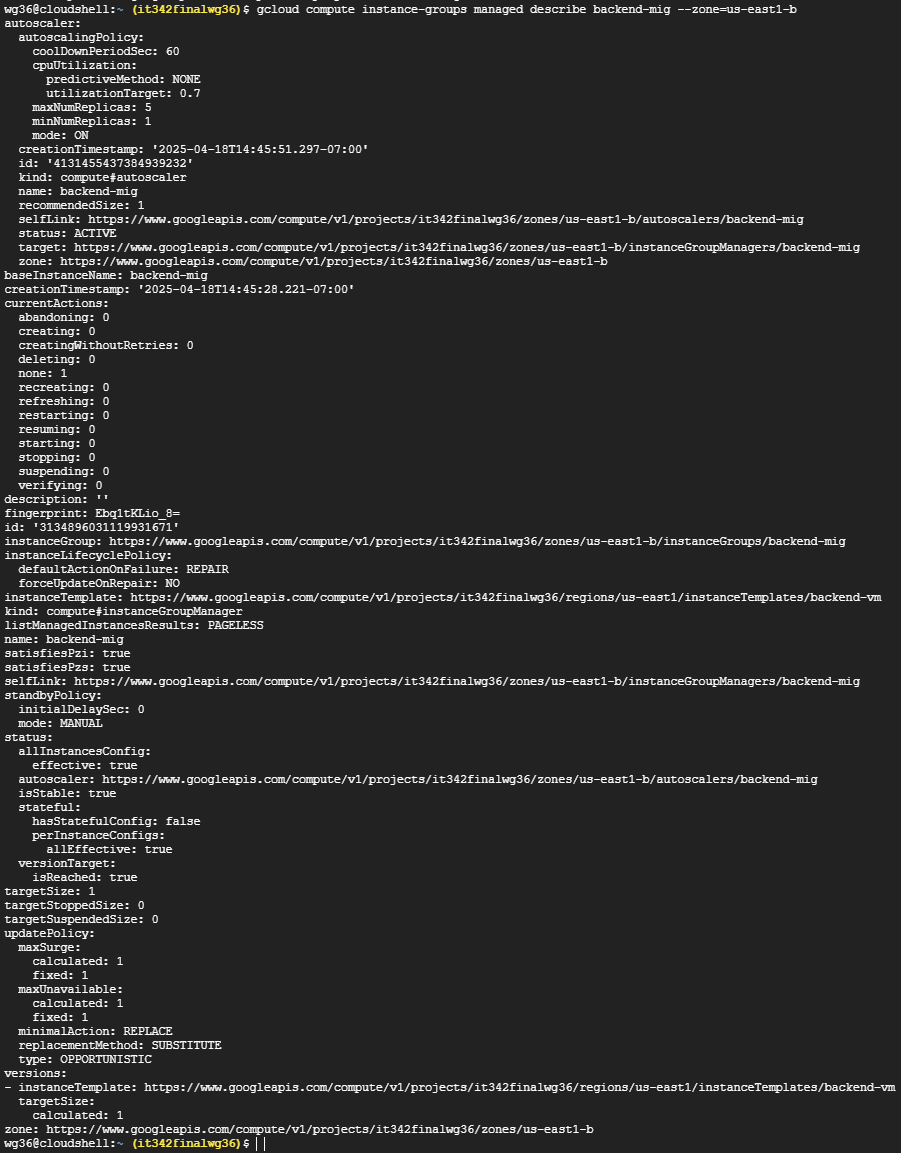
Deliverable 15/22: Output of gcloud compute instance-groups managed describe [name of MIG] --zone=[zone for your project]
For frontend MIG
Deliverable 16/22: Output of gcloud compute instance-groups managed describe [name of MIG] --zone=[zone for your project]
For backend MIG
13. Health Check Repairs
Health Check Probe FIrewall Rules
According to Google’s documentation, in order for health checks to work, we need to create firewall rules that allow incoming traffic from Google Cloud probers: https://cloud.google.com/load-balancing/docs/health-check-concepts
The health check probe IPv4 ranges are:
35.191.0.0/16130.211.0.0/22
Head to the Network Security console > Cloud NGFW > Firewall policies
The process to create a firewall rule should be familiar, however:
- For the frontend VM, the destination port would be 8080
- For the backend VM, the destination ports would be 8081 and 8082
- For both rules, specify the health check probe IPs for source IP range
- Make sure to use the appropriate network tags
These are what the rules look like:

Creating Health Checks
We must create separate health checks for each port
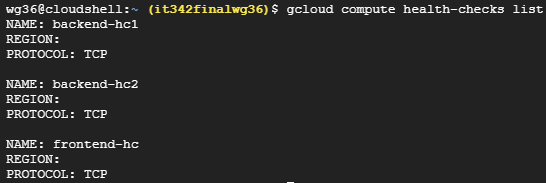
I used the command gcloud compute health-checks create tcp [vm]-hc --port=[x]
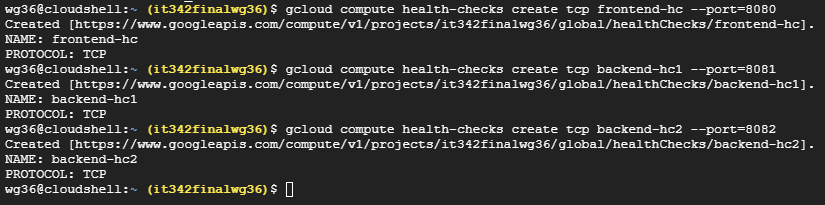
Deliverable 17/22: Output of gcloud compute health-checks list
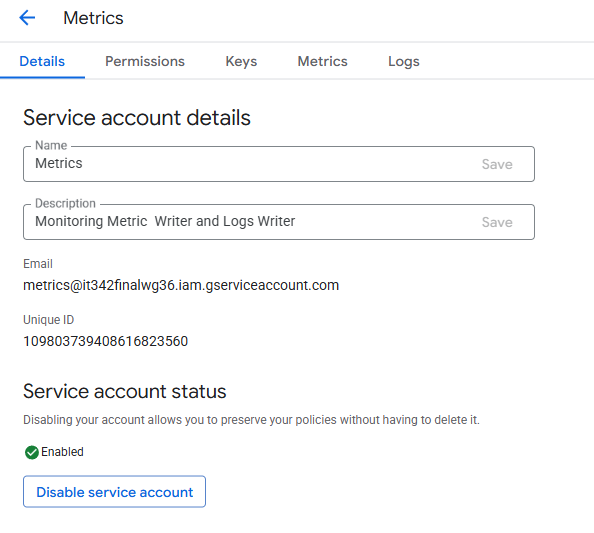
14. Service Account for Monitoring
Head to the IAM & Admin console and create a new service account
I just named this one Metrics
I assigned the permissions via the cloud shell
I ran the command: gcloud projects add-iam-policy-binding it342finalwg36 --member=”serviceAccount:metrics@it342finalwg36.iam.gserviceaccount.com” --role=”roles/monitoring.metricWriter”
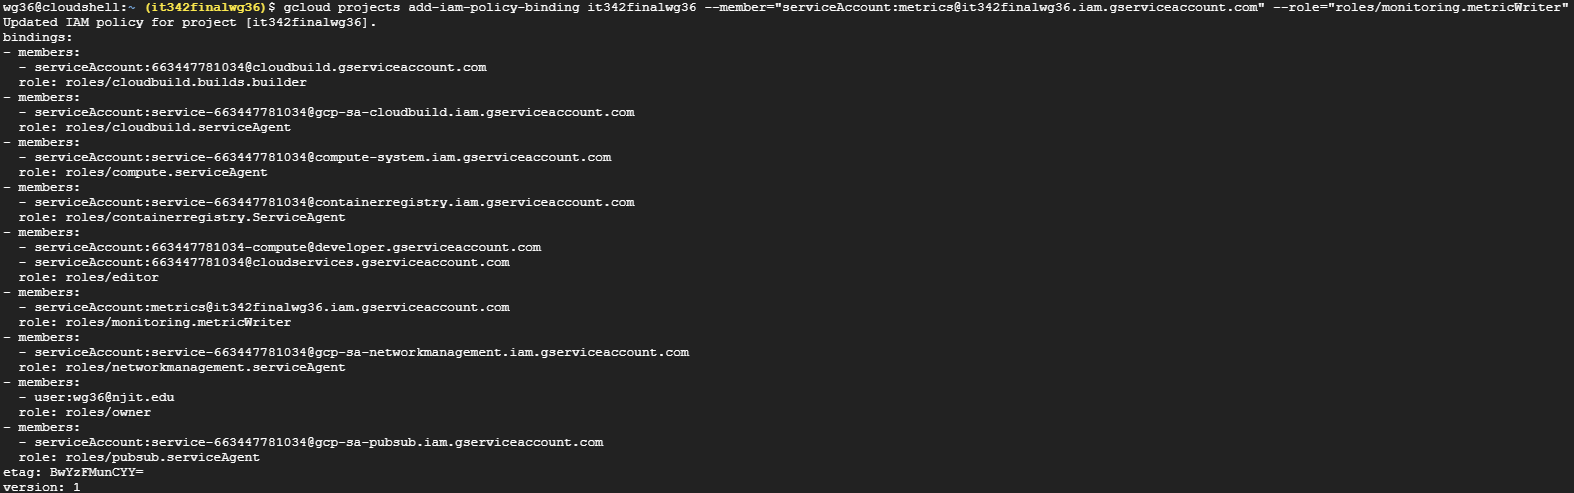
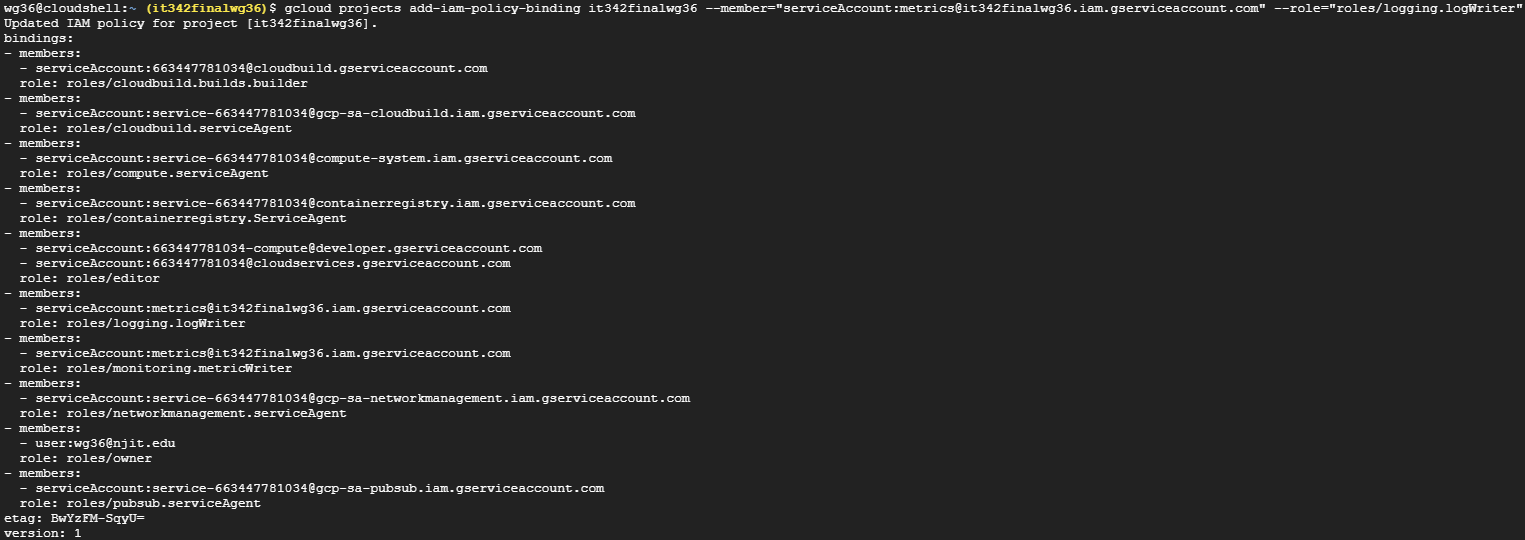
and this command: gcloud projects add-iam-policy-binding it342finalwg36 --member=”serviceAccount:metrics@it342finalwg36.iam.gserviceaccount.com” --role=”roles/logging.logWriter”
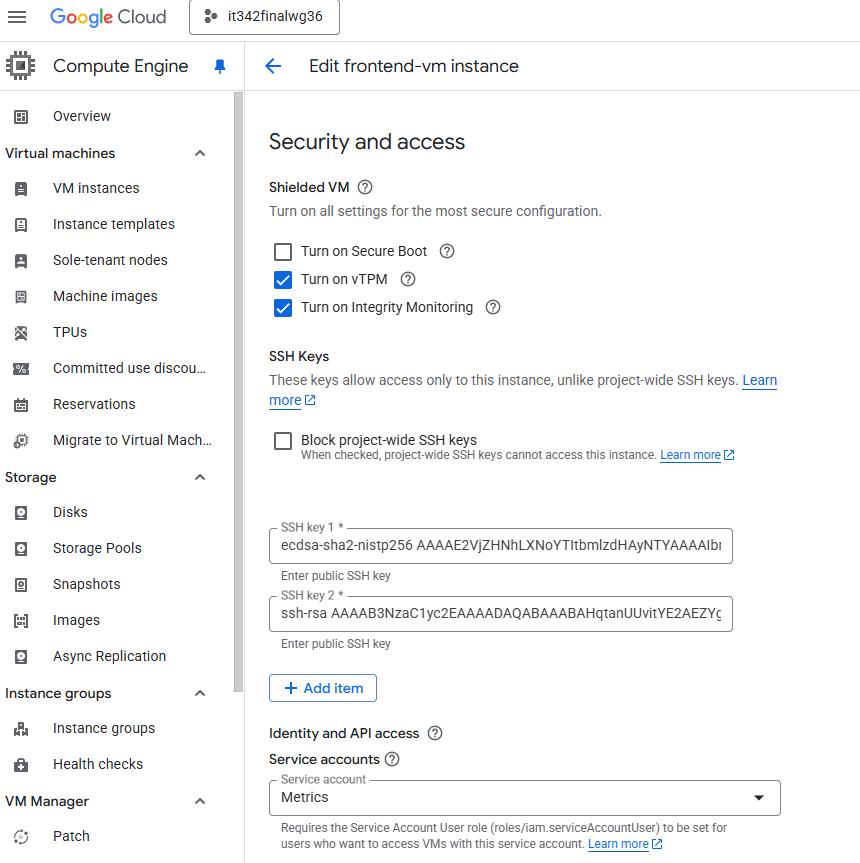
Stop the VM instances if they are running so that we can edit the service account
Head to the VM > Edit > Scroll down until you see Identity and API access
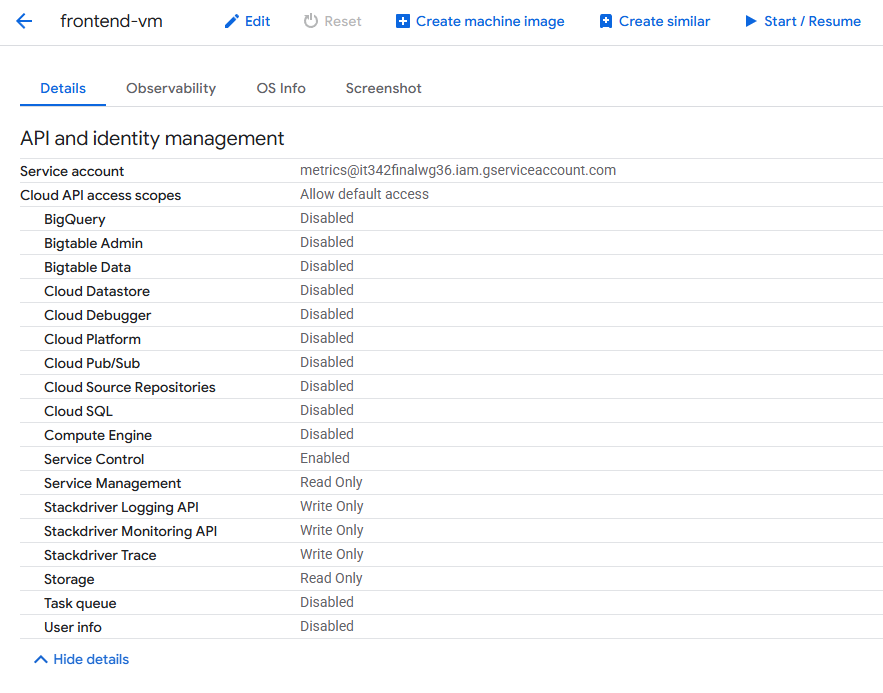
Change service account to Metrics
We will also have to change this under the instance templates
Deliverable 18/22: API and Identity management settings for frontend VM with new service account in place
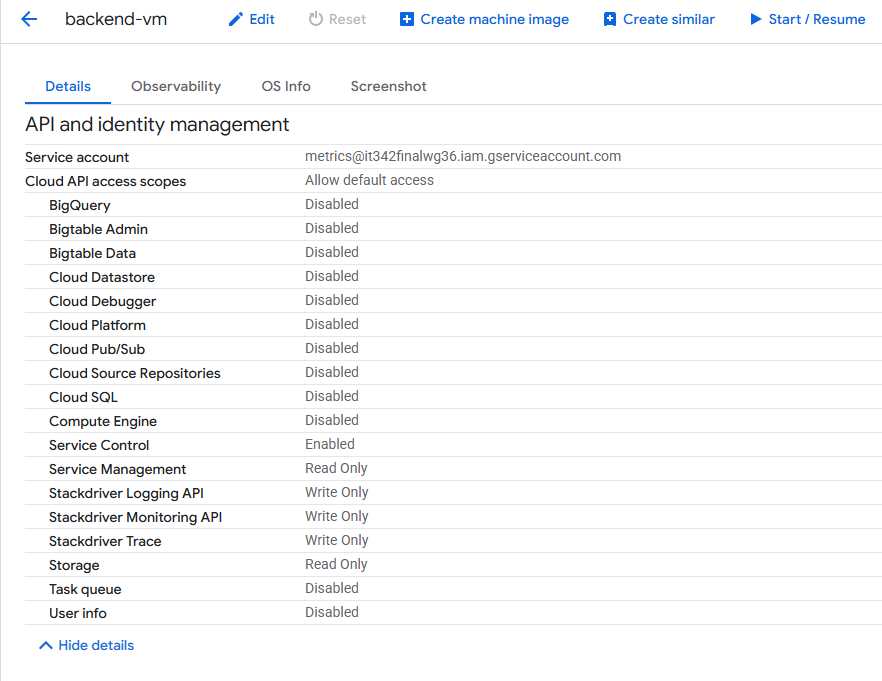
Deliverable 19/22: API and Identity management settings for backend VM with new service account in place
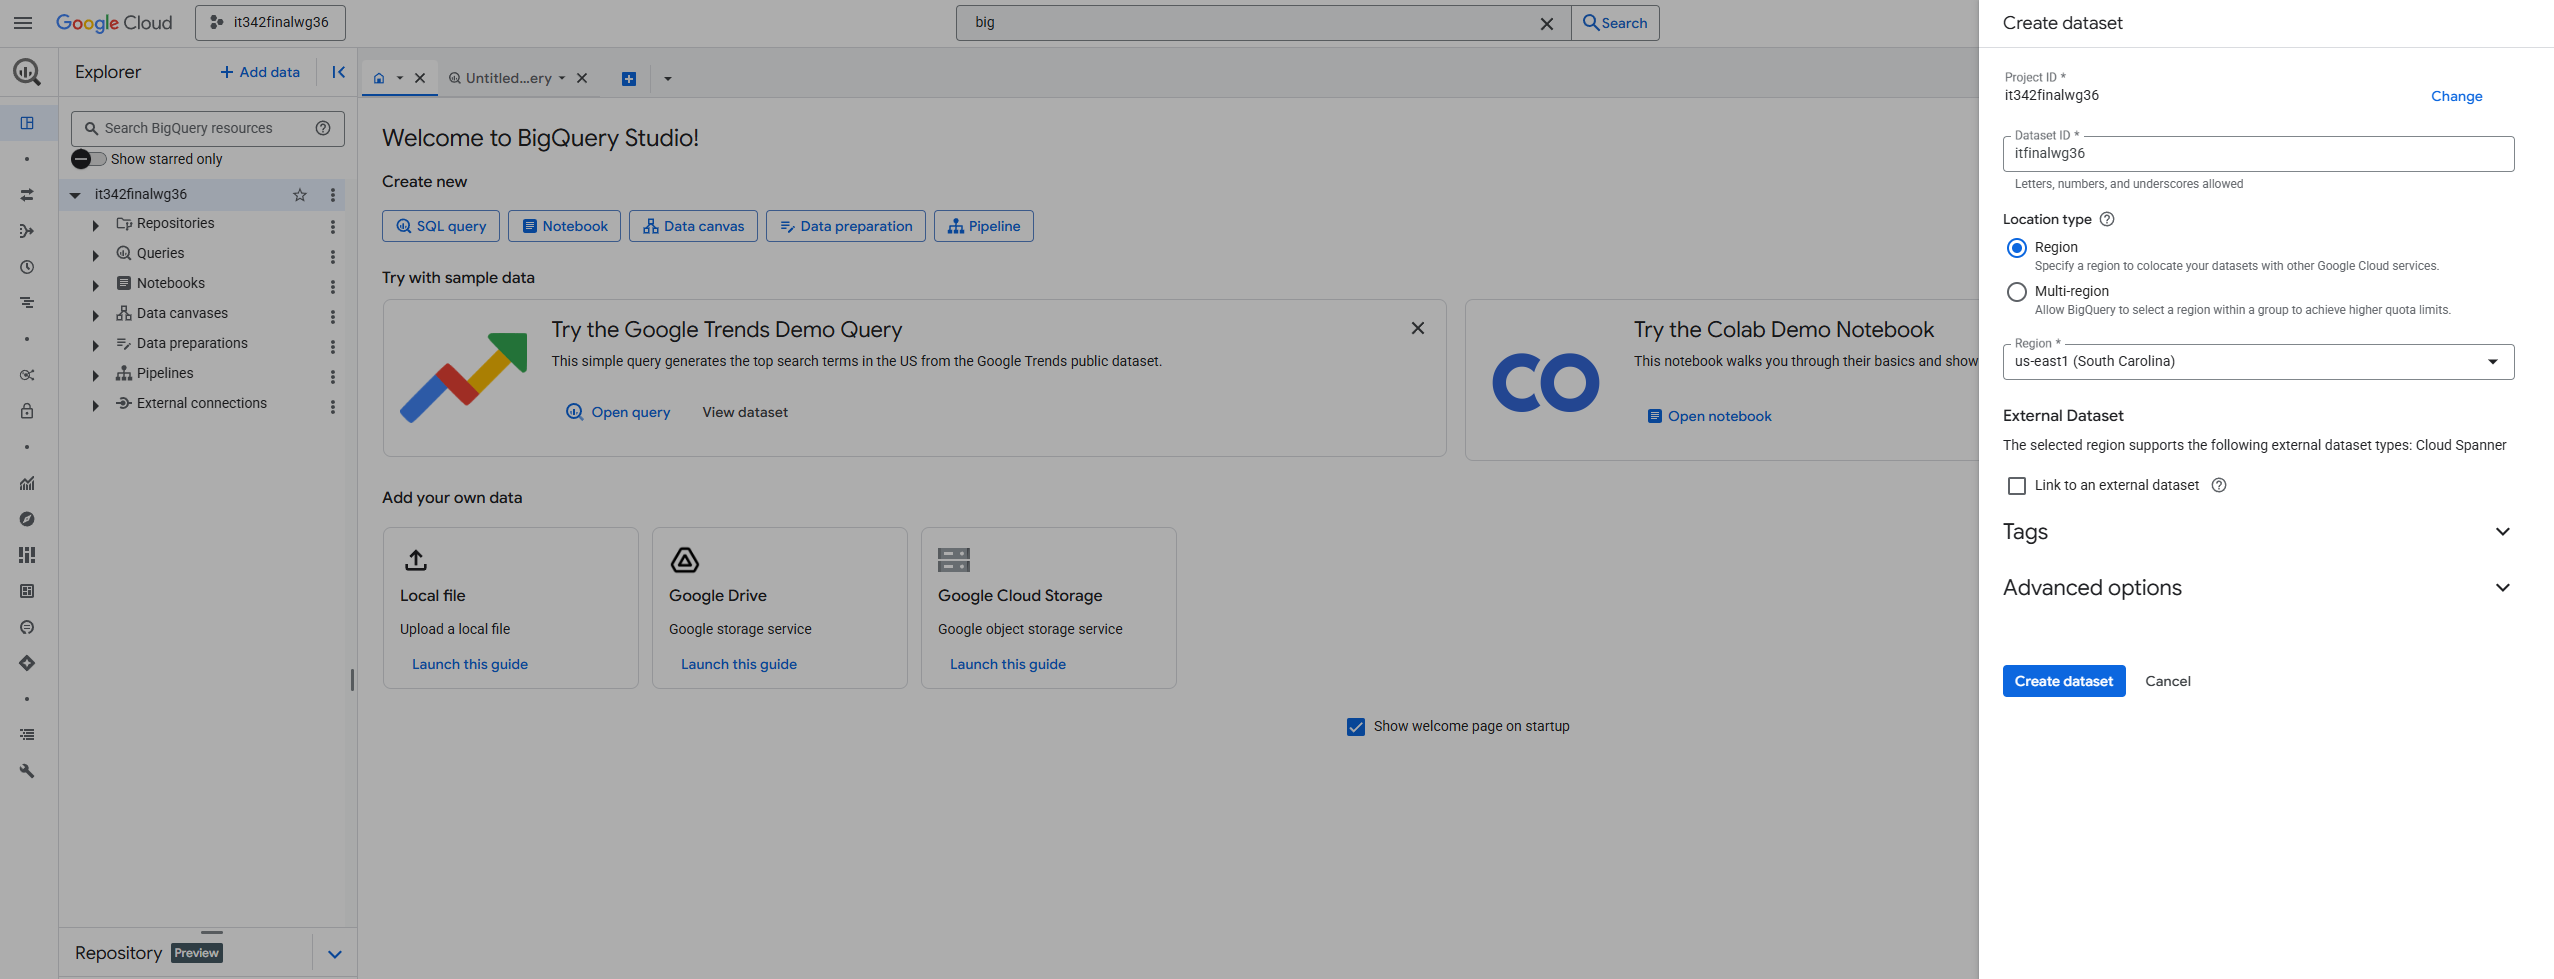
15. BigQuery
We must create a system to forward VM logs to BigQuery.
Head to the BigQuery console
Click the 3 dots next to project name > Create dataset
Give it a name (Dataset ID) and specify the region to match that of the VPC (us-east1)
Click Create dataset
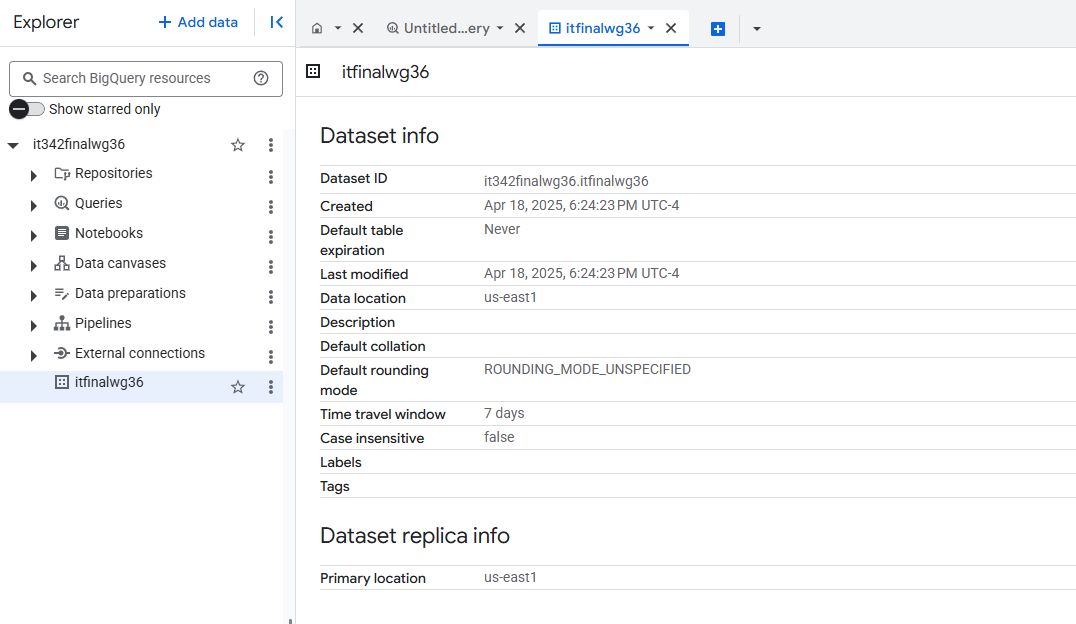
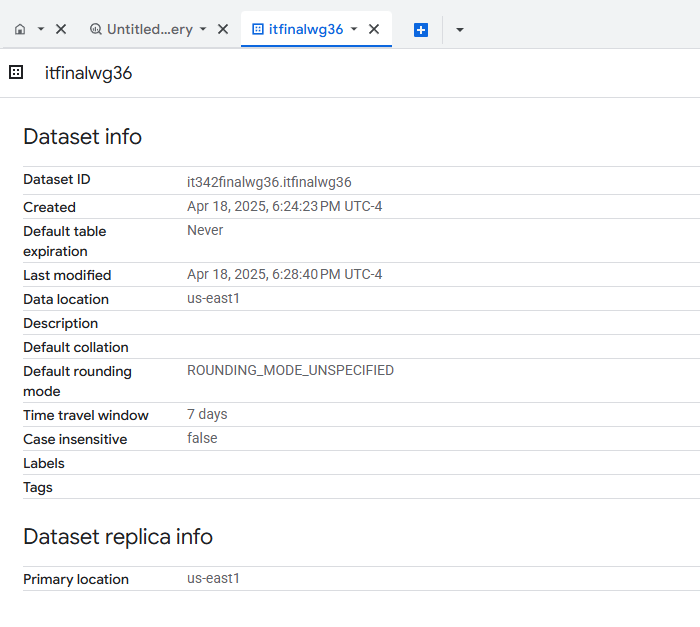
Dataset overview
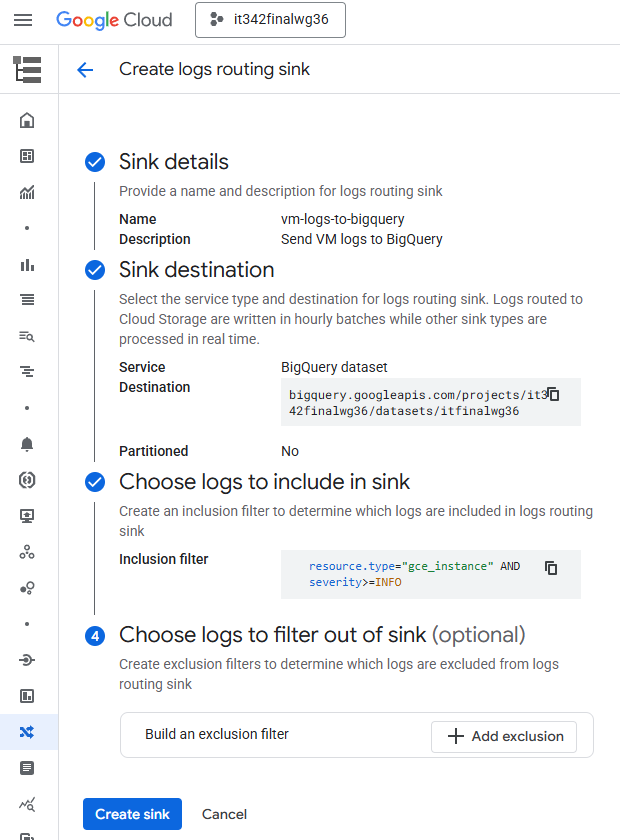
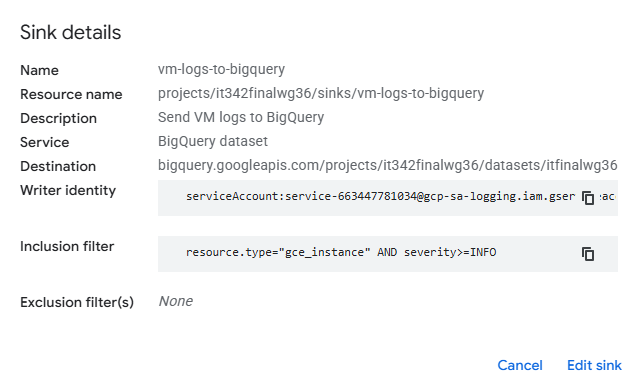
Sink Configuration
Go to log router and Create logs routing sink
Sink details
Name: vm-logs-to-bigquery
Description: Send VM logs to BigQuery
Sink destination
Service: BigQuery dataset
Destination: bigquery.googleapis.com/projects/it342finalwg36/datasets/itfinalwg36
Choose logs to include in sink
Inclusion filter: resource.type=”gce_instance” AND severity>=INFO
This filter forwards instance logs with a severity level of info or higher to the BigQuery dataset, as per the instructions
Click Create sink
Deliverable 20/22: Dataset Info of the new dataset created
Deliverable 21/22: Newly created logging sink
16. CIS Benchmark Implementation
I implemented: 4.3 Ensure “Block Project-Wide SSH Keys” Is Enabled for VM Instances
Project wide SSH keys means that a person only needs one pair of SSH keys to access every single VM in the project. While this is fine in controlled lab environments like this one because of the convenience, it is a very poor security practice in production environments. If one key is compromised, then every single VM will be compromised as well. Instance specific SSH keys instead of project-wide keys significantly reduce the attack surface and risk if SSH keys are compromised.
Default setting (Block project wide SSH keys unchecked)
Check the “Block project-wide SSH keys” box for both VMs and apply the changes
After applying the changes, when you look at the overview for the VM, “Block project-wide SSH keys” should be On
Deliverable 22/22: CIS Benchmark implementation