RDP Blocking Automation
Blocking RDP brute-force attackers using Sentinel playbooks.
At a high level, our automation will:
- Extract the source IP from the incident
- Pass this IP as a parameter to a PowerShell script, which creates a new NSG rule that blocks RDP traffic from the IP
- Update the incident with tags and a comment
Updated and final diagram:
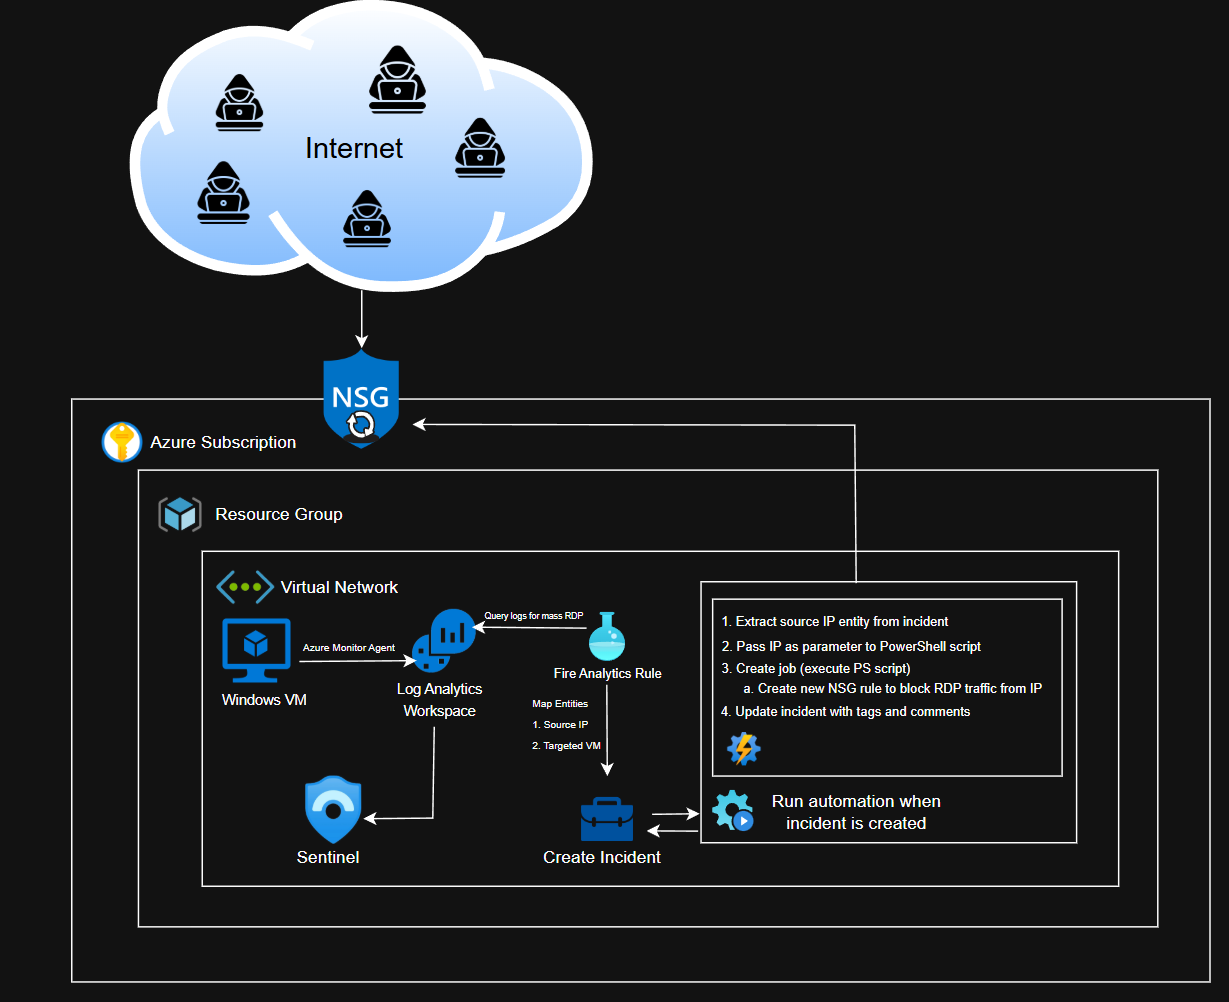
In order to accomplish this, we need detection logic for mass RDP events, create an incident on Sentinel whenever the detection is fired, create the PowerShell script, create a workflow, and then link the automation to the incident (the automation should fire when an incident is created).
Detection Logic
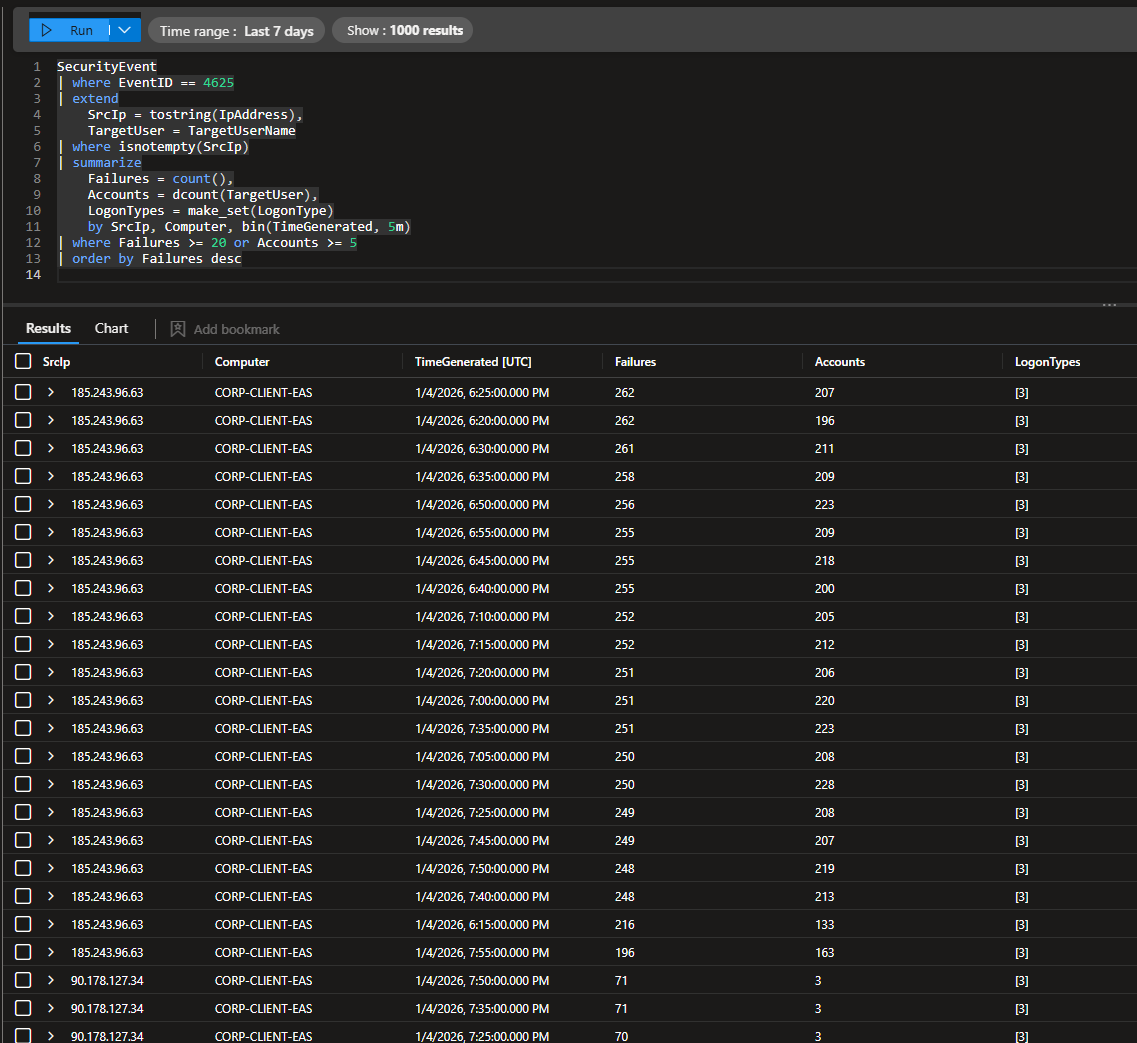
KQL Query
I used this query to look for failed logins where the attacker tried at least 5 different user accounts or failed at least 20 times.
1
2
3
4
5
6
7
8
9
10
11
12
13
14
SecurityEvent
| where EventID == 4625
| extend
    SrcIp = tostring(IpAddress),
    TargetUser = TargetUserName
| where isnotempty(SrcIp)
| summarize
    Failures = count(),
    Accounts = dcount(TargetUser),
    LogonTypes = make_set(LogonType)
    by SrcIp, Computer, bin(TimeGenerated, 5m)
| where Failures >= 20 or Accounts >= 5
| order by Failures desc
This detection was initially designed for RDP brute-force activity, but the authentication telemetry showed only network logon attempts (LogonType 3). This rule is generalized to detect mass network authentication failures, but it is fair to assume that these are RDP attacks since our VM is Windows-based and has port 3389 exposed.
Creating the Analytics Rule
Head to Sentinel > Configuration > Analytics
Create > Scheduled query rule
Give the rule a name and a fitting description
I set the severity to Medium and mapped it the appropriate MITRE ATT&CK TTPs (T1110)
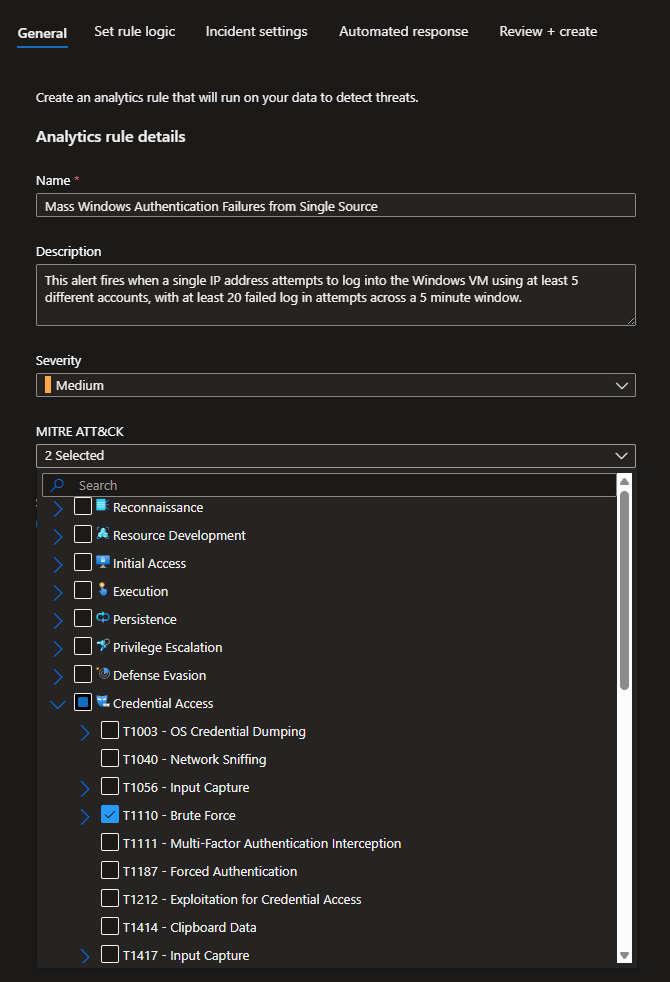
Paste the KQL Query we ran beforehand
Under Entity Mapping, I mapped the following
- IP: Address → SrcIP
- Host: HostName → Computer
These will provide some context to the incidents and allow our automation to extract the IP.
For Query scheduling, run every 5 minutes and load data from the last 5 minutes (this is the lowest you can go according to Azure)
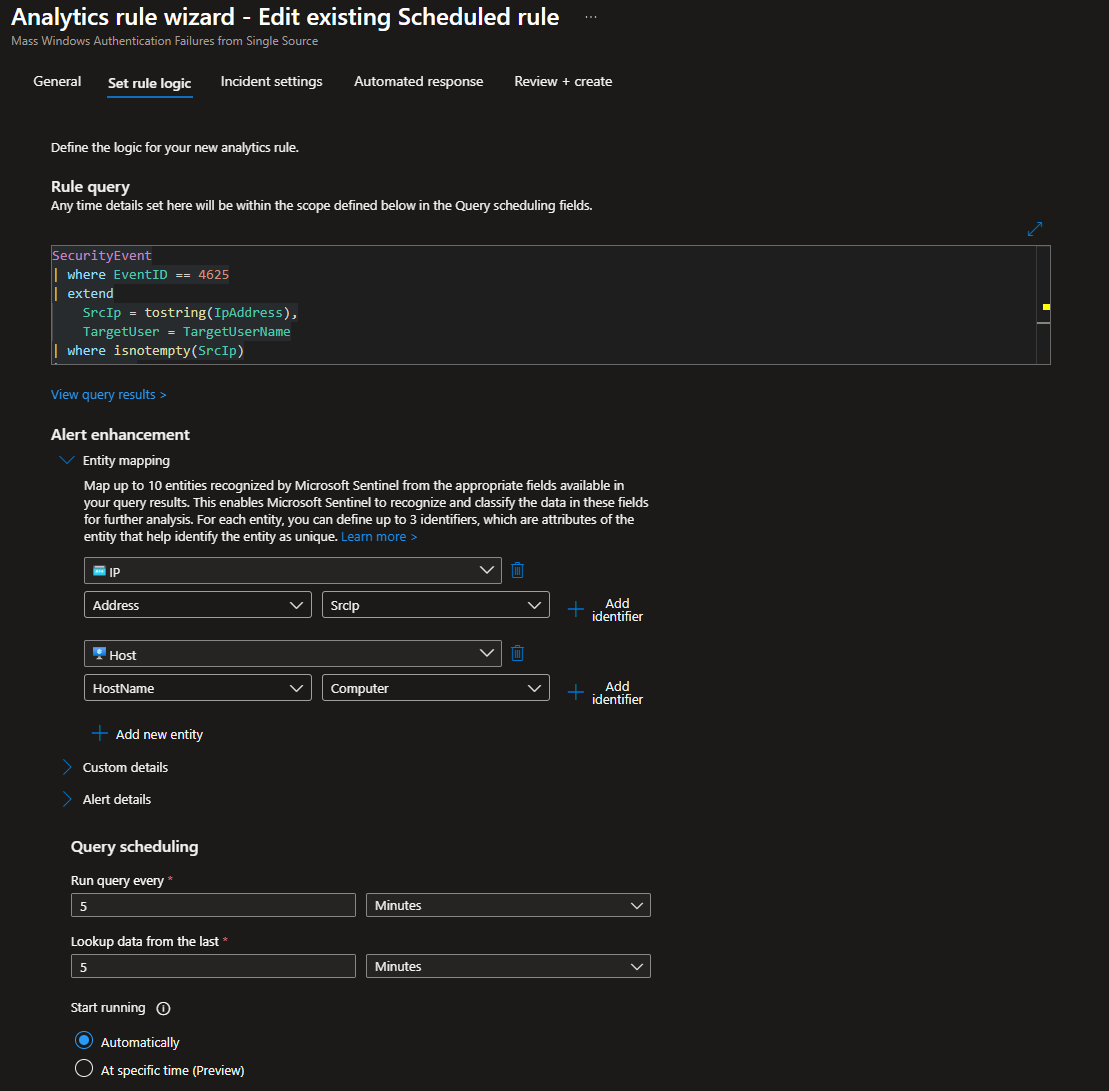
Leave Start running at Automatically
Set the Alert threshold greater than 0
This basically means an incident will be created if the KQL query returns any results.
Trigger an alert for each event (each IP will get their own alert/incident)
Leave Suppression off
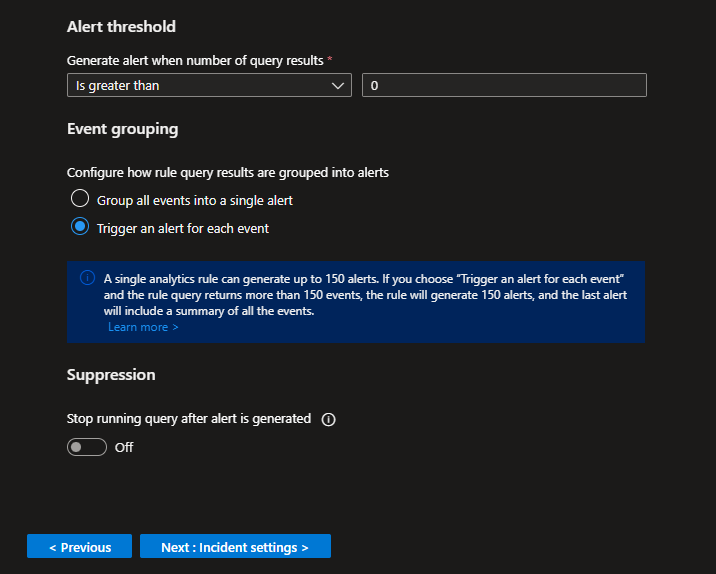
Create the Rule

Automation Account + Runbook
Head to Automation Accounts
Create new
Select the proper subscription, RG and region
Give the account a name
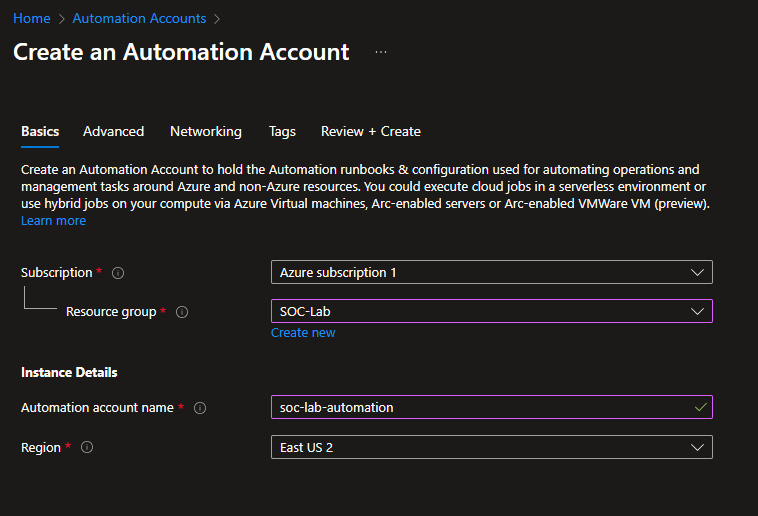
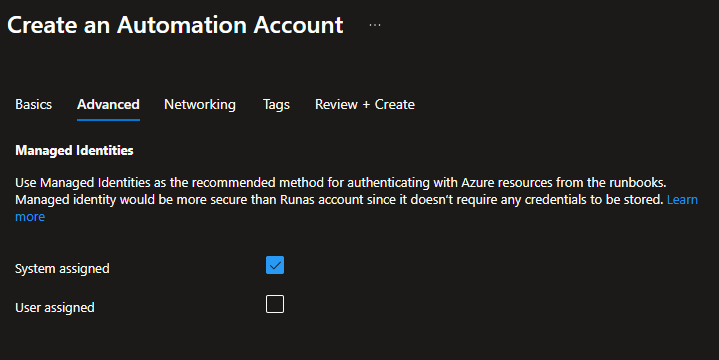
For managed identities, make sure System assigned is checked
Then click Review + Create
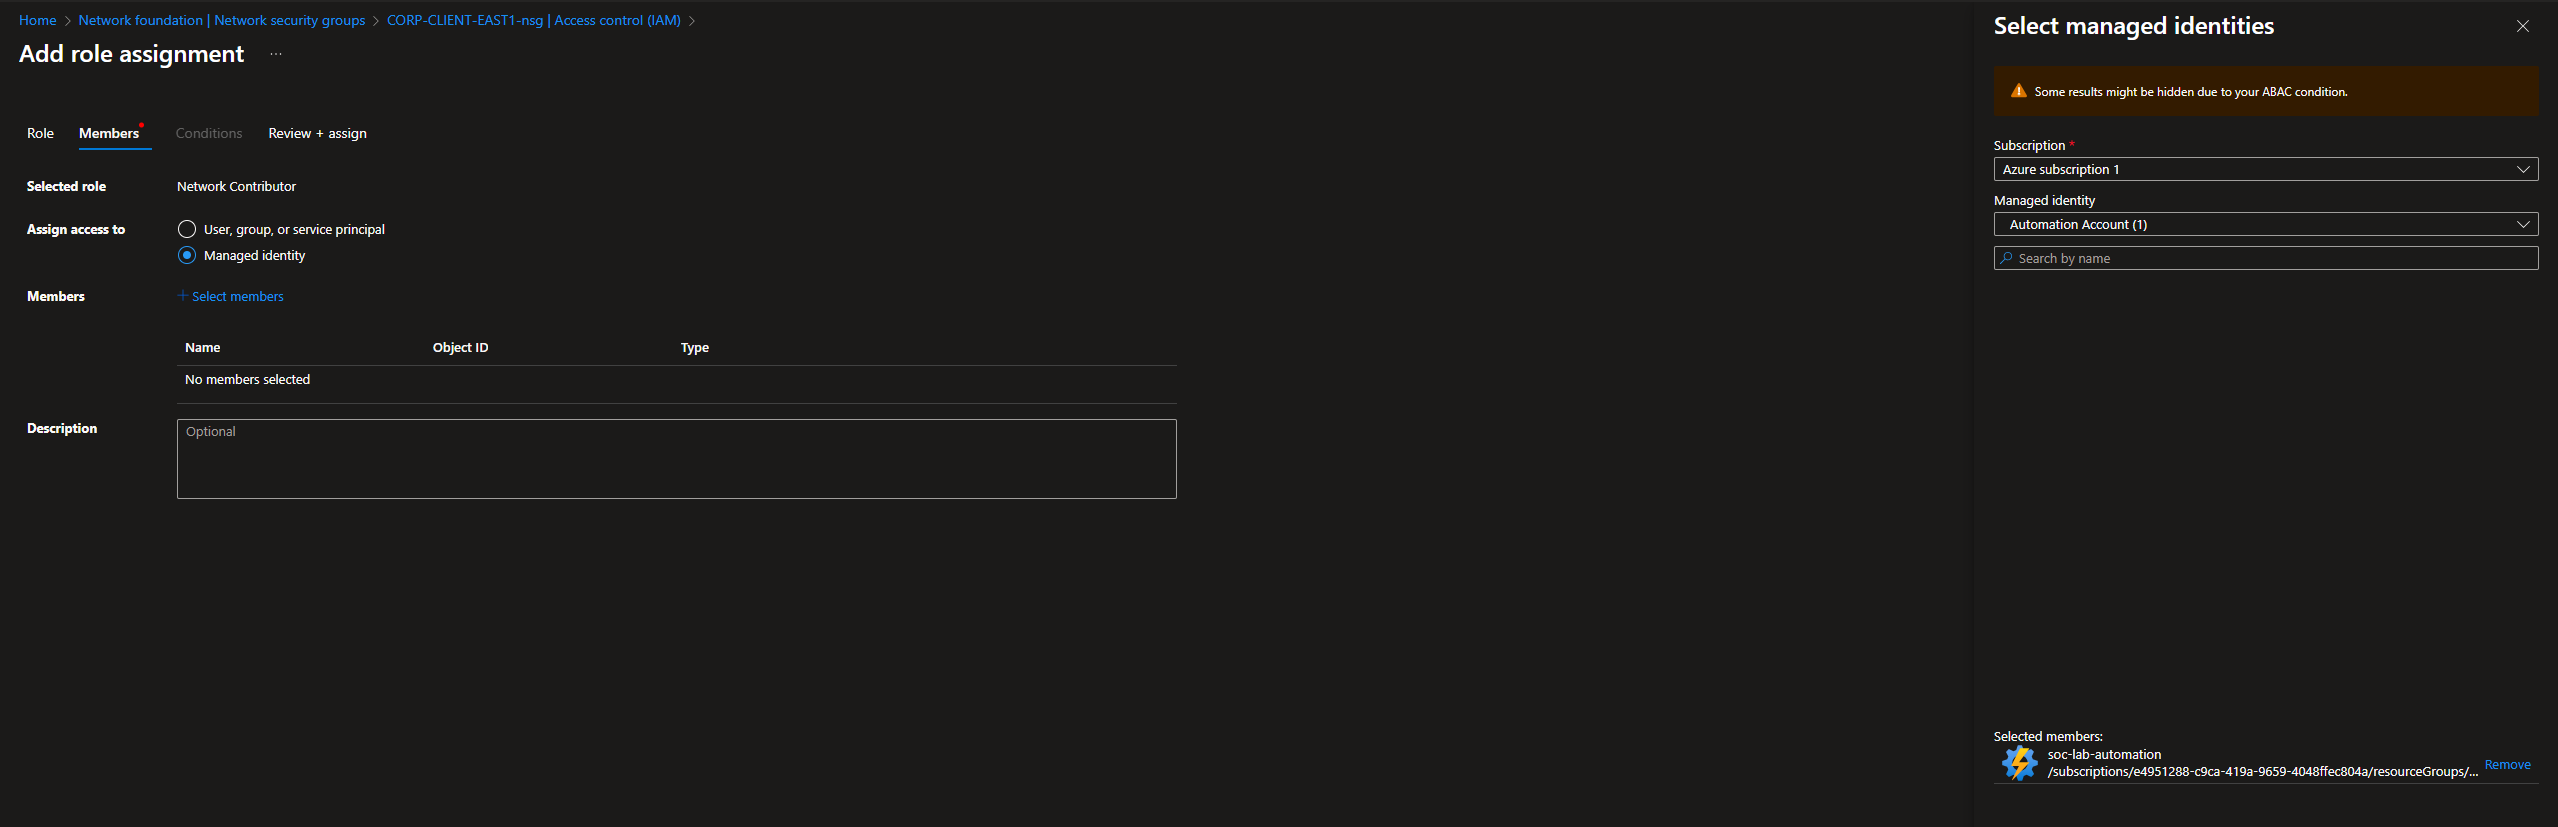
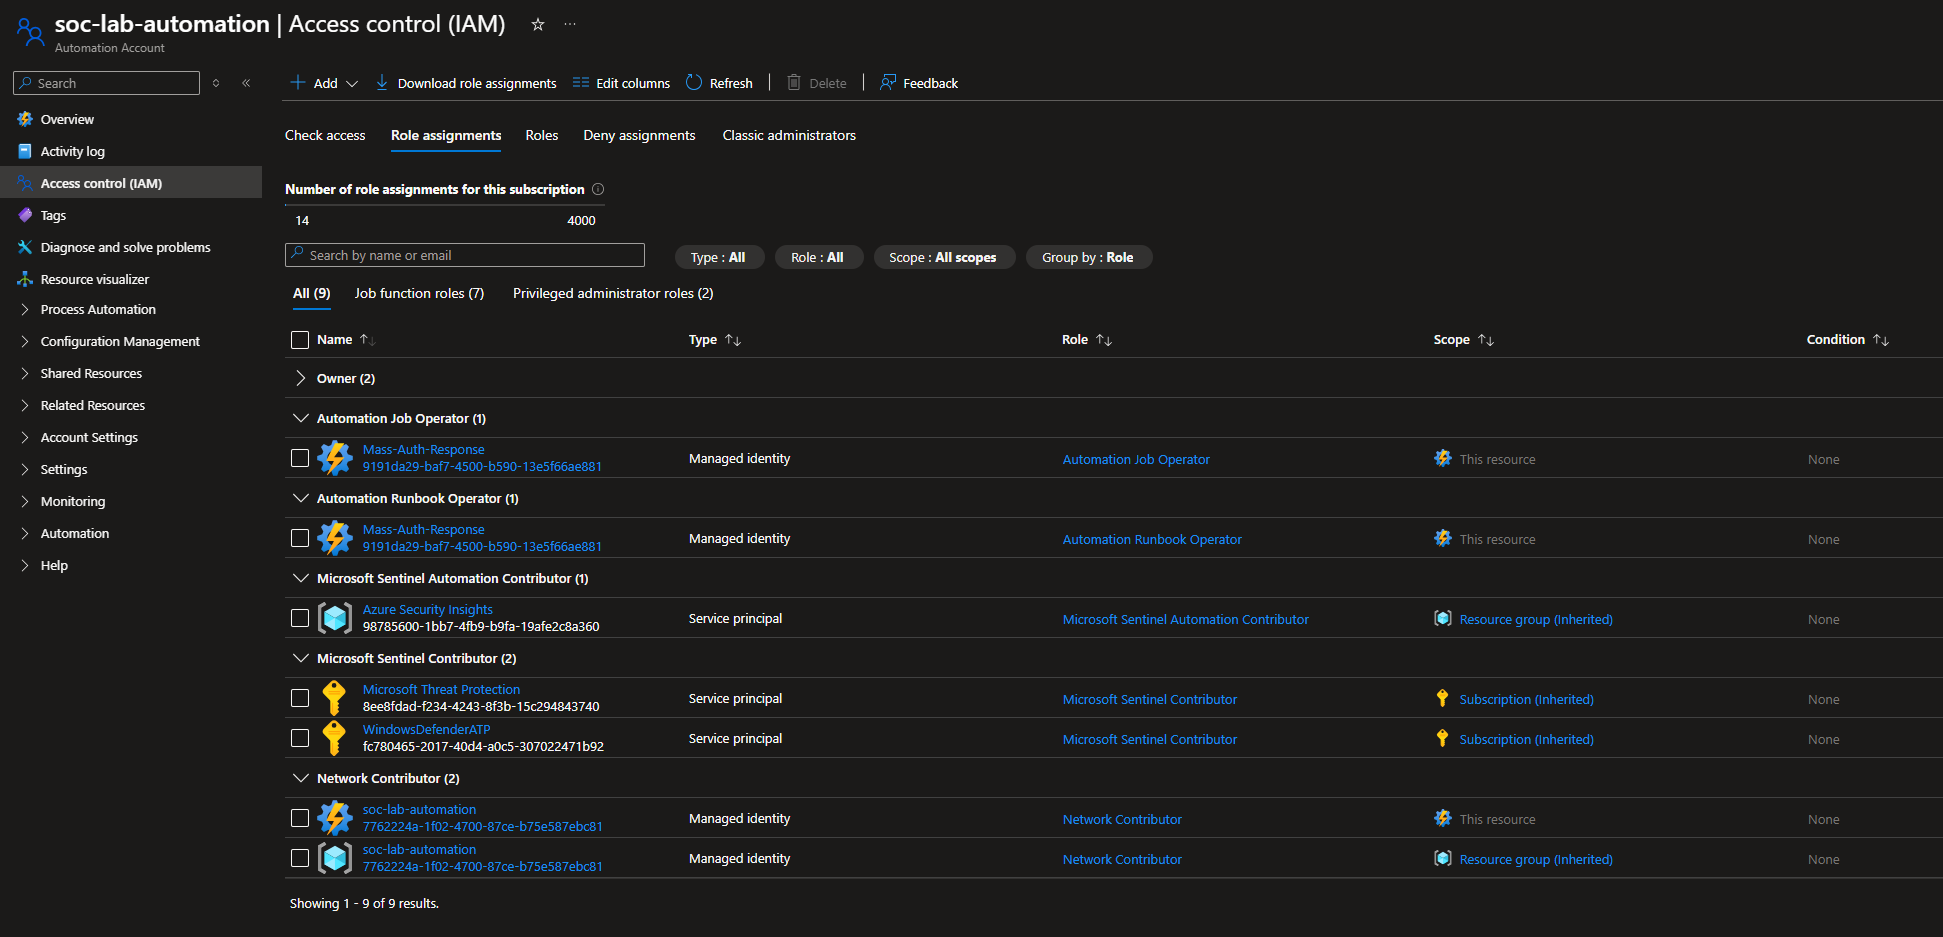
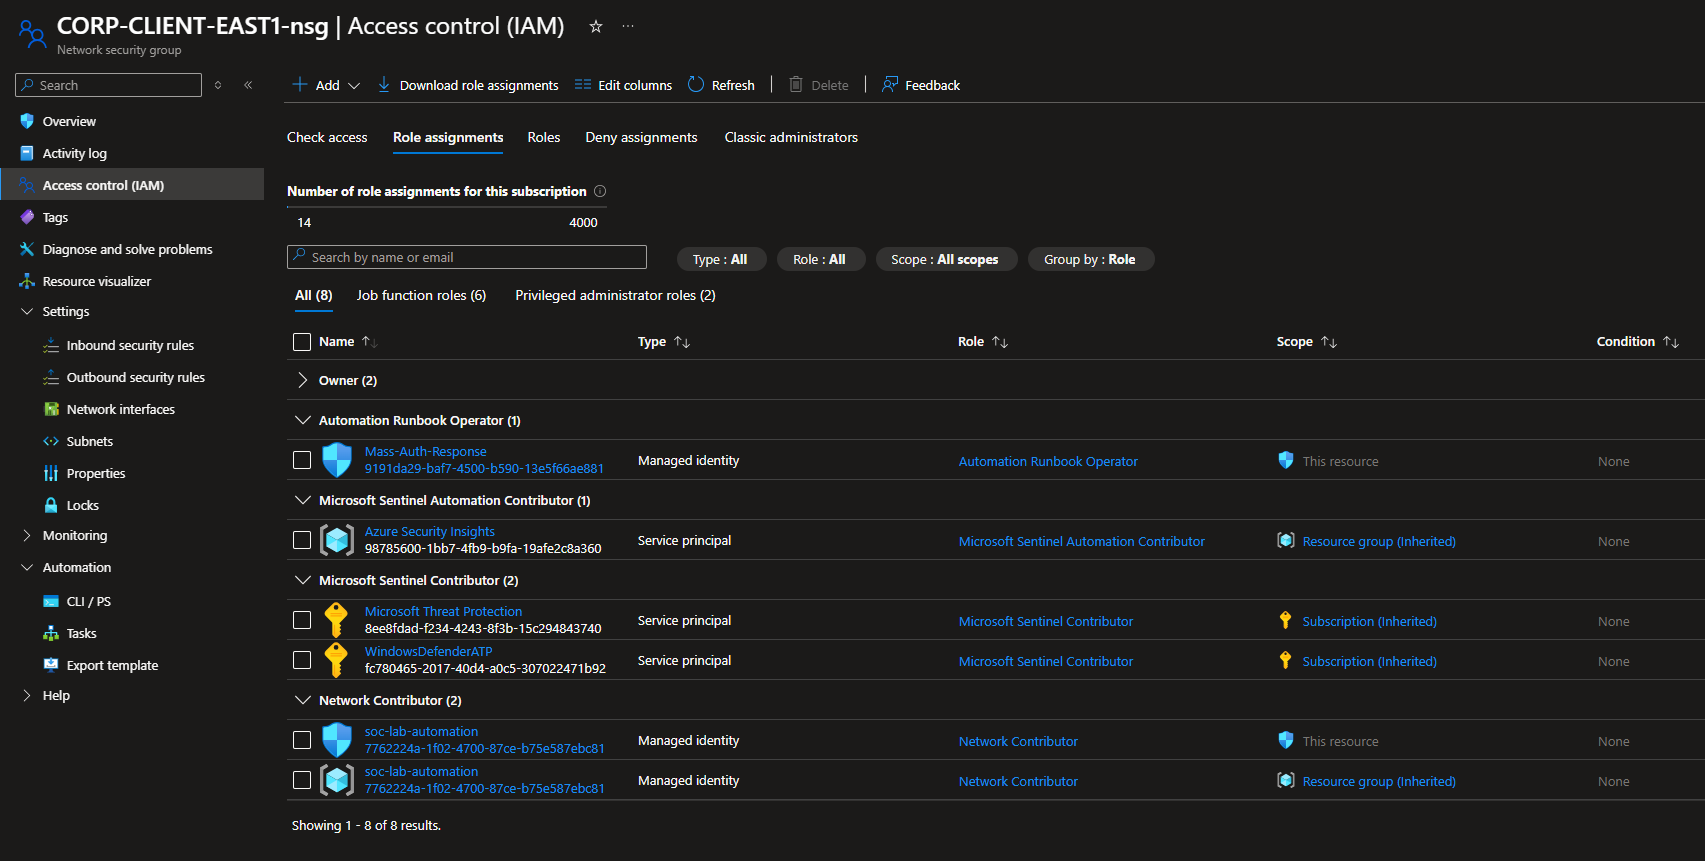
RBAC Configurations
Our Automation account needs certain permissions in order to work properly
Head to NSG > IAM
The automation account should have the Network Contributor role over the scope of our NSG, so it can create NSG rules.
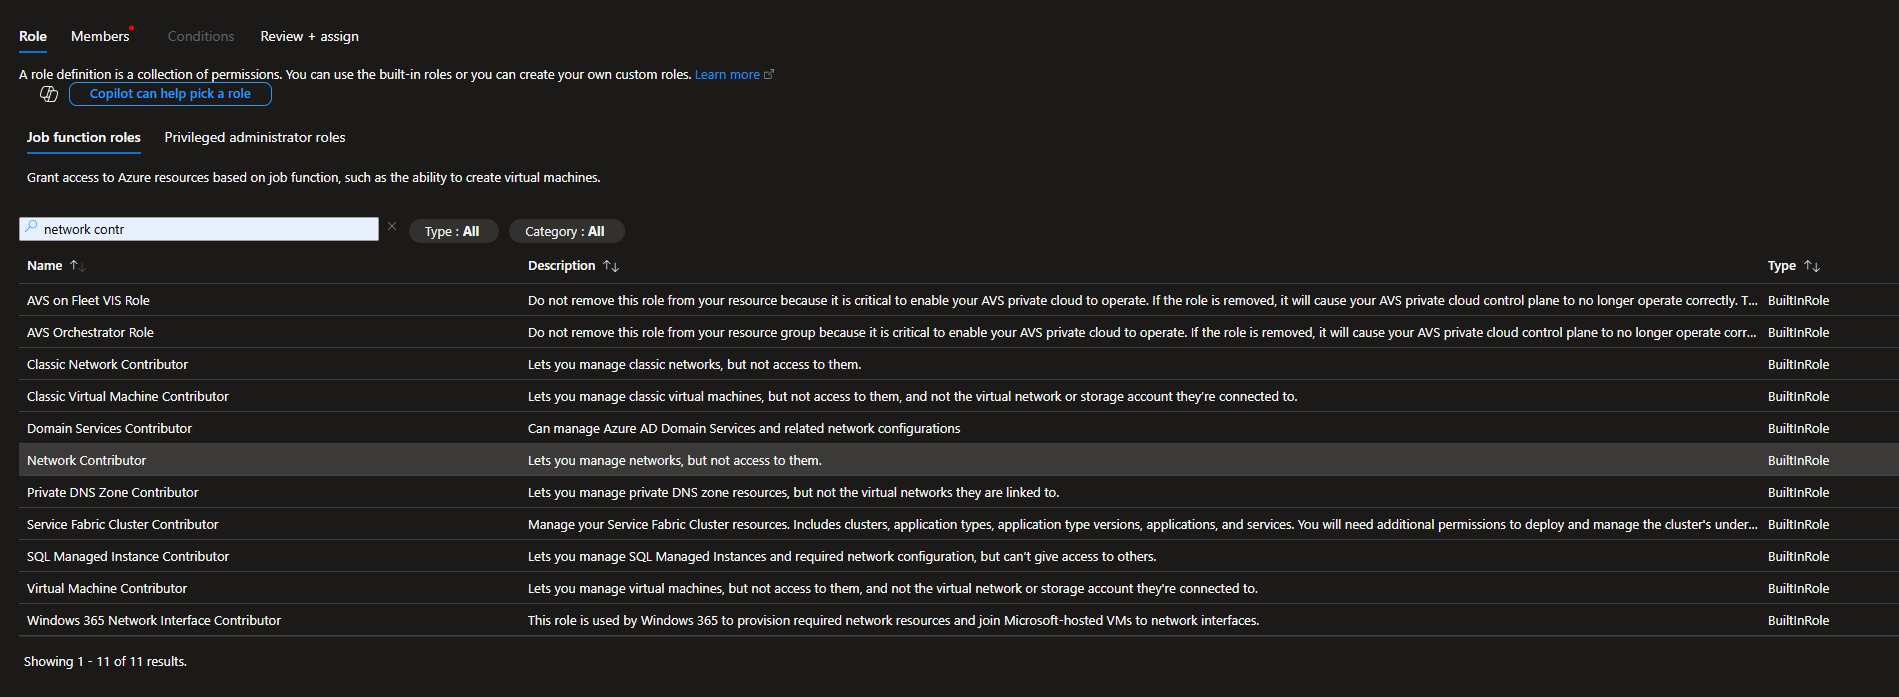
For members, select Managed Identity > Automation account
NSG Rule Creation Script
We will now create the PowerShell script that creates the NSG rule
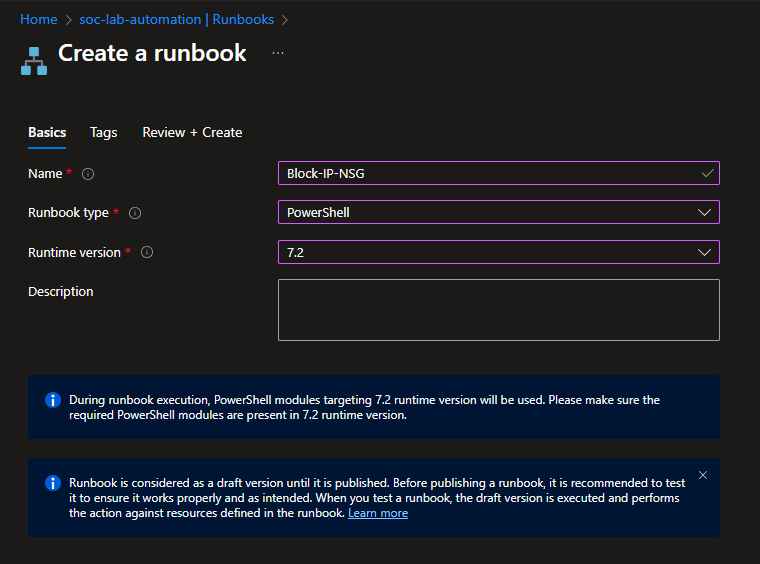
Head to Automation Account > Process Automation > Runbooks
Create new
Give the runbook a name, select the type to PowerShell and set the runtime version to 7.2
Click Review + Create
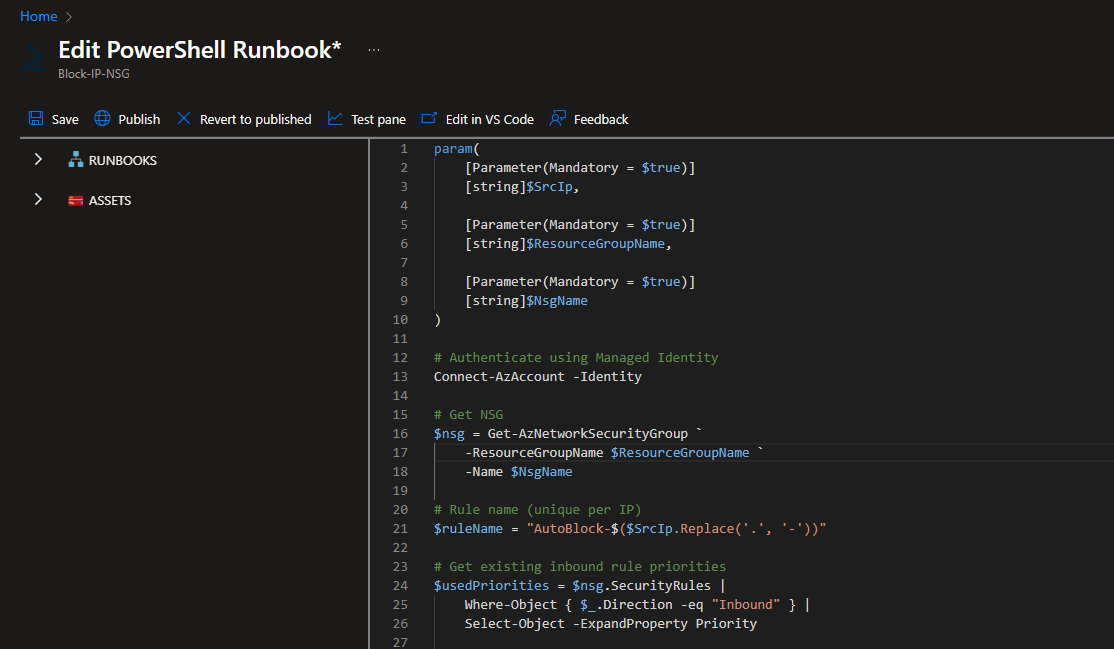
Script from: https://github.com/walterg7/azure-soc/blob/main/runbooks/Block-IP-NSG.ps1
Overview:
- Authenticates using managed identity
- Retrieves the specified NSG
- Generates a unique rule name from the IP address
- Finds the next available priority number (starting at 101, avoiding conflicts)
- Adds an inbound deny rule that blocks the source IP on RDP port 3389
- Skips if the rule already exists to prevents duplicates
- Outputs confirmation of the blocked IP and priority used
Paste the script, save and publish
Script Testing
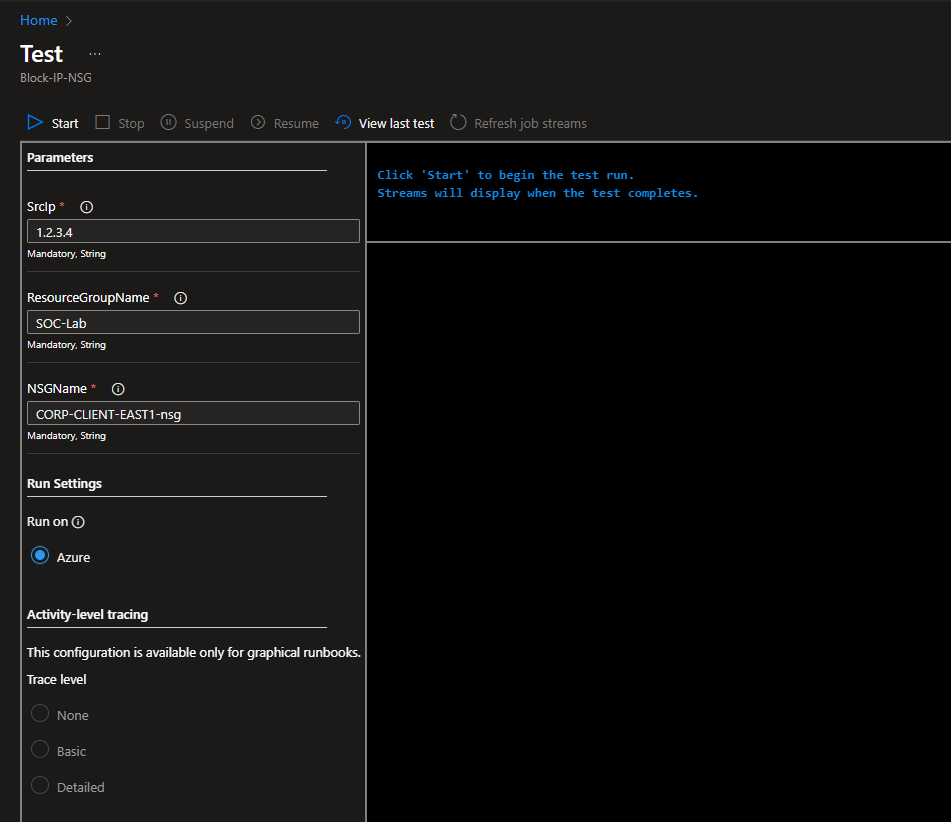
Click the test pane
The script expects 3 parameters: the RG name, NSG name, and the IP to block.
Make sure the RG and NSG names match according to your setup, then put in any IP to test the script.
Click start.
After the script finishes running, head to NSG
We should see the new rule automatically added.
Logic App (Workflow)
Head to the Logic Apps dashboard
Select Create (Consumption)
I named my app Mass-Auth-Response
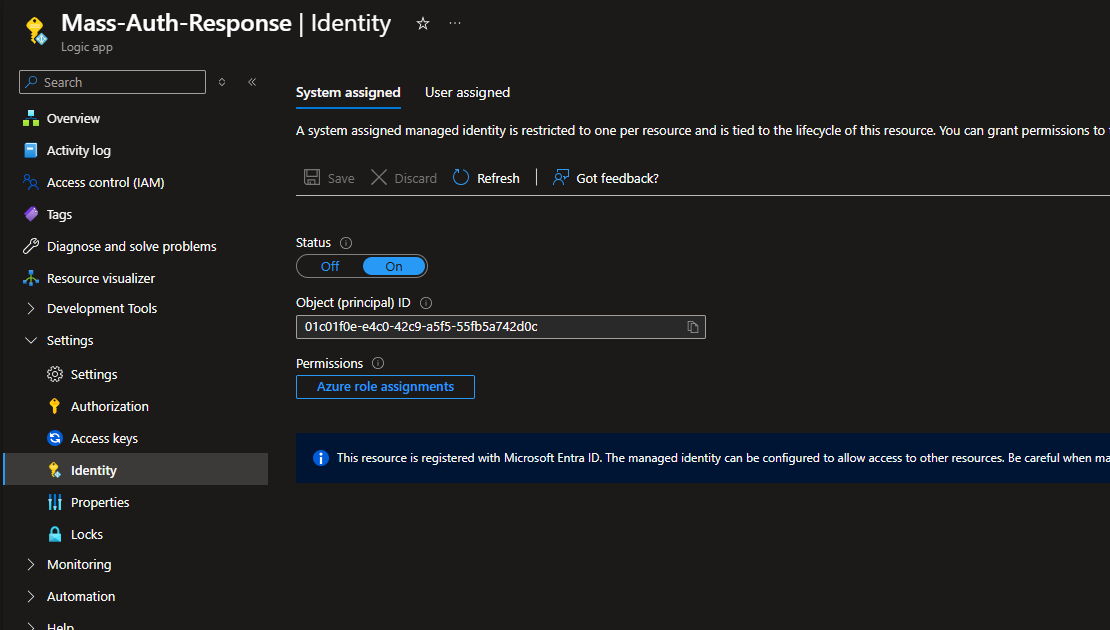
Head to Settings > Identity
Make sure System assigned is set to On
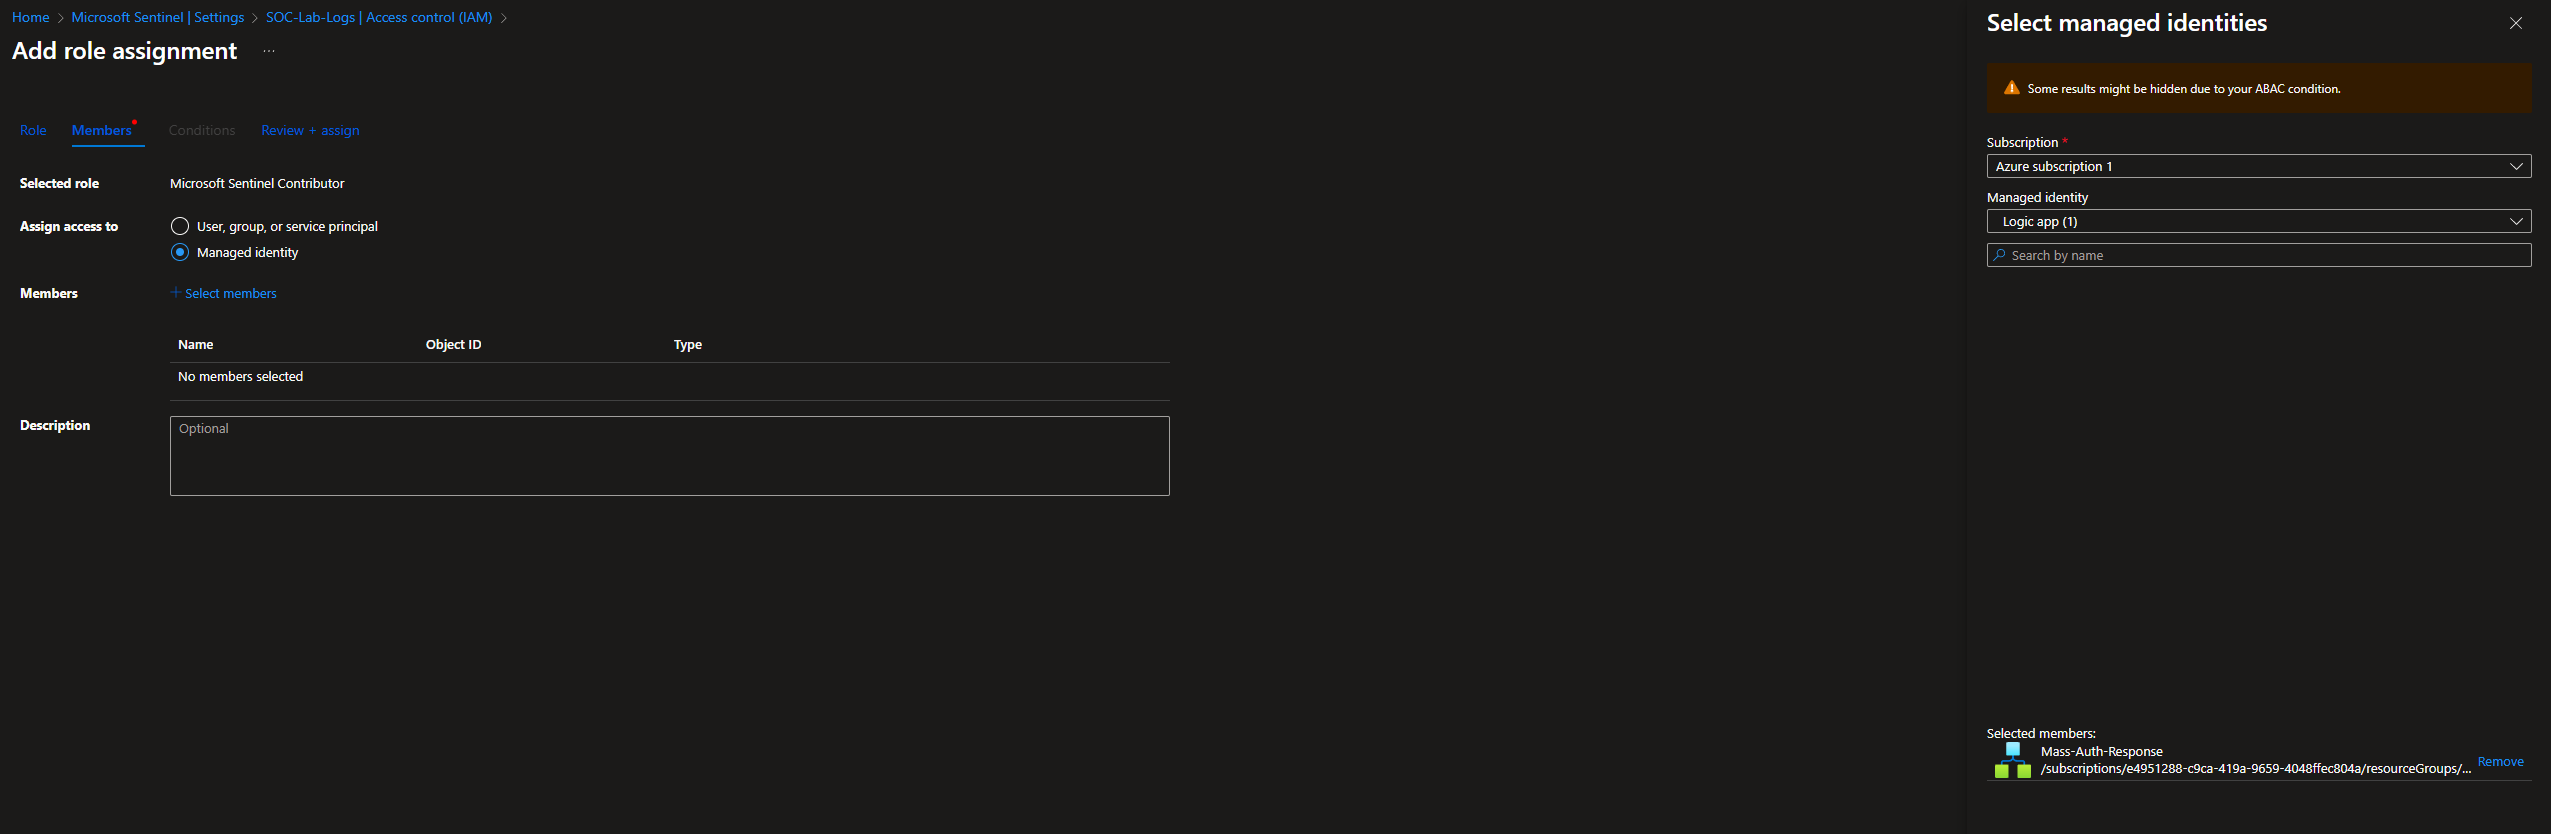
RBAC Configurations
The runbook runs in an Azure Automation Account, so the Logic App identity needs permission to start jobs.
Go to Automation Account → IAM
Add role assignment
- Roles: Automation Job Operator + Automation Runbook operator
- Assign access to: Managed identity: Logic App (Mass-Auth-Response in my case)
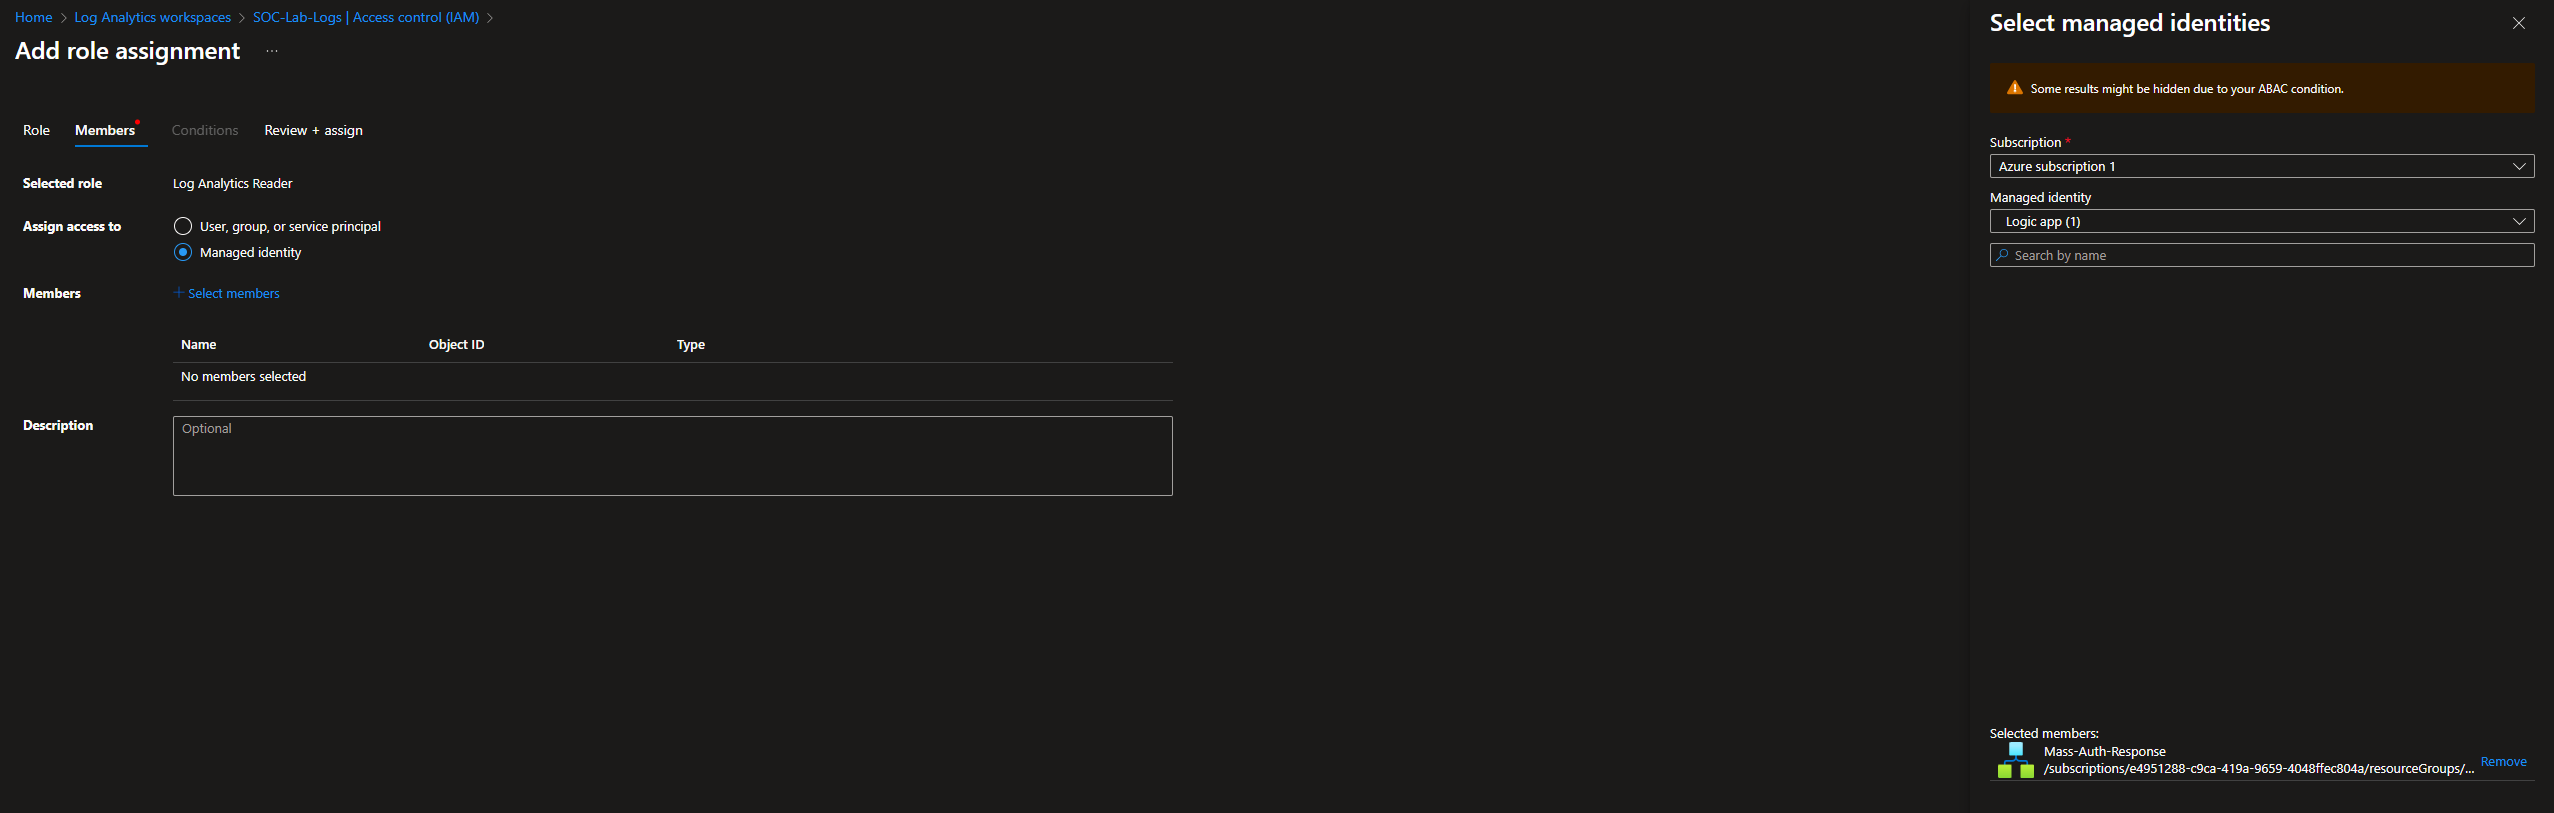
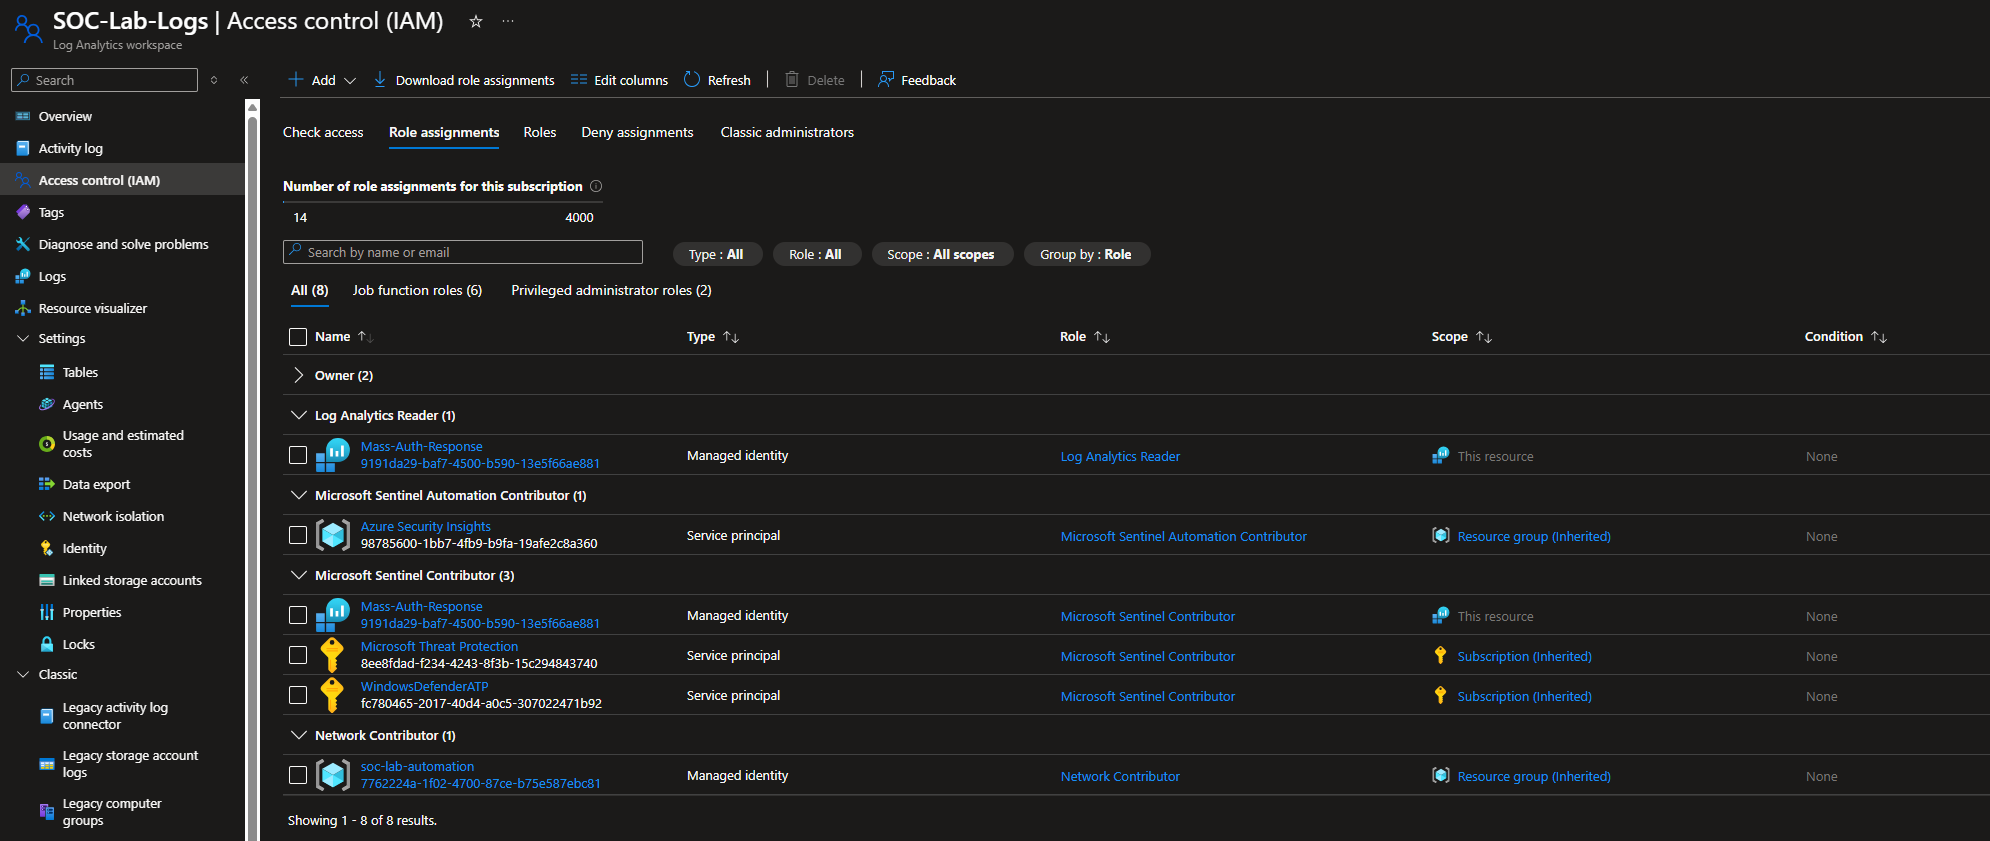
Our runbook also needs to be able to read SecurityEvent data
Head to Log Analytics Workspace → IAM
Add role assignment
- Roles: Log Analytics Reader
- Assign access to: Managed identity: Logic App (Mass-Auth-Response in my case)
Finally, head to Sentinel > Automation
Click configure permissions
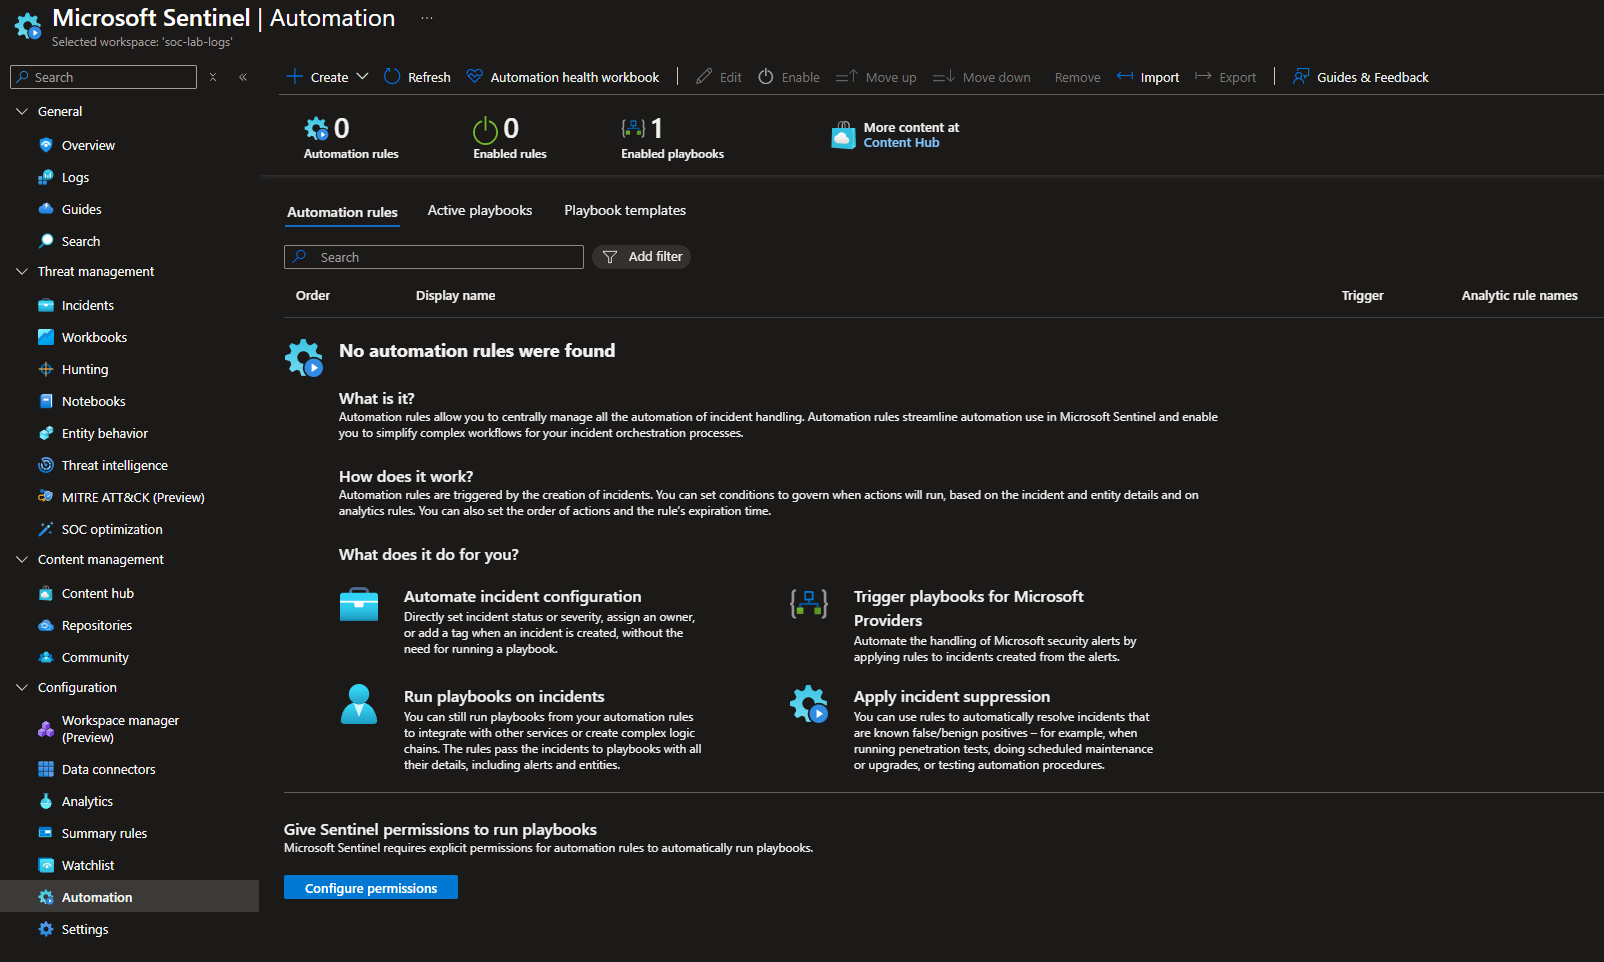
Select our RG
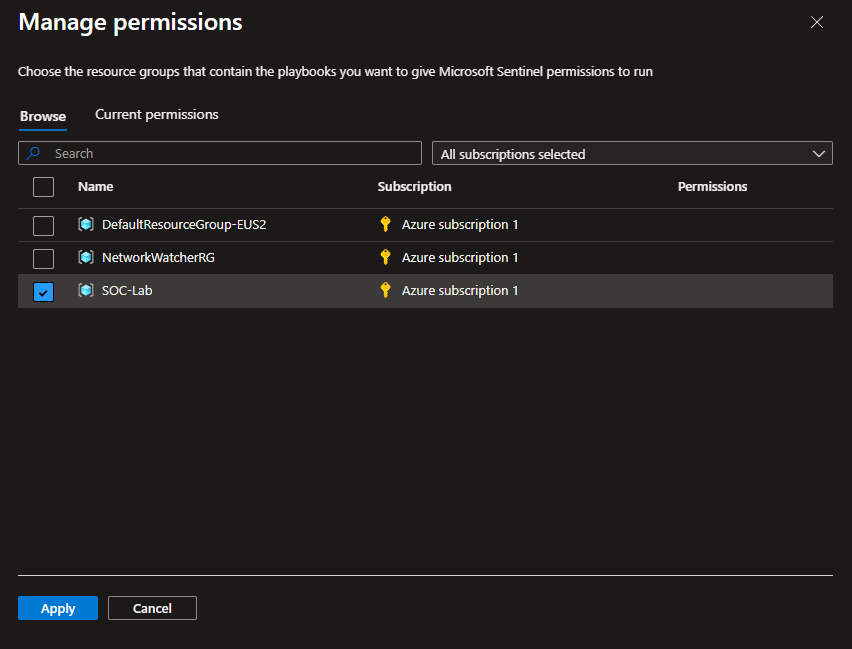
Add the logic app as a Sentinel contributor so tagging and commenting works

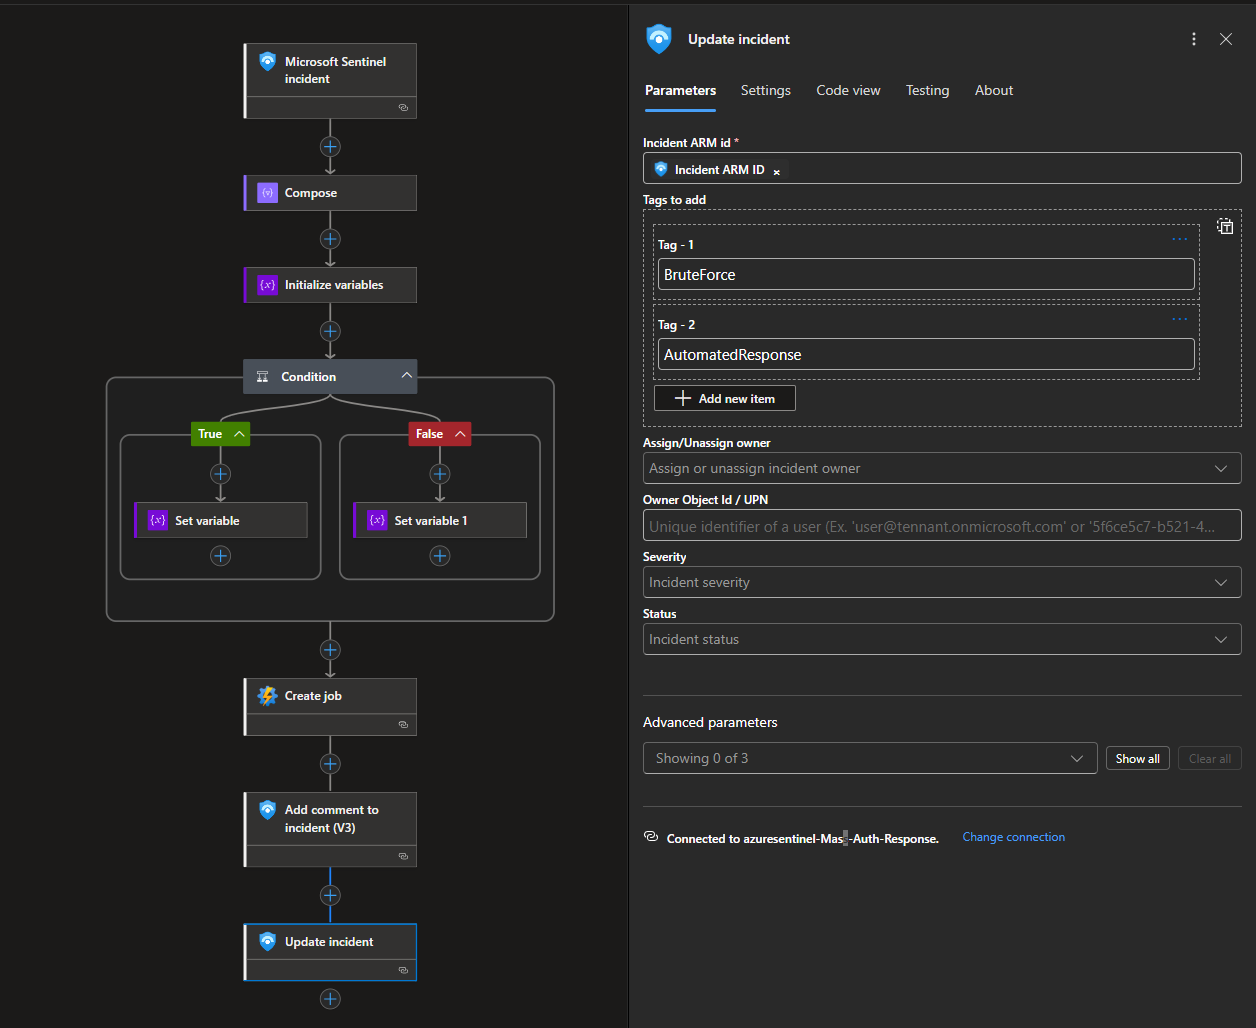
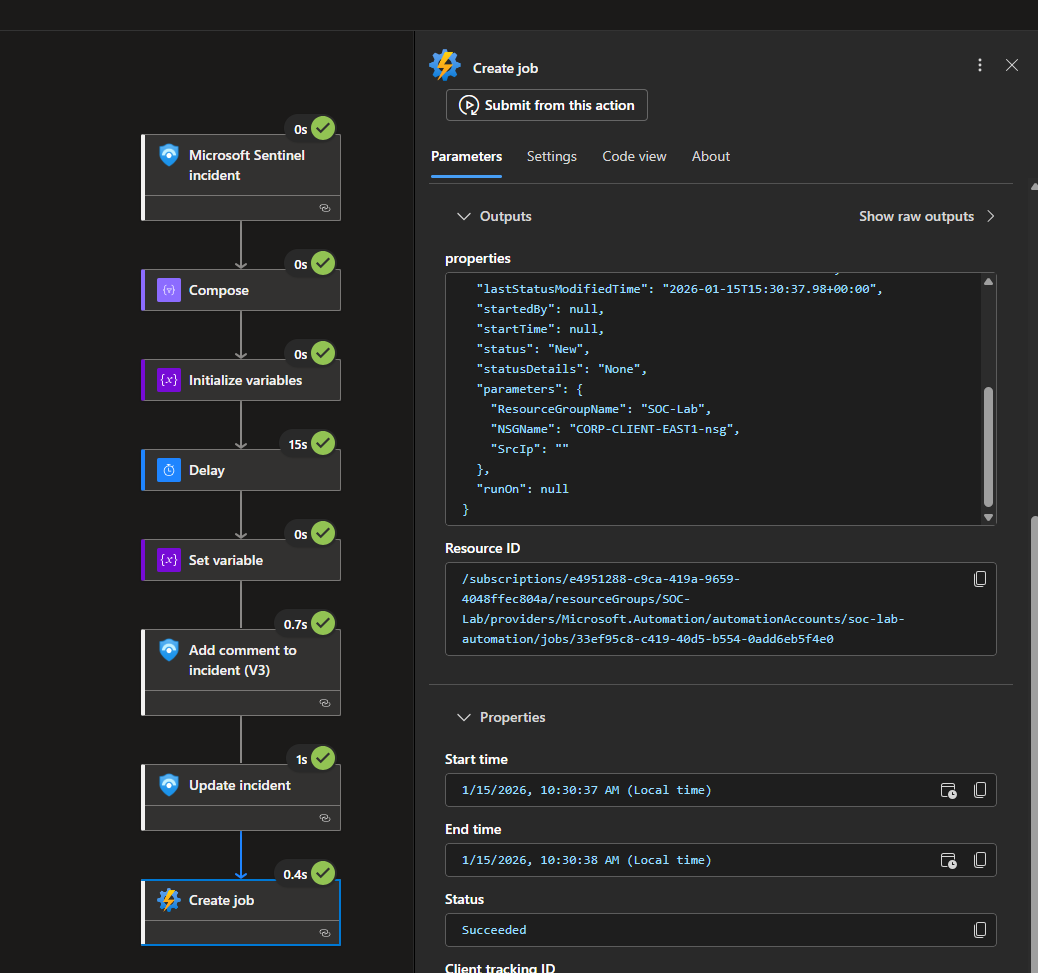
Workflow
Head to Logic Apps > Development Tools > Logic app designer
Workflow Breakdown
This workflow is triggered when a Sentinel incident is created from our mass authentication attempt detection rule.
First, it inspects the incident’s related entities to identify the source IP address associated with the alert.
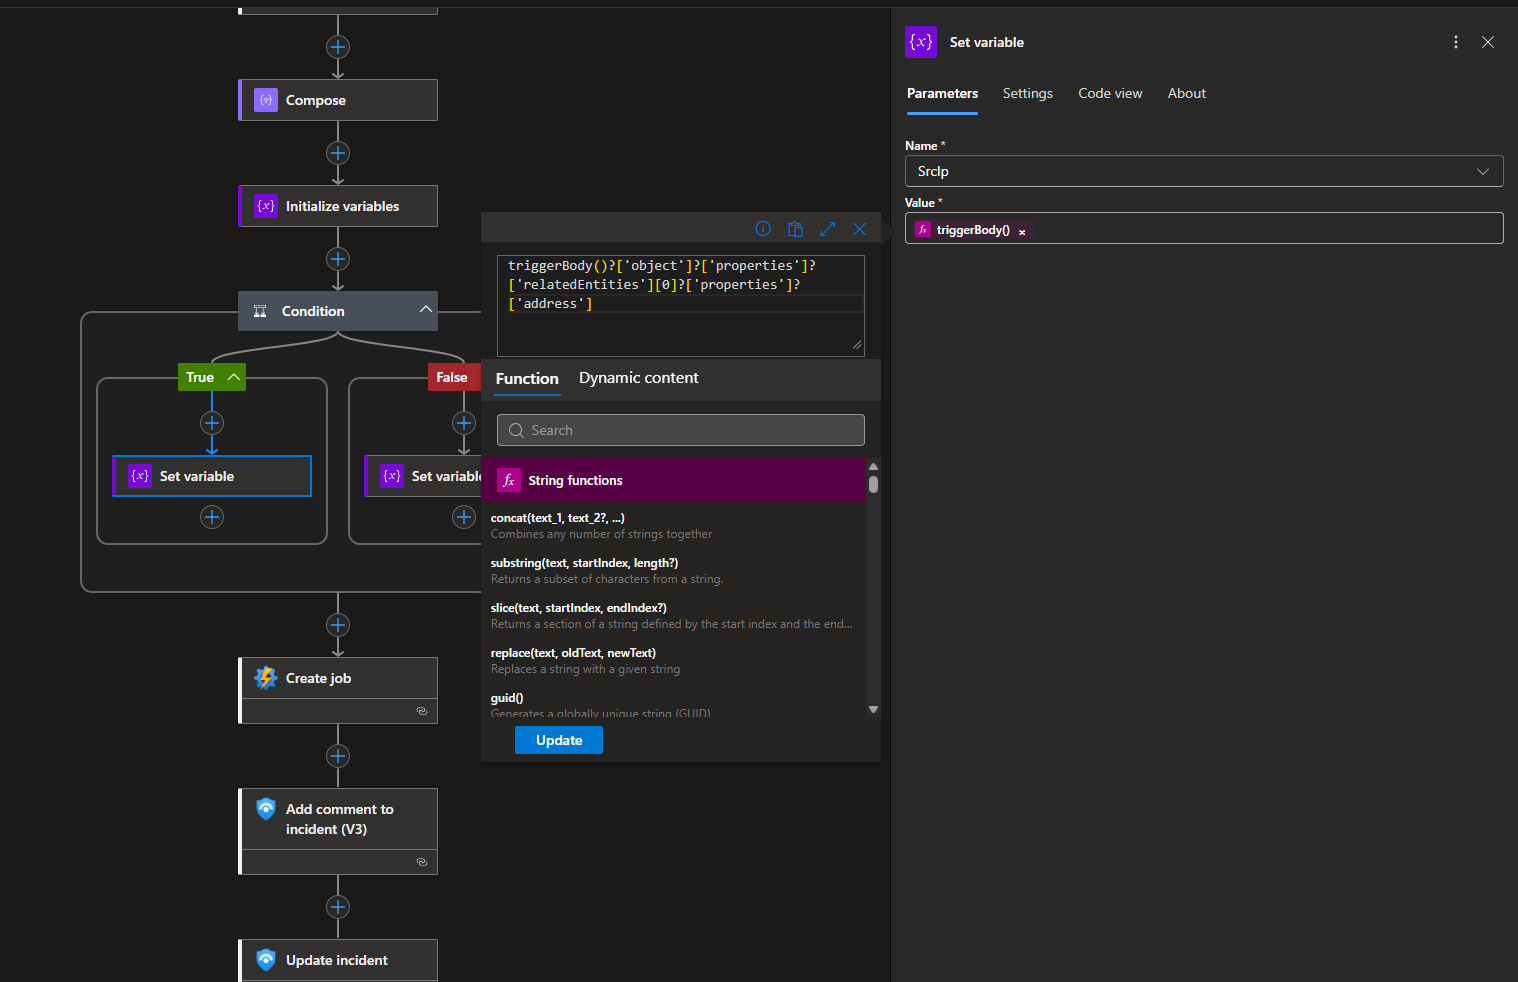
Then, it initializes a variable, SrcIp, that must be passed onto the PowerShell script.
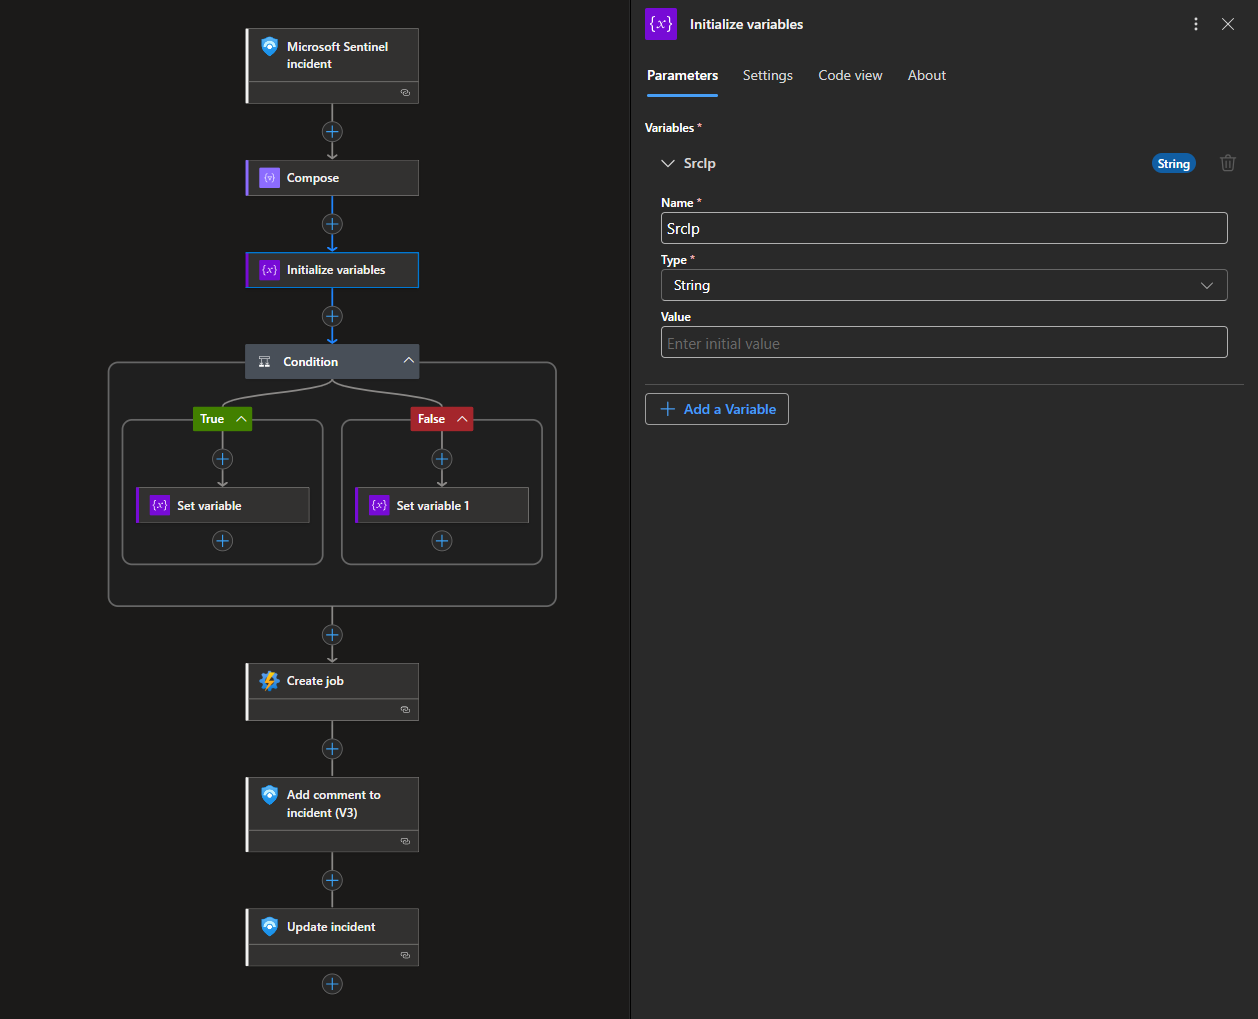
Because the ordering of entities is not guaranteed, the playbook includes conditional logic to determine which entity contains the IP address and extracts it accordingly. See the NSGs not Being Created portion of the Troubleshooting section.
This logic works because during incident creation, only 2 entities are mapped: the source IP address and host name. If you have more entities mapped, using a for loop is a better approach.
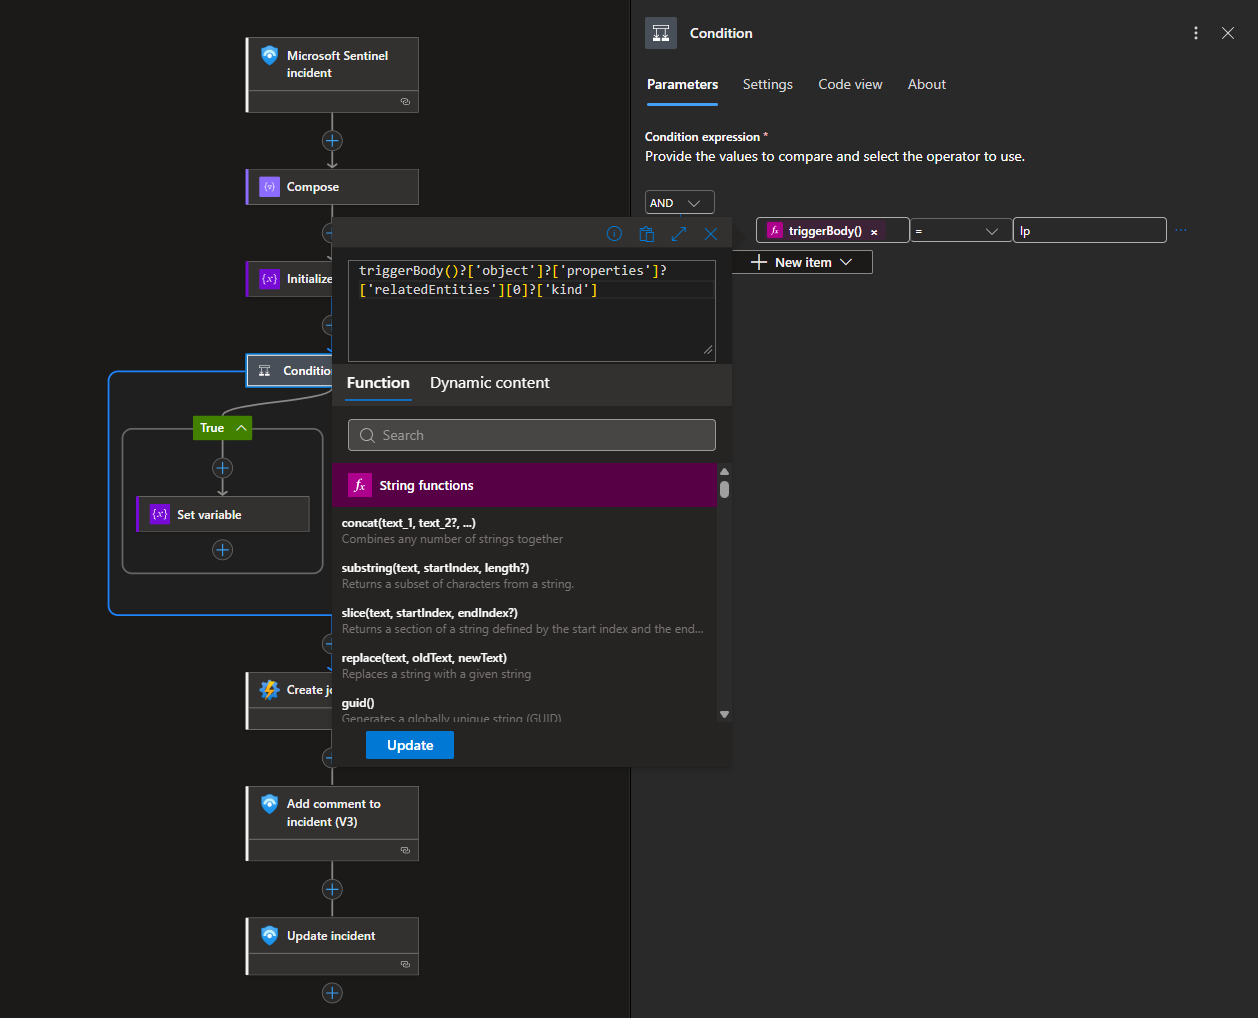
If the IP entity is found at index 0, we set the value of SrcIp to the extracted IP address.
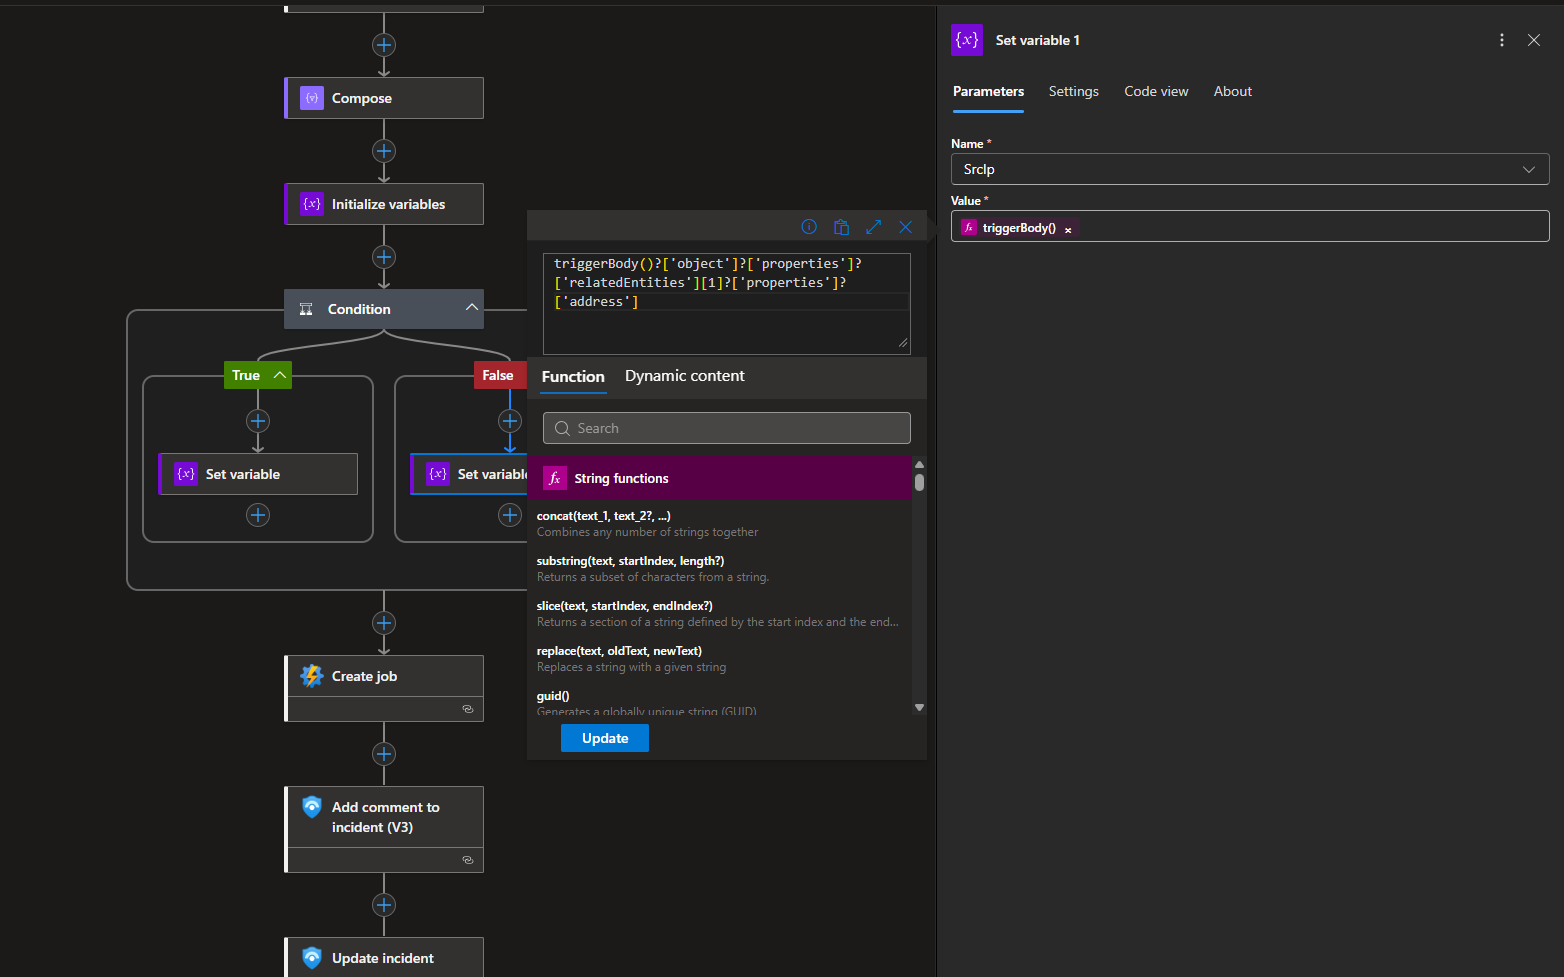
If the IP entity is found at index 1, we set the value of SrcIp to the extracted IP address.
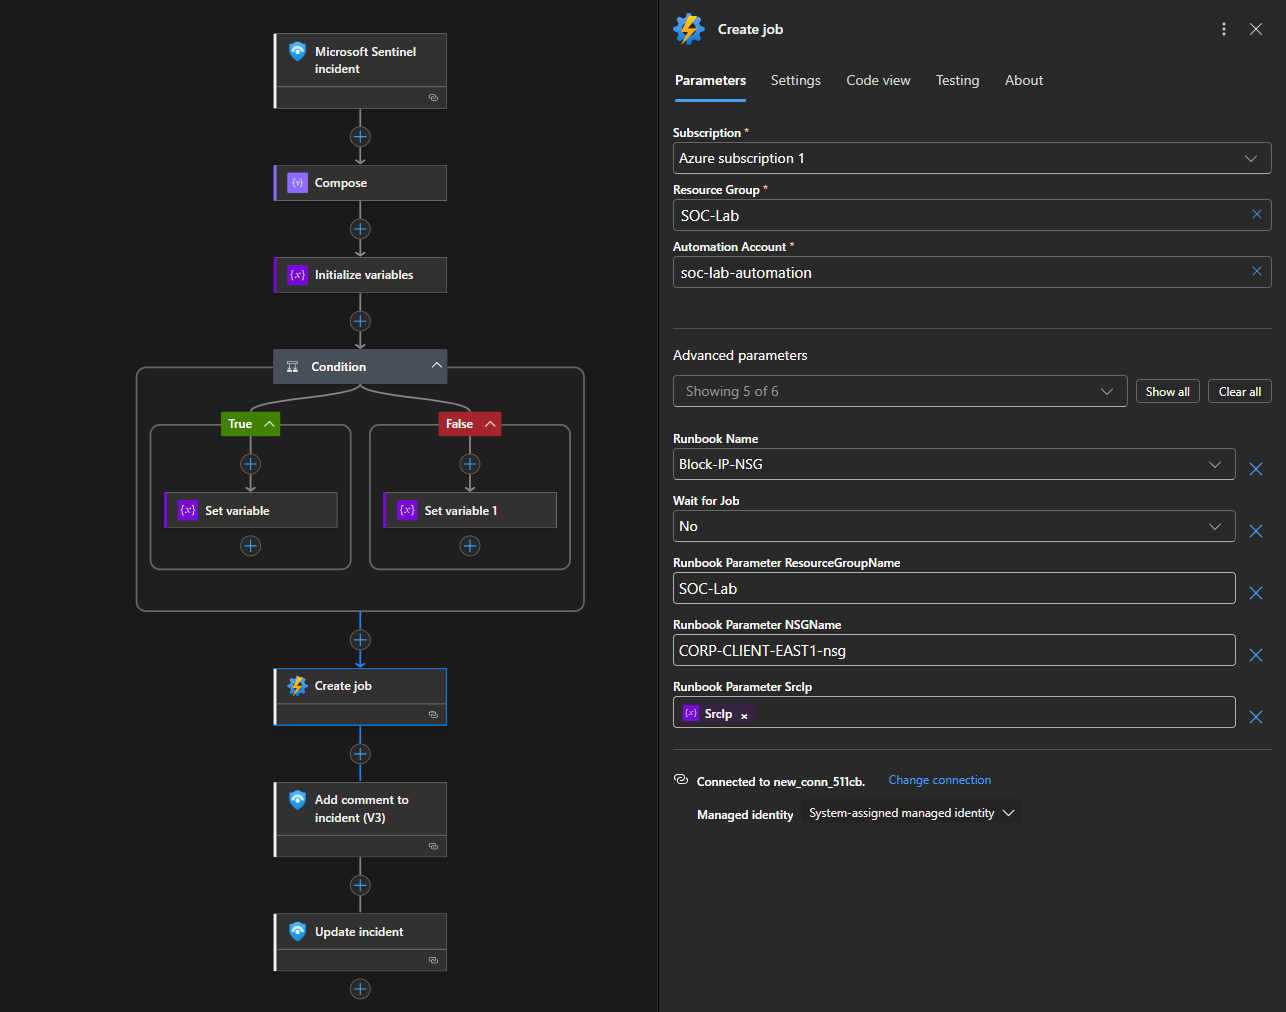
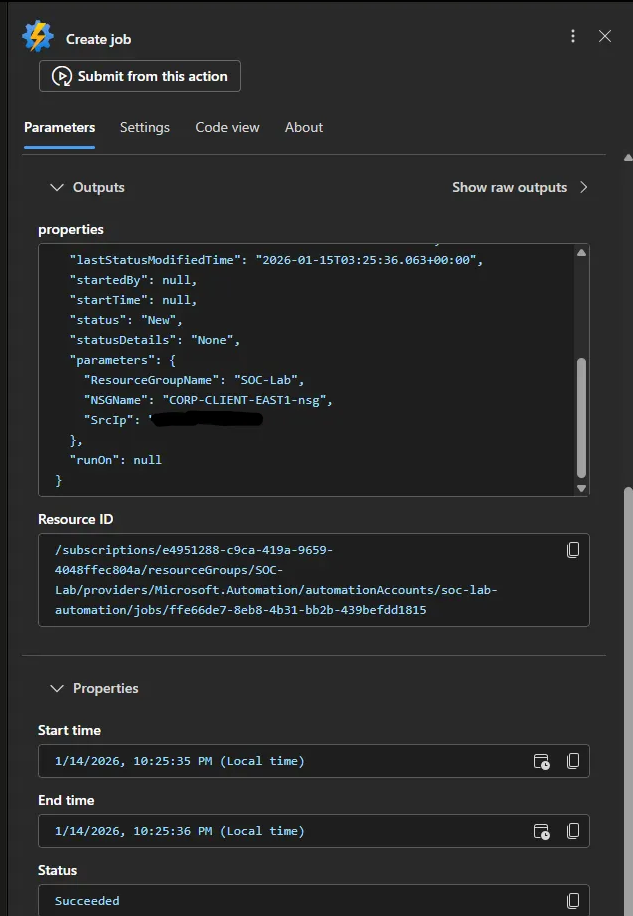
Once the source IP is identified, the playbook invokes the automation runbook that dynamically creates a deny rule in the specified NSG, blocking inbound traffic from the offending IP at the network layer.
The RG and NSG names are hardcoded in my setup.
After the containment action is initiated, the playbook adds a comment describing the response.
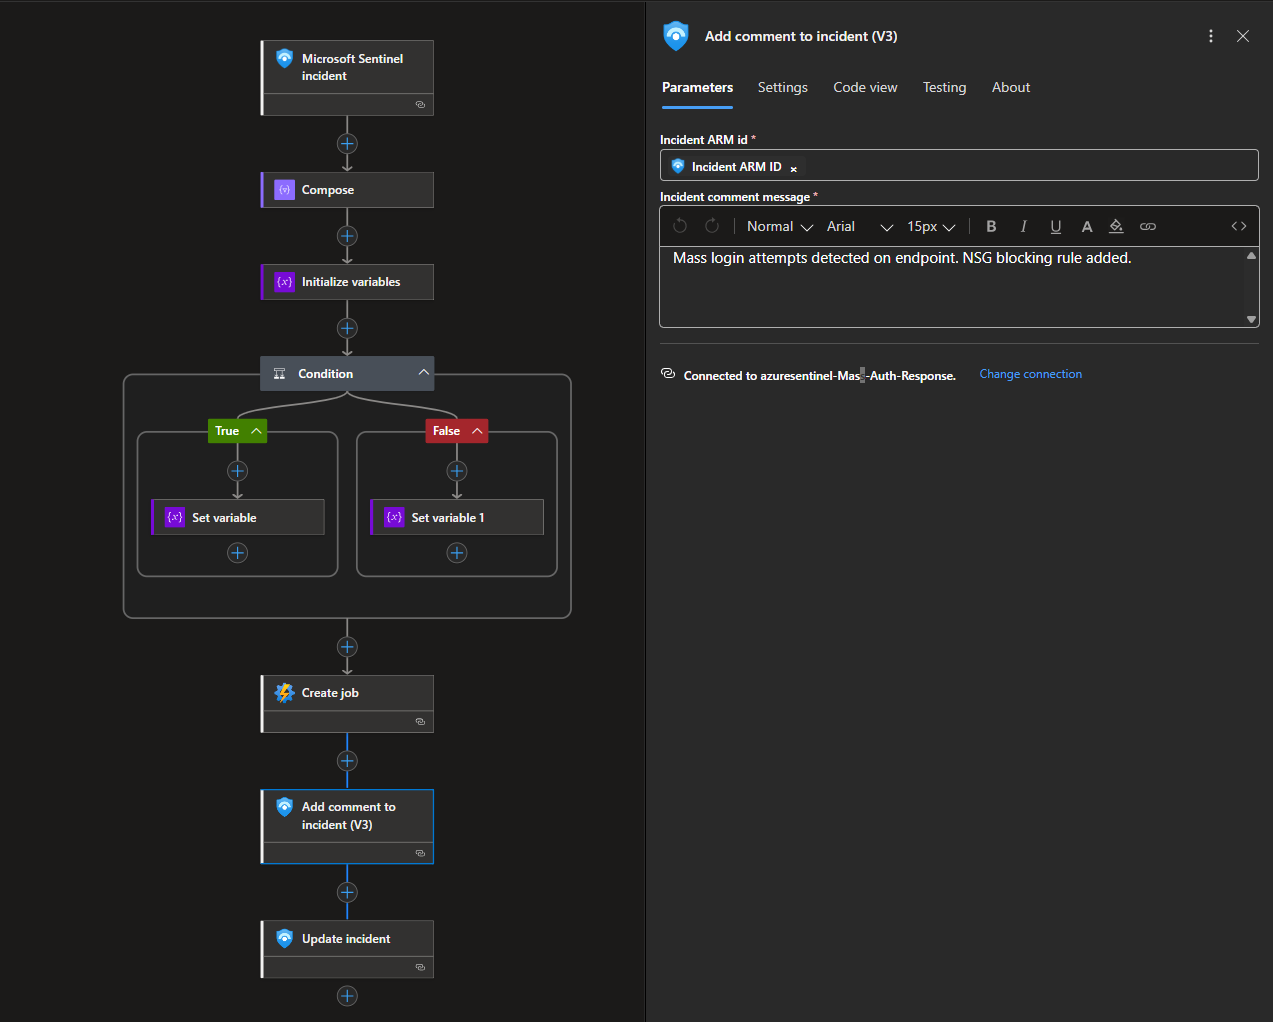
Finally, it applies tags to the incident, indicating brute force activity and automated remediation.
Workflow JSON configuration: https://github.com/walterg7/azure-soc/blob/main/playbooks/block-ip-nsg-playbook.json
Testing and Troubleshooting
We will first run a manual test.
Head to Sentinel > Threat Management > Incidents
If you do not already have an incident, manually generate one by failing RDP using 5 different users.

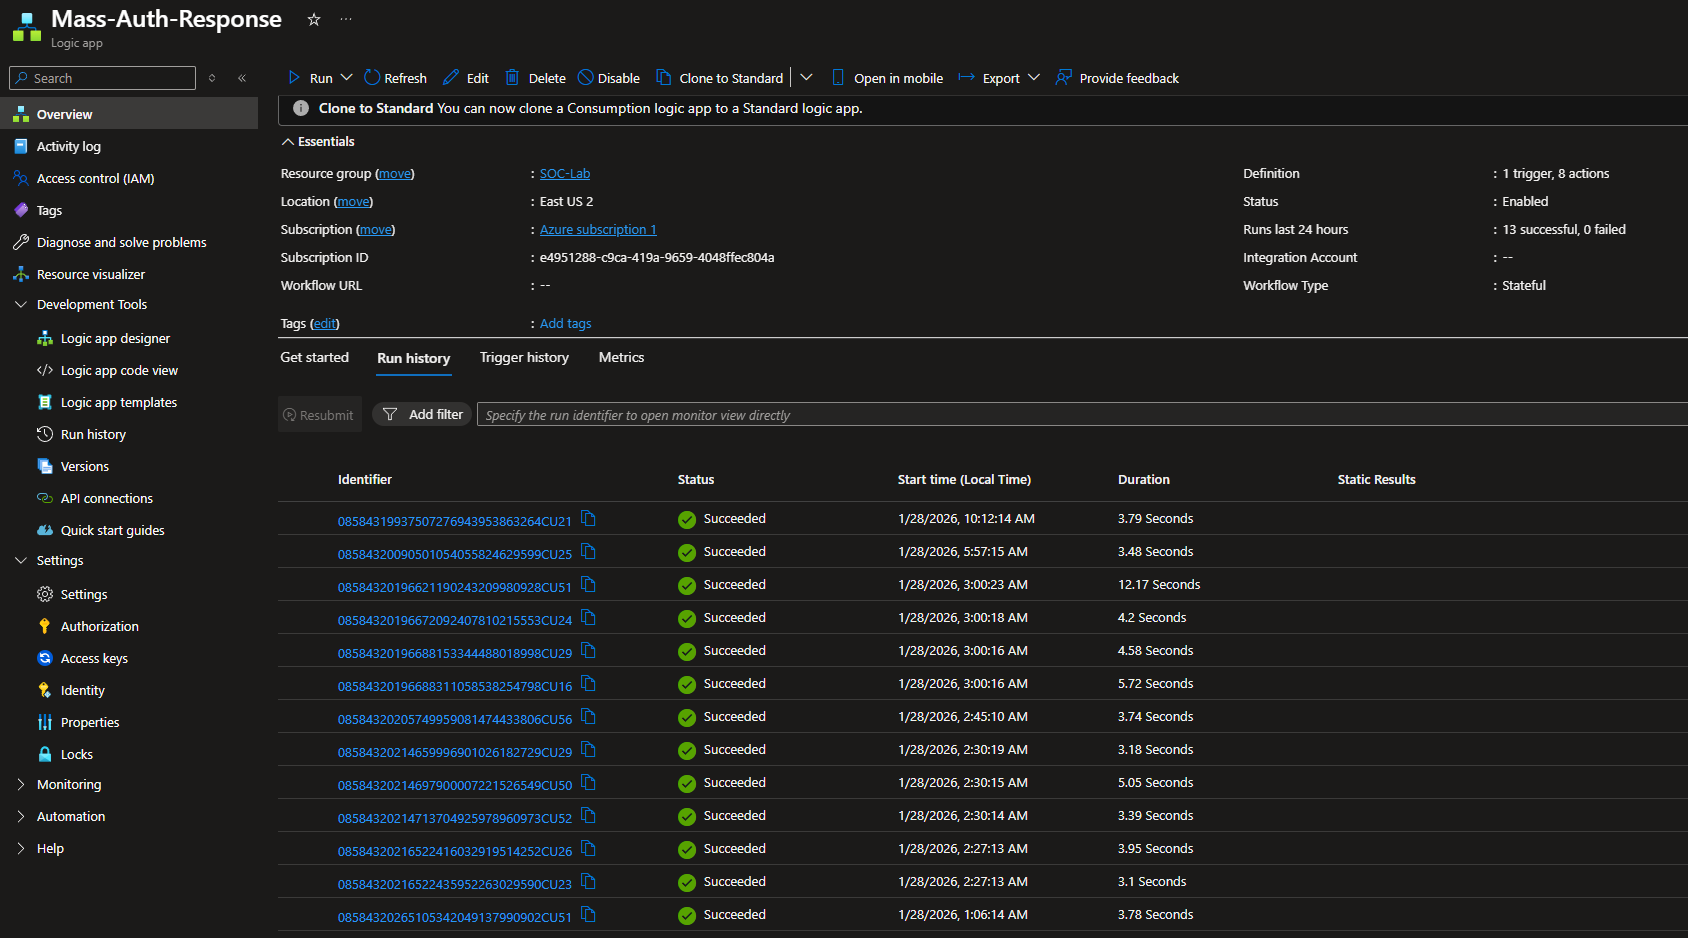
Head to Logic apps > Developer Tools > Run history
The SrcIp is my actual public IP, which I redacted. This IP was passed as a paremeter to the PowerShell script.
Now head back to the Incidents page.
Notice that the incident got tagged and a comment was added.
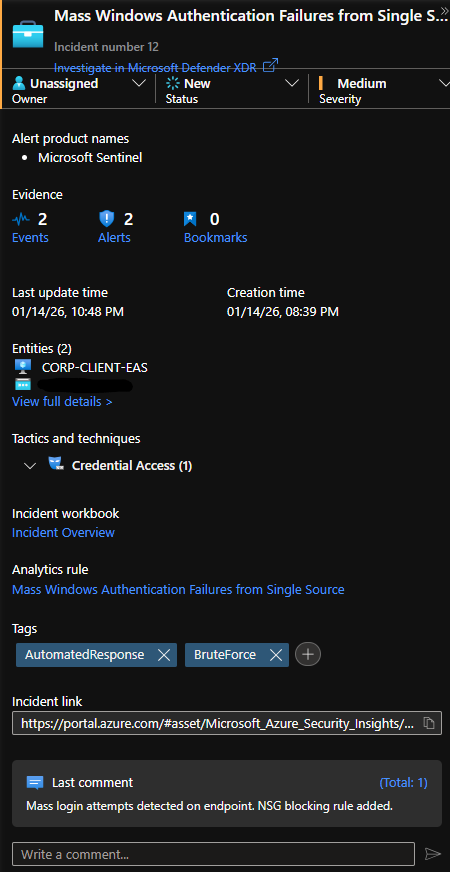
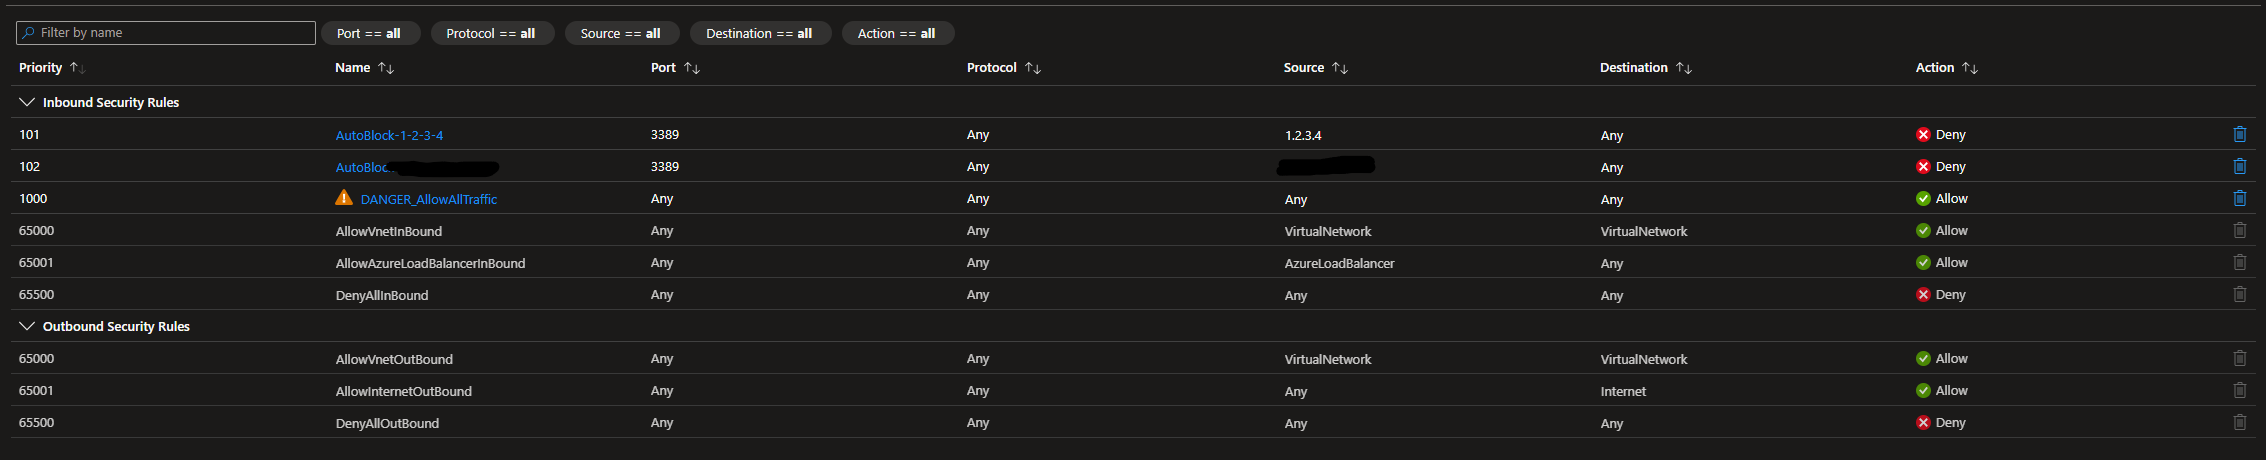
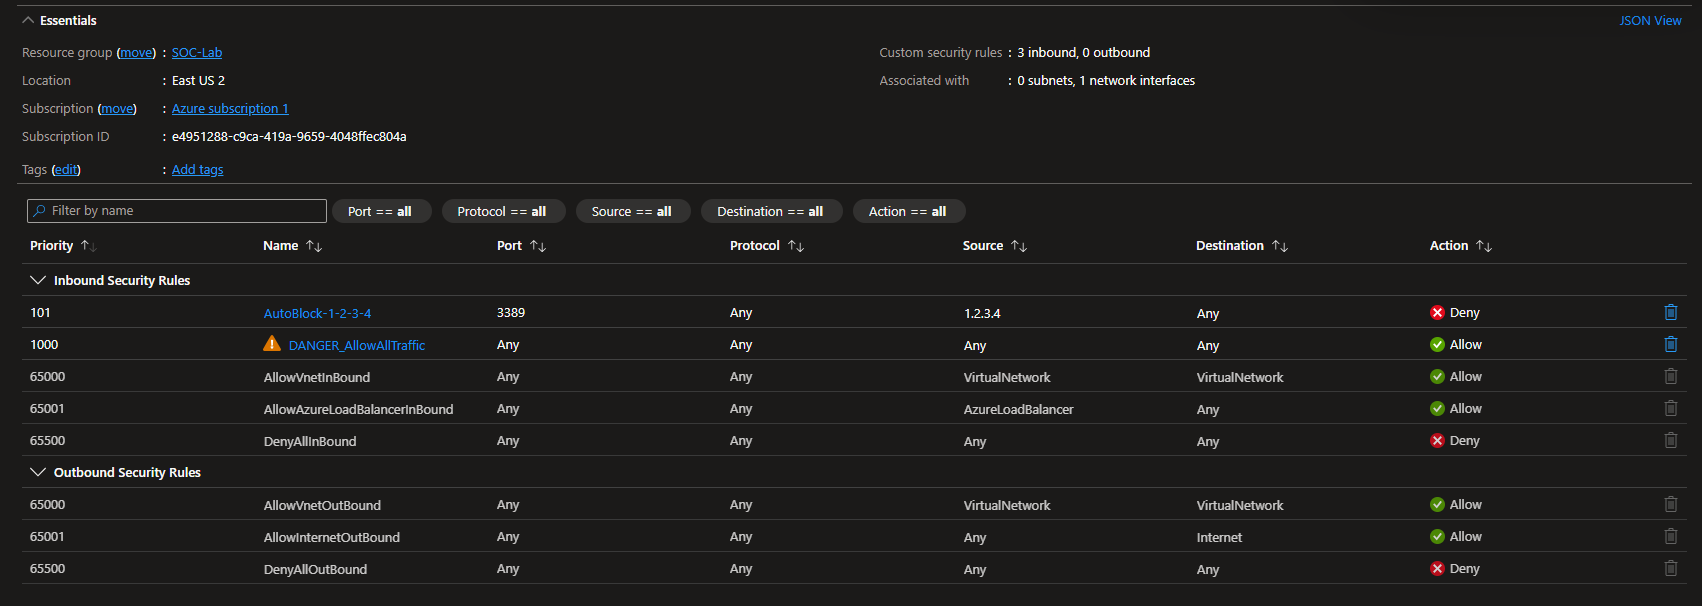
Head to NSGs, a rule blocking incoming RDP traffic from my source IP should be added.
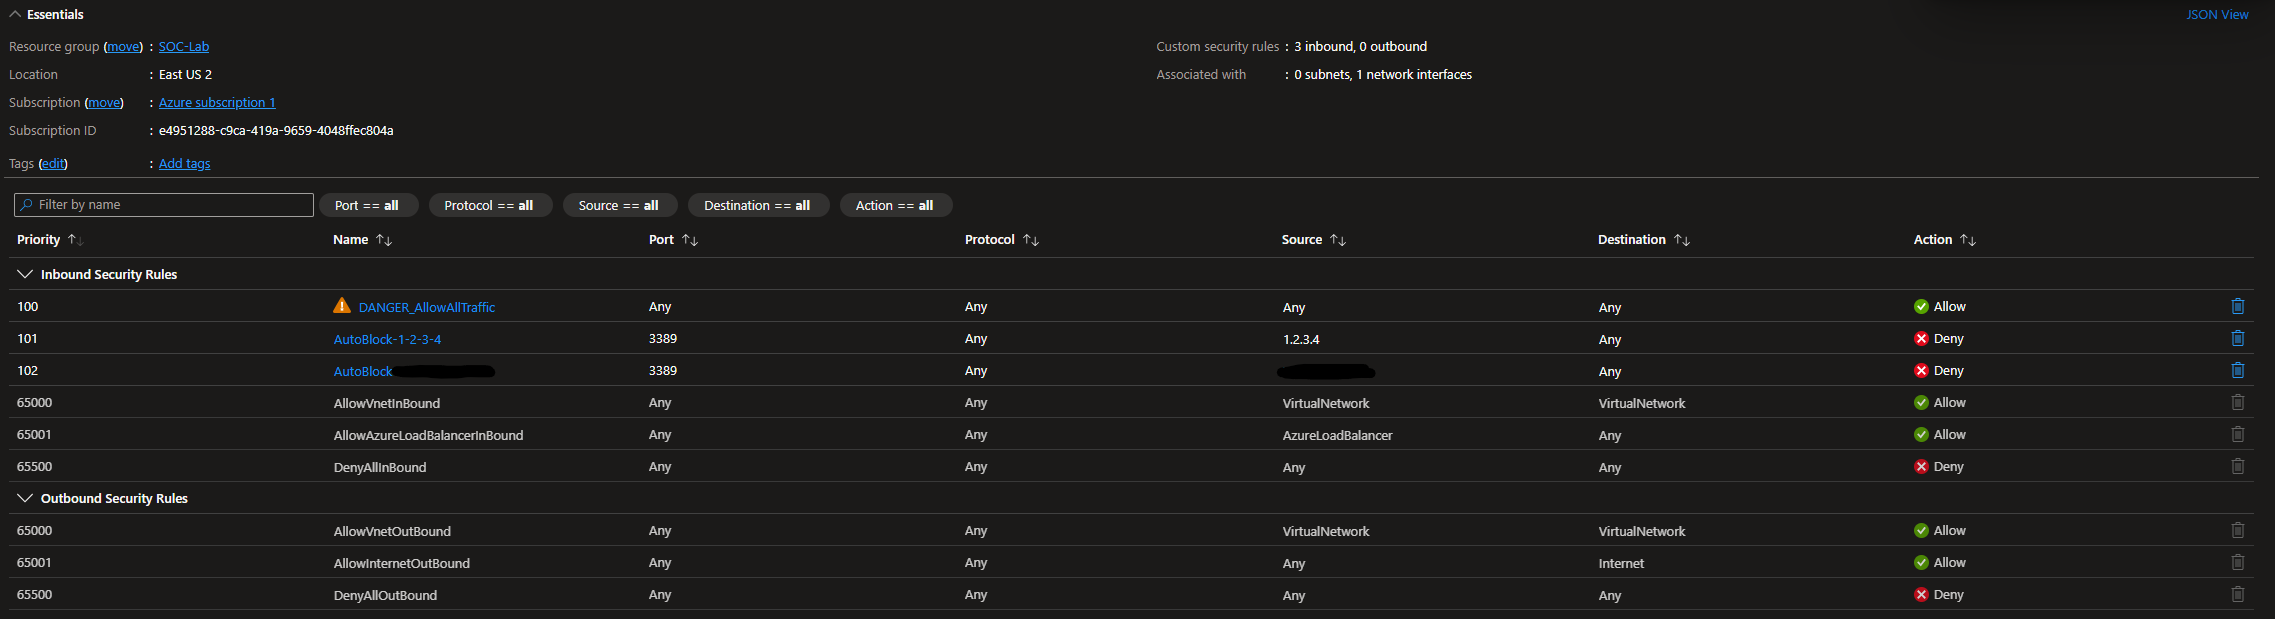
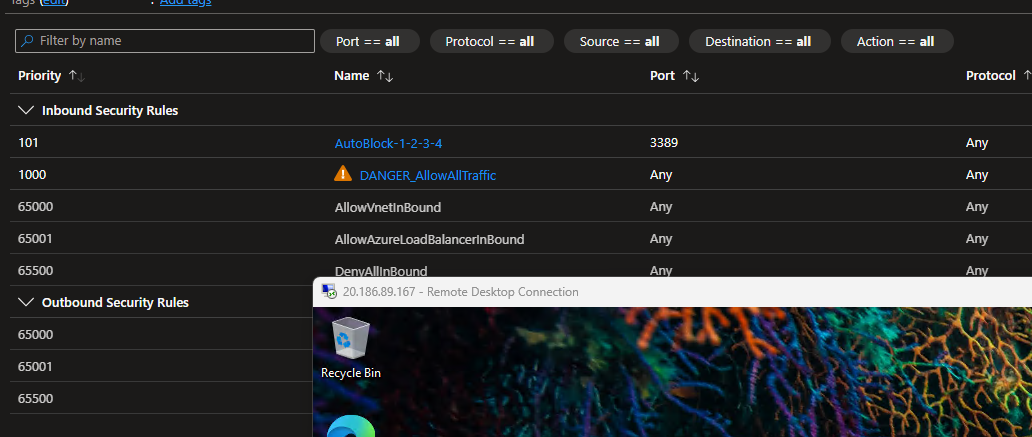
Despite being blocked, I am still able to RDP into the VM. This is because the allow all traffic rule has the highest priority (100), meaning that it will override any block rules we add.
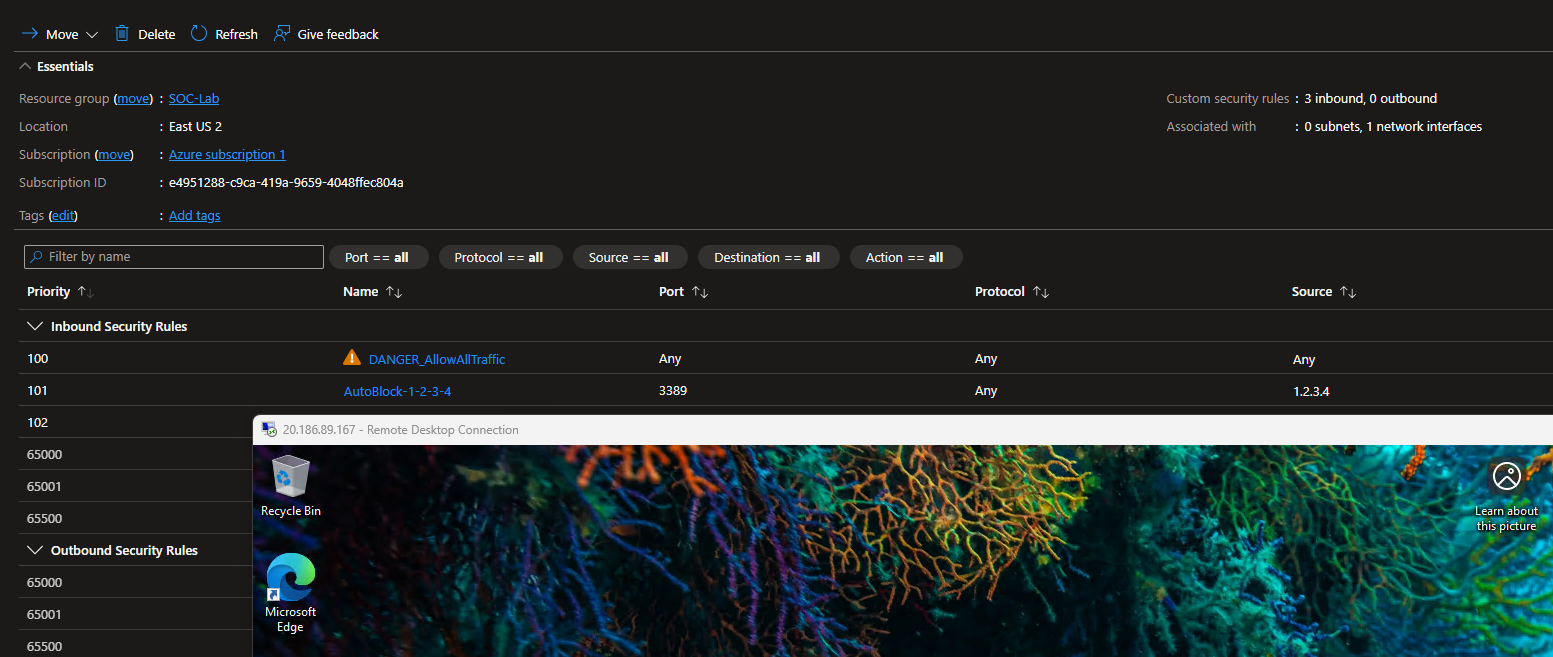
Change the priority of the allow all rule to 1000 (lower priority)
Now when I try to RDP, I get this error.
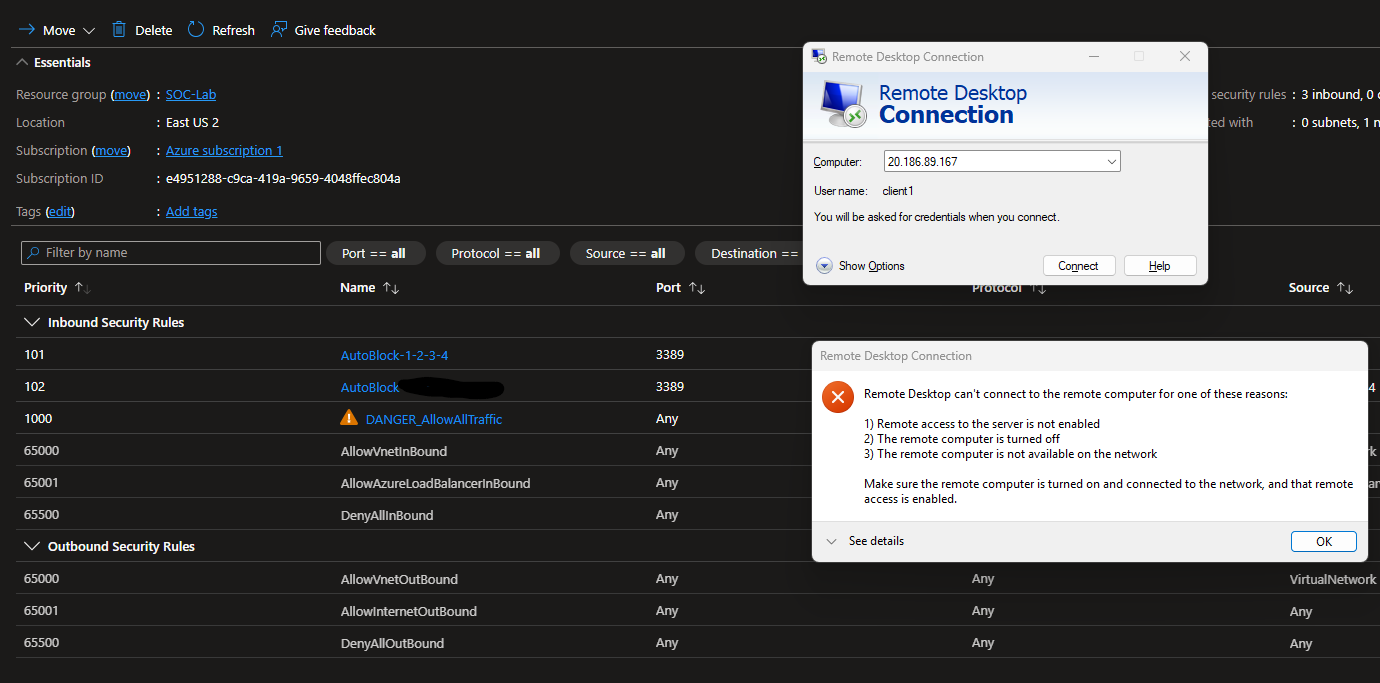
We can always delete the NSG rule so we don’t lock ourselves out
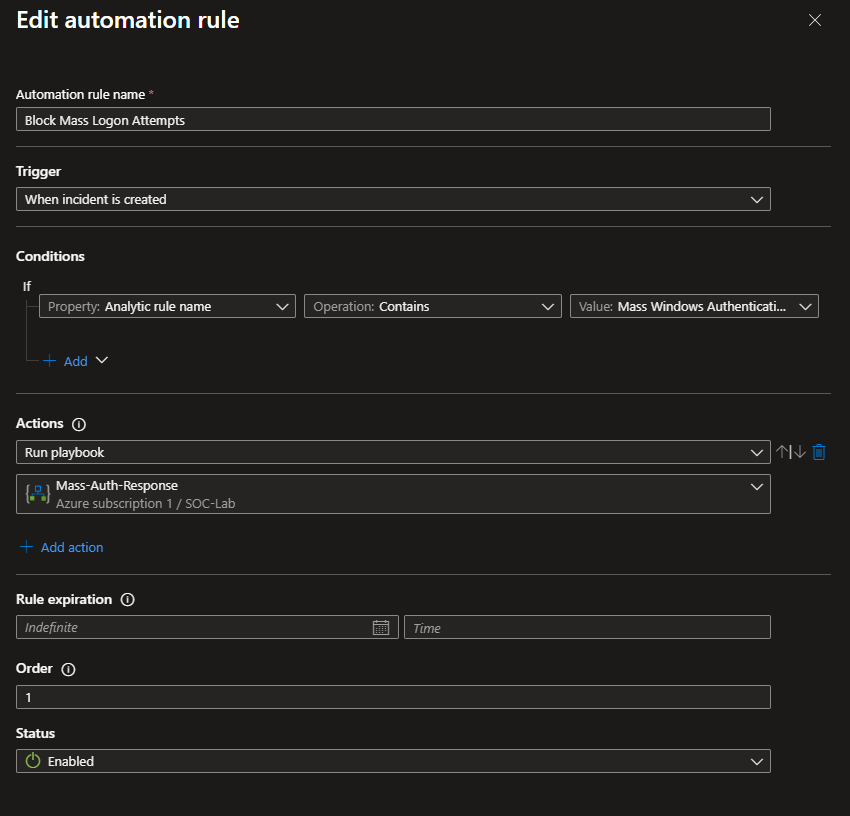
Automation Rule
Now that we can confirm the playbook works when ran manually, let’s set it so that it is run automatically, when an RDP brute-force incident is created.
Head to Sentinel > Configuration > Automation
Create new automation rule
Give it a name
For the trigger, set it to When incident is created
For the condition, if the Analytic rule name matches Mass Windows Authentication Failures from Single Source (the detection rule we previously created), run the playbook Mass-Auth-Response (adds the NSG rule to block RDP traffic)
Let’s generate another incident to make sure the playbook fires automatically.
Notice the time of when the incident was created compared to the last updated time (when the incident was tagged and commented).

We can speculate that the rule was added 20 minutes after the incident was created.
Final Test
I left VM running overnight at 1/28/26 from 12:00am to 12:00pm
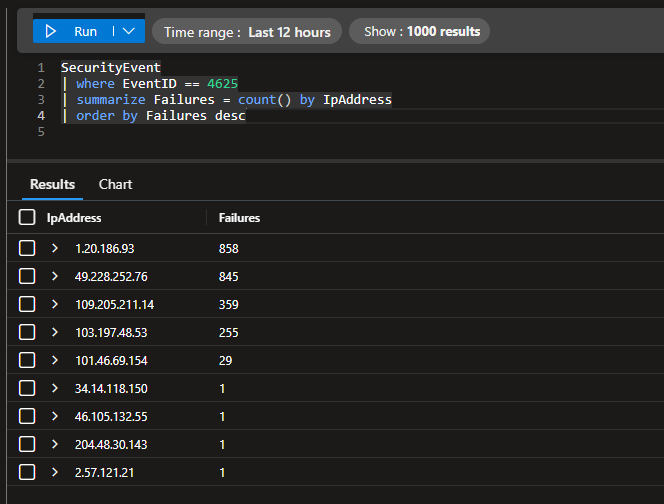
We have a total of 4 incidents and several alerts. Notice that each IP may have several alerts, however they are mapped to 1 incident.

An issue with the playbook is that there is no deduplication logic to prevent commenting and tagging. Keep in mind that it can take up to 20 minutes from when the attack initially happens to when the IP is blocked, so the playbook may be ran multiple times on the same IP. However, the PowerShell script can handle duplicate rule creation.
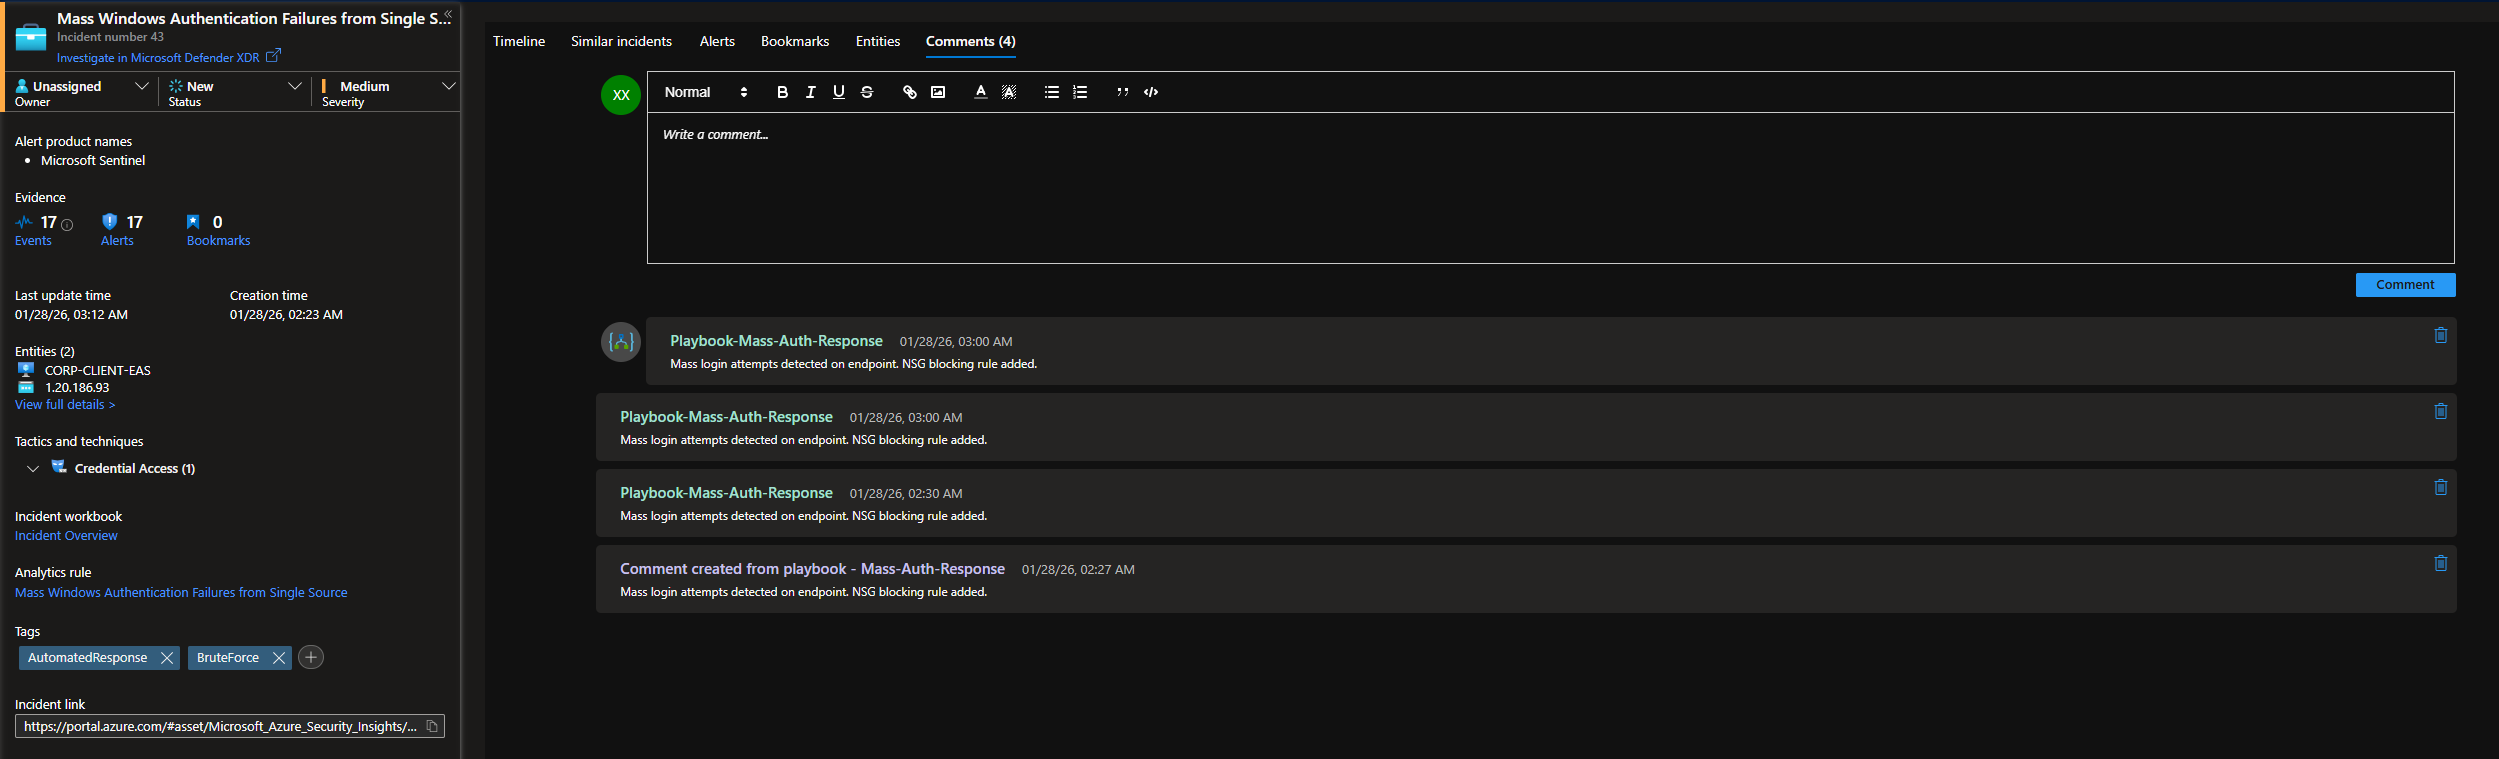
When looking at the playbook run logs, it looks like the playbook was indeed ran multiple times on the same IP, hence the duplicate comments. This is most likely due to latency from when the Windows VM sends logs to LAW, to when the detection rule is fired and the playbook is ran. See the Timing and MTTR portion of the Final Thoughts section.
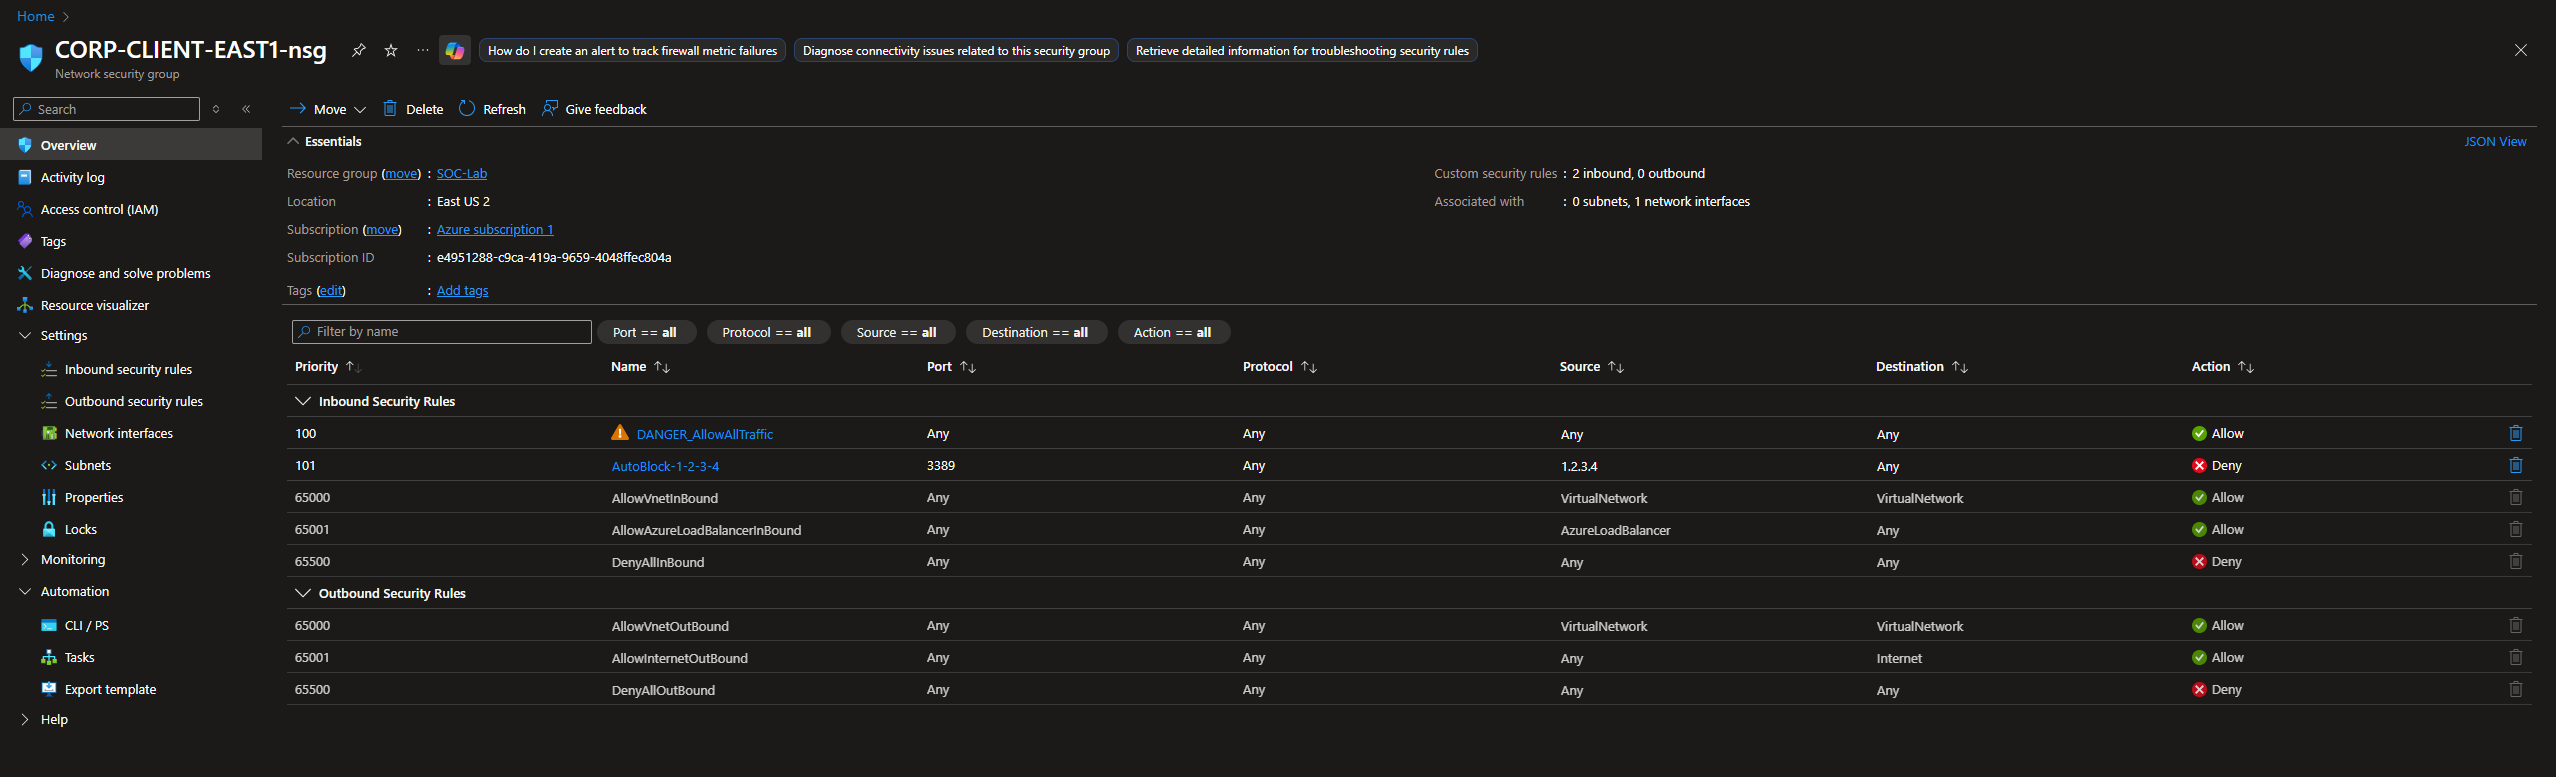
NSG page
The attacking IPs were successfully blocked. Notice that there are no duplicate rules. This playbook is not perfect, but it works.
Rule number 102 was skipped because that was the rule created when RDP brute-forcing from my host machine, which I then deleted after the final test.

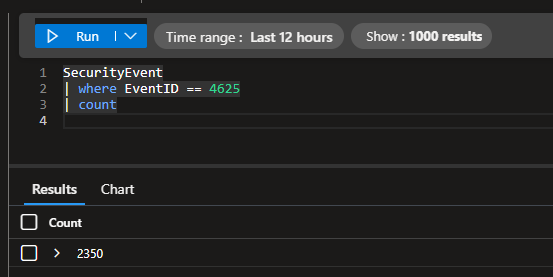
In total, we only had ~2,300 failed logins over the 12 hour window with this automation implemented. Before, we had over 18,000 failed log ins. This is a significant decrease from our baseline.
There are also significantly less failures compared to our baseline.
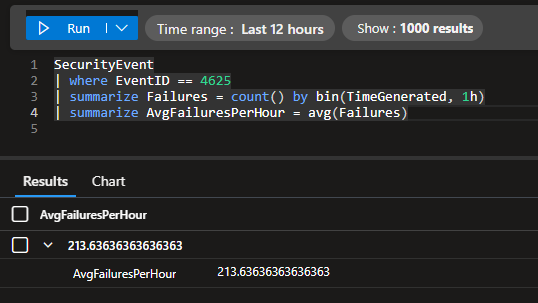
We had an average of 213 failed logins per hour with this automation implemented, compared to the baseline’s 1,411 failed logins per hour.
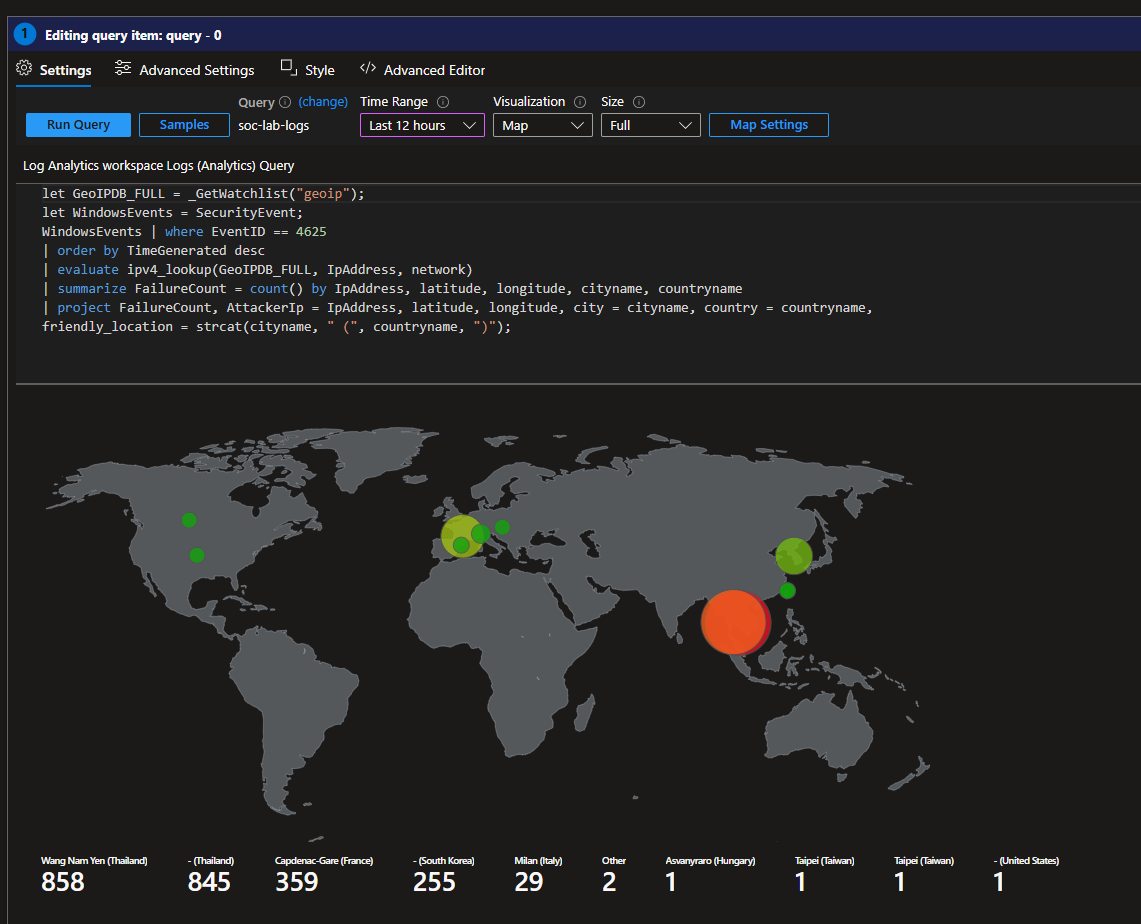
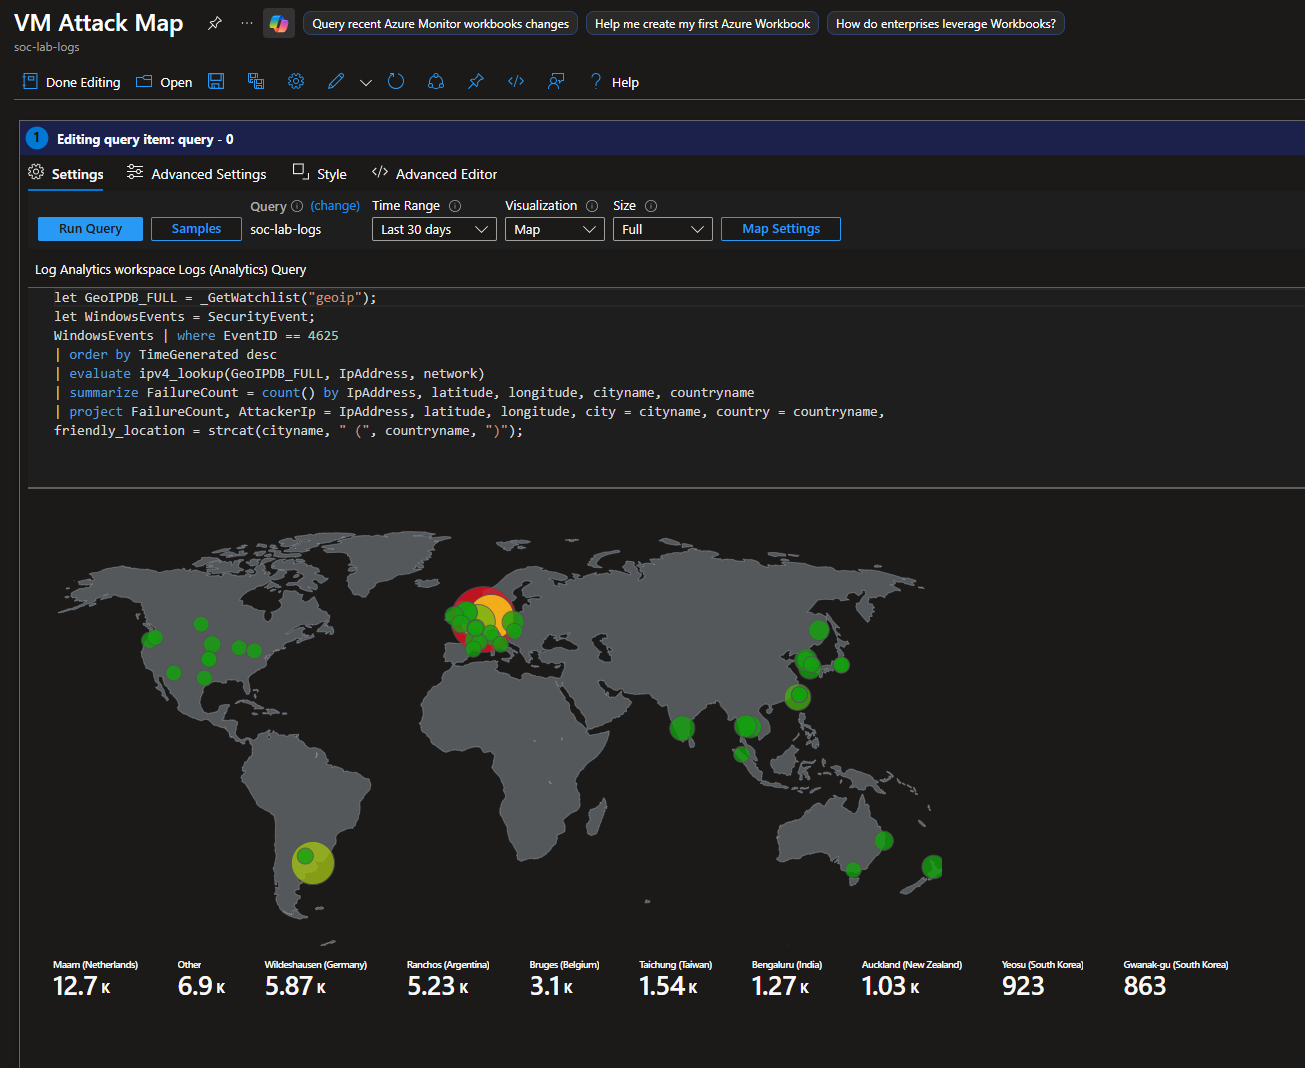
This is what the map looks like for the final test. Looks like most of the attacks came from Southeast Asia and France.
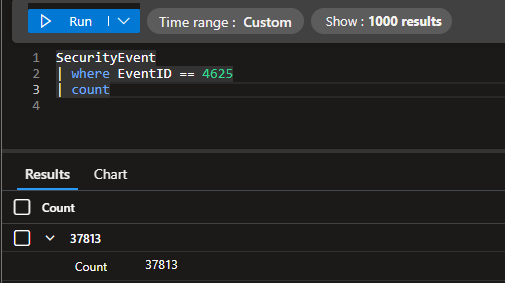
If you’re curious, at the end of this project I had over 37,000 failed logins.
This is what the final map looks like.
Final Thoughts
Timing and MTTR
Event-to-response breakdown
| Stage | Time |
|---|---|
| Event occurs on VM | Immediate |
| Event logged locally | Immediate |
| Log forwarded to Sentinel | 30 seconds – 20 minutes |
| Analytics rule window | 5 minutes minimum |
| Incident created | ~1 minute |
| Playbook executes | ~1 minute |
| NSG rule applied | Seconds |
Theoretically, the NSG rule is applied within ~7 minutes of the attacker’s initial brute force attempt, at best. At worst, enforcement may occur ~30 minutes after initial activity.
Due to log ingestion latency and analytics rule scheduling, this automation does not provide immediate blocking. Instead, it focuses on containment once malicious behavior is confidently detected via the KQL query.
By the time detection thresholds are met, the attacker has already demonstrated malicious intent, making containment an appropriate automated response.
This approach is effective at disrupting ongoing brute-force activity, reducing attack noise, and preventing repeated abuse from known malicious sources. NSG-based blocking provides a reversible, low-risk containment mechanism suitable for automation.
Use Case
In practice, credential-stuffing and brute-force attacks often run for hours or days, frequently reusing the same source IPs. Even with detection delay, continued abuse is blocked, the attack surface is reduced, and alert noise is minimized.
Applying NSG rules at the network level also prevents the same attacker from targeting multiple VMs within the same subnet.
The response is non-destructive and easy to roll back. As demonstrated, accidental lockouts can be resolved by simply removing the generated NSG rule.
From a SOC perspective, this automation helps reduce alert fatigue by blocking repeat offenders once and grouping activity into a single incident per source IP.
Scalability
Adding one deny rule per IP, per VM (with individual NSGs) is not scalable. Rule sprawl, lack of expiration, and long-term maintenance quickly become operational risks.
A more scalable approach is to apply NSGs at the subnet level, allowing a single rule to protect multiple workloads.
For example:
- One rule → protects an entire tier (e.g., RDP jump hosts, workstations, servers)
This automation is conceptually aligned with that model and can be extended with rule expiration, aggregation, or upstream enforcement for larger environments.
Troubleshooting
Permission Errors
A majority of my problems came down to permission errors. Make sure each resource on the subscription has the proper permissions to perform their functions.
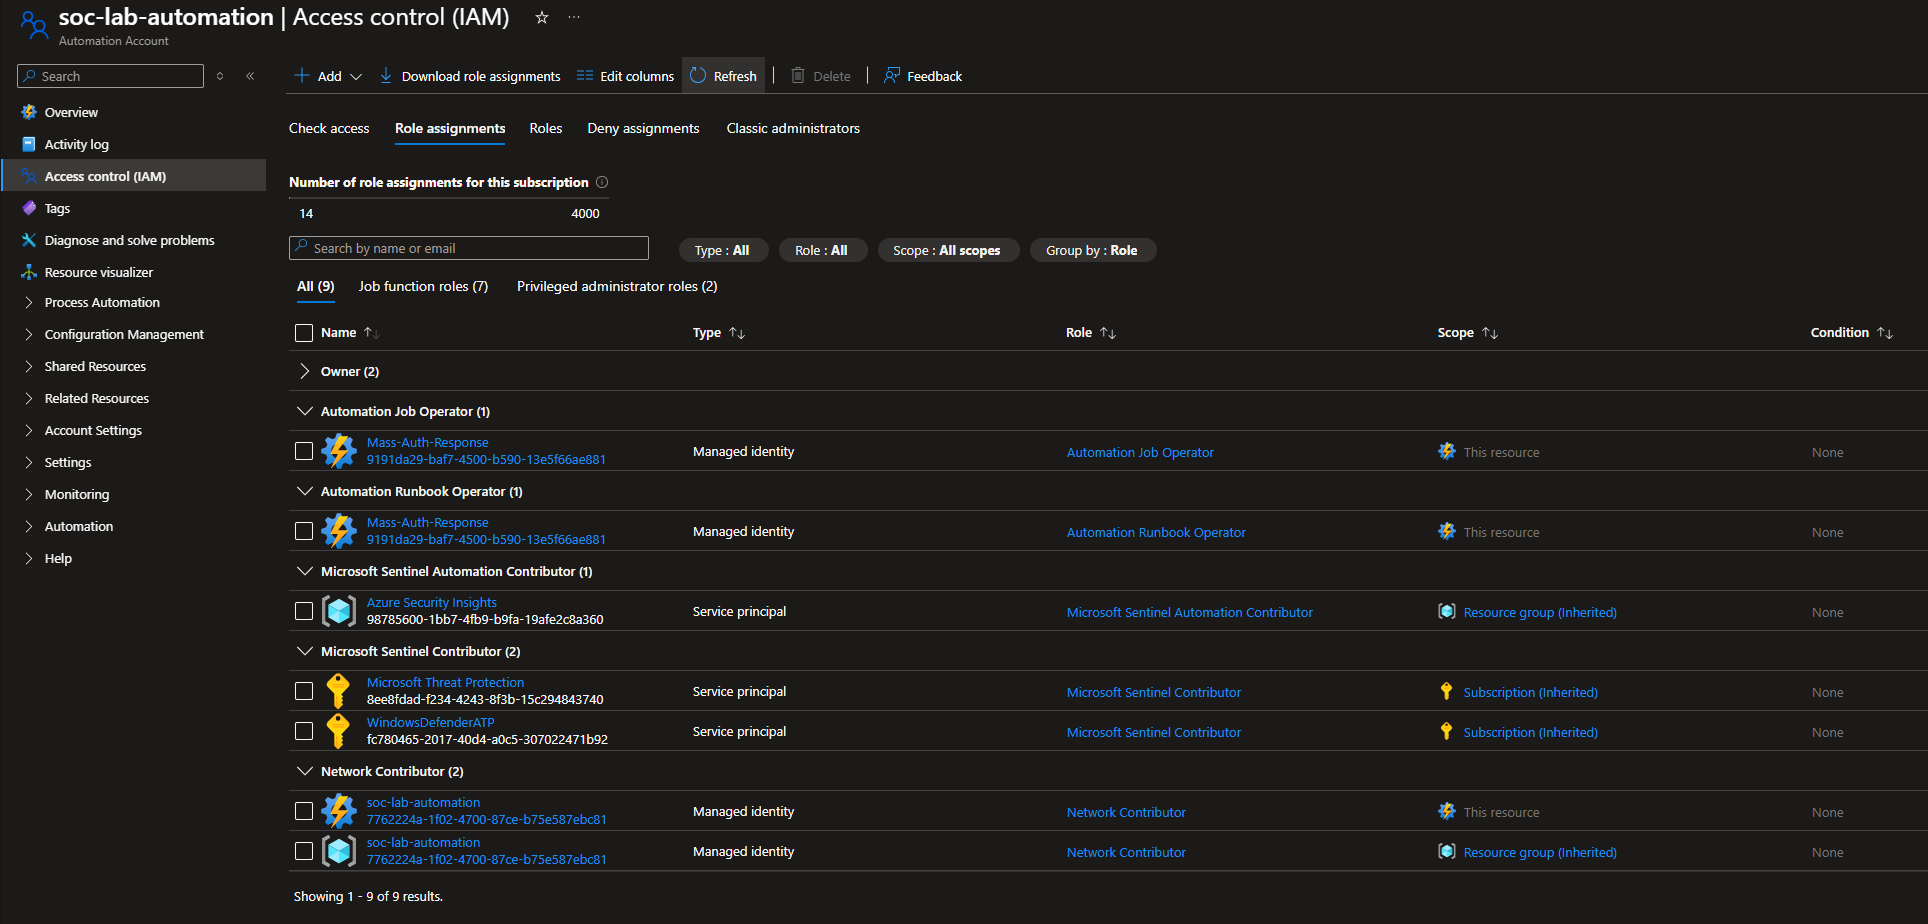
IAM configuration for Automation Account (soc-lab-automation)
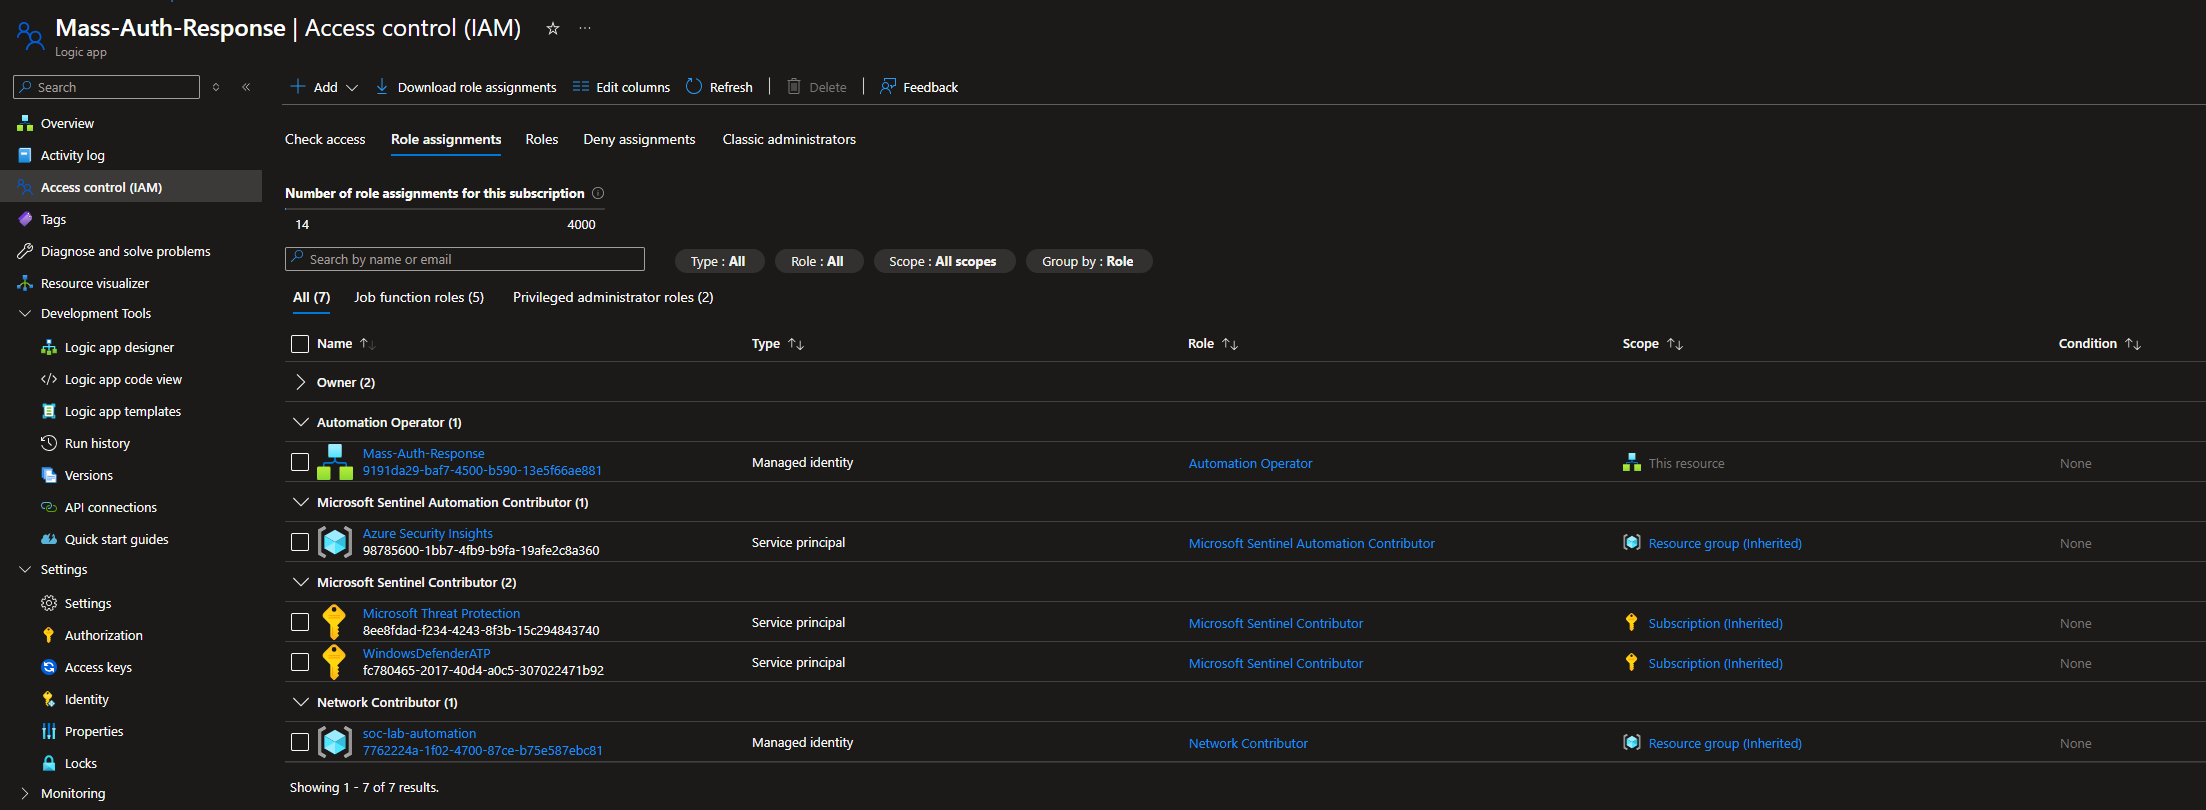
IAM configuration for Logic app (Mass-Auth-Response)
IAM configuration for NSG (CORP-CLIENT-EAST1-nsg)
IAM configuration for Log Analytics Workspace (SOC-Lab-Logs)
NSGs not Being Created
Before the Final Test, I left the VM left running from 1/15/26 at 1am - 1pm est. Notice all these alerts and incidents.

Yet, when I head to NSG, no rules were created
This is the old workflow I was running.
The workflow ran, however it did not pass the IP into the PowerShell script, so the NSG rule could not be created. Notice that SrcIp is empty
The Problem
Microsoft Sentinel incidents include entities under the relatedEntities array. While the entity content is consistent, the order of entities in the array is not guaranteed.
In my analytics rule, I mapped two entities:
- Ip (source IP of the brute force activity)
- Host (target endpoint)
During testing, I noticed that the Ip entity did not always appear at the same array index. In some incidents, the IP was located at index [0], in others, it appeared at index [1].
Sample Compose data
1
2
3
4
5
6
7
8
9
10
11
12
13
14
15
16
17
18
19
20
21
22
23
"bookmarks": [],
        "relatedEntities": [
            {
                "id": "/subscriptions/e4951288-c9ca-419a-9659-4048ffec804a/resourceGroups/soc-lab/providers/Microsoft.OperationalInsights/workspaces/soc-lab-logs/providers/Microsoft.SecurityInsights/Entities/359709e1-ea53-b7d5-8435-338e856d5cb4",
                "name": "359709e1-ea53-b7d5-8435-338e856d5cb4",
                "type": "Microsoft.SecurityInsights/Entities",
                "kind": "Ip",
                "properties": {
                    "address": "110.136.66.60",
                    "friendlyName": "110.136.66.60"
                }
            },
            {
                "id": "/subscriptions/e4951288-c9ca-419a-9659-4048ffec804a/resourceGroups/soc-lab/providers/Microsoft.OperationalInsights/workspaces/soc-lab-logs/providers/Microsoft.SecurityInsights/Entities/edab20cb-8379-9e76-a87e-e9316c34c56a",
                "name": "edab20cb-8379-9e76-a87e-e9316c34c56a",
                "type": "Microsoft.SecurityInsights/Entities",
                "kind": "Host",
                "properties": {
                    "hostName": "CORP-CLIENT-EAS",
                    "friendlyName": "CORP-CLIENT-EAS"
                }
            }
        ],
Root Cause
The original playbook logic assumed a fixed array index: relatedEntities[1].properties.address
When the IP entity was not at index [1], the SrcIp variable was set to an empty string. As a result, the playbook would run, however the NSG rule creation would be skipped. The containment effectively never happened.
The Solution
Instead of assuming a fixed index, I implemented conditional logic that:
- Checks the kind of the entity at index [0]
- If it is an Ip, extract the address
- Otherwise, extract the IP from index [1]
1
2
3
4
IF relatedEntities[0].kind == "Ip"
    SrcIp = relatedEntities[0].properties.address
ELSE
    SrcIp = relatedEntities[1].properties.address
This ensures the correct source IP is extracted regardless of entity order.
Because the analytics rule only maps two entities, this conditional logic is sufficient and safe for this use case.
In a larger production environment, a loop based approach (iterating through all entities and selecting the Ip kind) would be more scalable, but for this controlled scope, the conditional solution is appropriate and efficient.
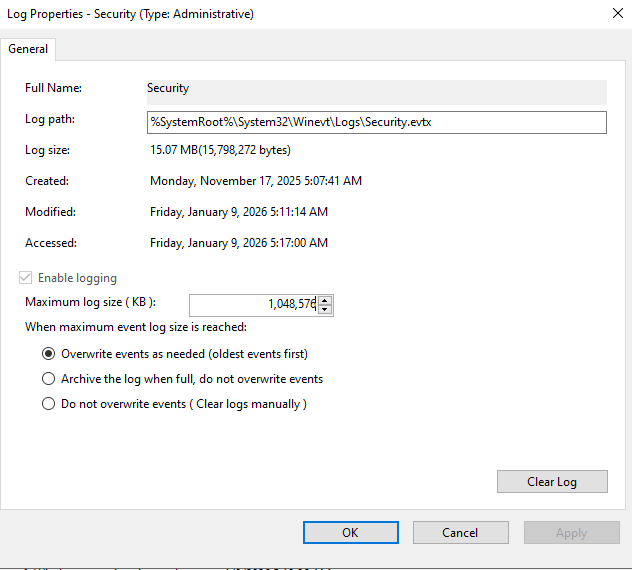
No Logs Appearing on Sentinel
If you reach over 20,000 failed log ins, your log is most likely reaching its maximum capacity and Windows stopped logging these events.
First, head to Event Viewer and right click the Security Log > Properties
Windows sets the limit to logs for 20MB which is ridiculous.
I set my max log size to 1GB (1,048,576KB)
Next, reenable logging for logon events.
Head to Local Group Policy Editor > Computer Configuration > Windows Settings > Security Settings > Local Policies > Audit Policy
Click on Audit logon events, and check both Success and Failure
